Finding Slope of a Line in y=mx+b Form: Everything You Need to Know
Are you ready to learn how to understand and identify the slope of a line and how to find the slope of a line?
Before you learn an easy method for finding slope (with and without a calculator), let’s make sure that you understand a few basics of slope, including the slope definition.
Slope Definition:
The slope of a line refers to its direction and steepness.

There are 4 kinds of slope: positive, negative, zero, and undefined. In this guide, we are only going to look at positive and negative slope. Click here to watch a video tutorial review of the 4 kinds of slope.

Note that positive slopes increase from left to right and negative slopes decrease from left to right.
Finding Slope: Rise Over Run
The slope of a line is expressed as a fraction that is commonly referred to as rise over run.
The numerator (rise) refers to how many units up or down and the denominator (run) refers to how many units left or right. The direction will depend on whether or not the slope is positive or negative.
Positive Slope: Rise Over Run
Rise: UPWARDS Run: TO THE RIGHT

Negative Slope: Rise Over Run
Rise: DOWNWARDS Run: TO THE RIGHT

How to Find the Slope of a Line: 3 Easy Steps
You can find the slope of any line by following these three easy steps:
Step One: Determine if the slope if positive (increasing) or negative (decreasing)
Step Two: Using two points on the line, calculate the rise and the run and express it as a fraction (rise over run).
Step Three: Simplify the fraction if possible.
Let’s take a look at a few examples!
EXAMPLE: Find the slope of the line below.

Step One: Determine if the slope if positive (increasing) or negative (decreasing)
Notice that the line is increasing from left to right, so we know that this line has a positive slope!

Step Two: Using two points on the line, calculate the rise and the run and express it as a fraction (rise over run).
For this example, let’s start by choosing the left farthest point (-9,-6) and the right farthest point (9,6).
To find rise over run, draw a vertical line that rises from (-9,6) and a horizontal line that runs to (9,6), then count how many units you had to travel upward (rise) and how many to the right (run) and express it as a fraction as follows:

Rise over run is like building a staircase!

Step Three: Simplify the fraction if possible.
Right now, you can say that the slope of the line is 12/18. But 6/9 is also equivalent to 12/18, so let’s see what that would look like on the graph by starting from the first point (-9,-6) and this time rising up 6 and running to the right 9 units repeatedly as follows:

Notice how you end up in the same spot!
At this point, it is clear that the line has a slope of 12/18 and a slope of 6/9.
But we don’t want to have multiple slopes for the same line, so you will always express the slope of a line in simplest or reduced form.
In this example, the slopes of 12/18 and 6/9 can be simplified to 2/3 as follows:

And since 2/3 can not be simplified further, you can conclude that:
Final Answer: The line has a slope of positive 2/3
Finding Slope of a Line Examples
EXAMPLE #1: Find the Slope of the Line
Step One: Determine if the slope if positive (increasing) or negative (decreasing)
Notice that the line is increasing from left to right, so we know that this line has a positive slope!
Step Two: Using two points on the line, calculate the rise and the run and express it as a fraction (rise over run).
In this example, use the two given points as follows:
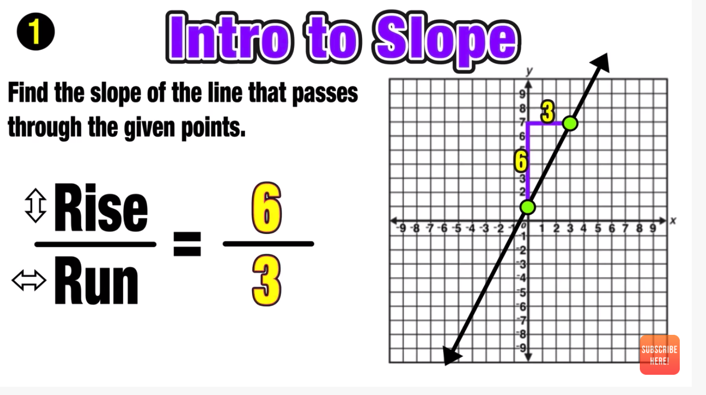
The rise is 6 and the run is 3.
Step Three: Simplify the fraction if possible.
You should know that 6/3 is equal to 2 (six divided by three). Since we want to think about slope as the fraction rise over run, we can express 2 as 2/1:

Notice that 6/3 reduces to 2/1 or just 2.
You can see that 2/1 is equivalent to 6/3 since the pink staircase on the graph above still gets you to the same point.
So now you can express your answer as follows:

Final Answer: The line has a slope of positive 2.
Finding Slope of a Line Examples
EXAMPLE #2: Find the Slope of the Line

Step One: Determine if the slope if positive (increasing) or negative (decreasing)
Notice that the line is decreasing from left to right, so we know that this line has a negative slope!
Step Two: Using two points on the line, calculate the rise and the run and express it as a fraction (rise over run). Remember that you have to rise down when dealing with negative slopes.
In this example, use the two given points as follows:

The slope is negative!
Step Three: Simplify the fraction if possible.
Notice that the fraction -3/8 can not be simplified further, so you can conclude that:
Final Answer: The line has a slope of - 3/8.
Looking to Learn More About Slope?
Check out these free video tutorials:
Free Slope Calculator

If you need a fast and easy way to find the slope of a line, then you can take advantage of the many free online slope calculators that are available.

This free slope calculator from calculator.net not only finds slope but it expresses it in reduced form and includes whether the slope is positive or negative.
To use the slope calculator, simply input the x and y-values for any two points on the line and press calculate.
Finding Slope of a Line Worksheet
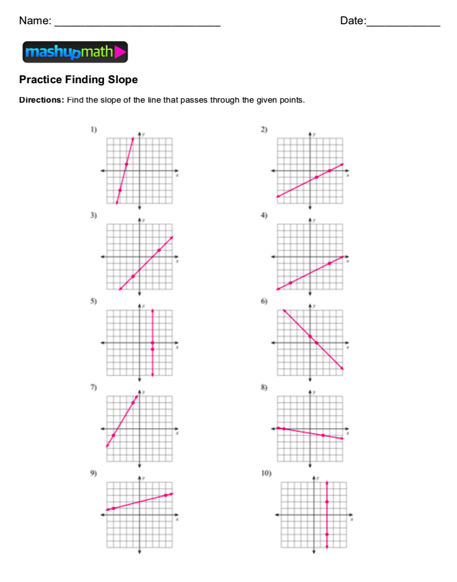
Do you need more practice with finding the slope of a line? The following finding slope worksheet and answer key will give you plenty of opportunities to practice using the three-step process!
Click here to download your free Finding Slope Worksheet with Answers.
And if you are looking for a more in-depth lesson on how to find the slope of a line, check out this free Finding Slope Video Lesson:
Read More Posts About Math Education:


Share your ideas, questions, and comments below!
(Never miss a Mashup Math blog--click here to get our weekly newsletter!)

By Anthony Persico
Anthony is the content crafter and head educator for YouTube's MashUp Math . You can often find me happily developing animated math lessons to share on my YouTube channel . Or spending way too much time at the gym or playing on my phone.