Multiplying Polynomials: The Complete Guide

Comment

Multiplying Polynomials: The Complete Guide

The Best Method for Multiplying Polynomials

The following step-by-step guide will show you how to multiply polynomials using the distributive method and includes 3 examples!

 
TNAIL.jpg
 

Welcome to this free lesson guide that accompanies this Multiplying Polynomials Made Easy! video tutorial where you will learn the answers to the following key questions and information:

  • What is the best method for multiplying polynomials?

  • How to perform multiplication of polynomials

  • Multiplication of monomials, binomials, and trinomials

  • Multiplying Polynomials Using the Distributive Property

This Complete Guide to Multiplying Polynomials includes several examples, a step-by-step tutorial and an animated video tutorial.


*This lesson guide accompanies our animated Multiplying Polynomials Made Easy! video.

Want more free math lesson guides and videos? Subscribe to our channel for free!


Multiplying Polynomials Explained!

Before you learn how to multiply polynomials, let’s quickly review some important information:

The Distributive Property

Definition: The distributive property allows for you to multiply a sum by multiplying each term separately and then add all of the products together.

Dist.jpg


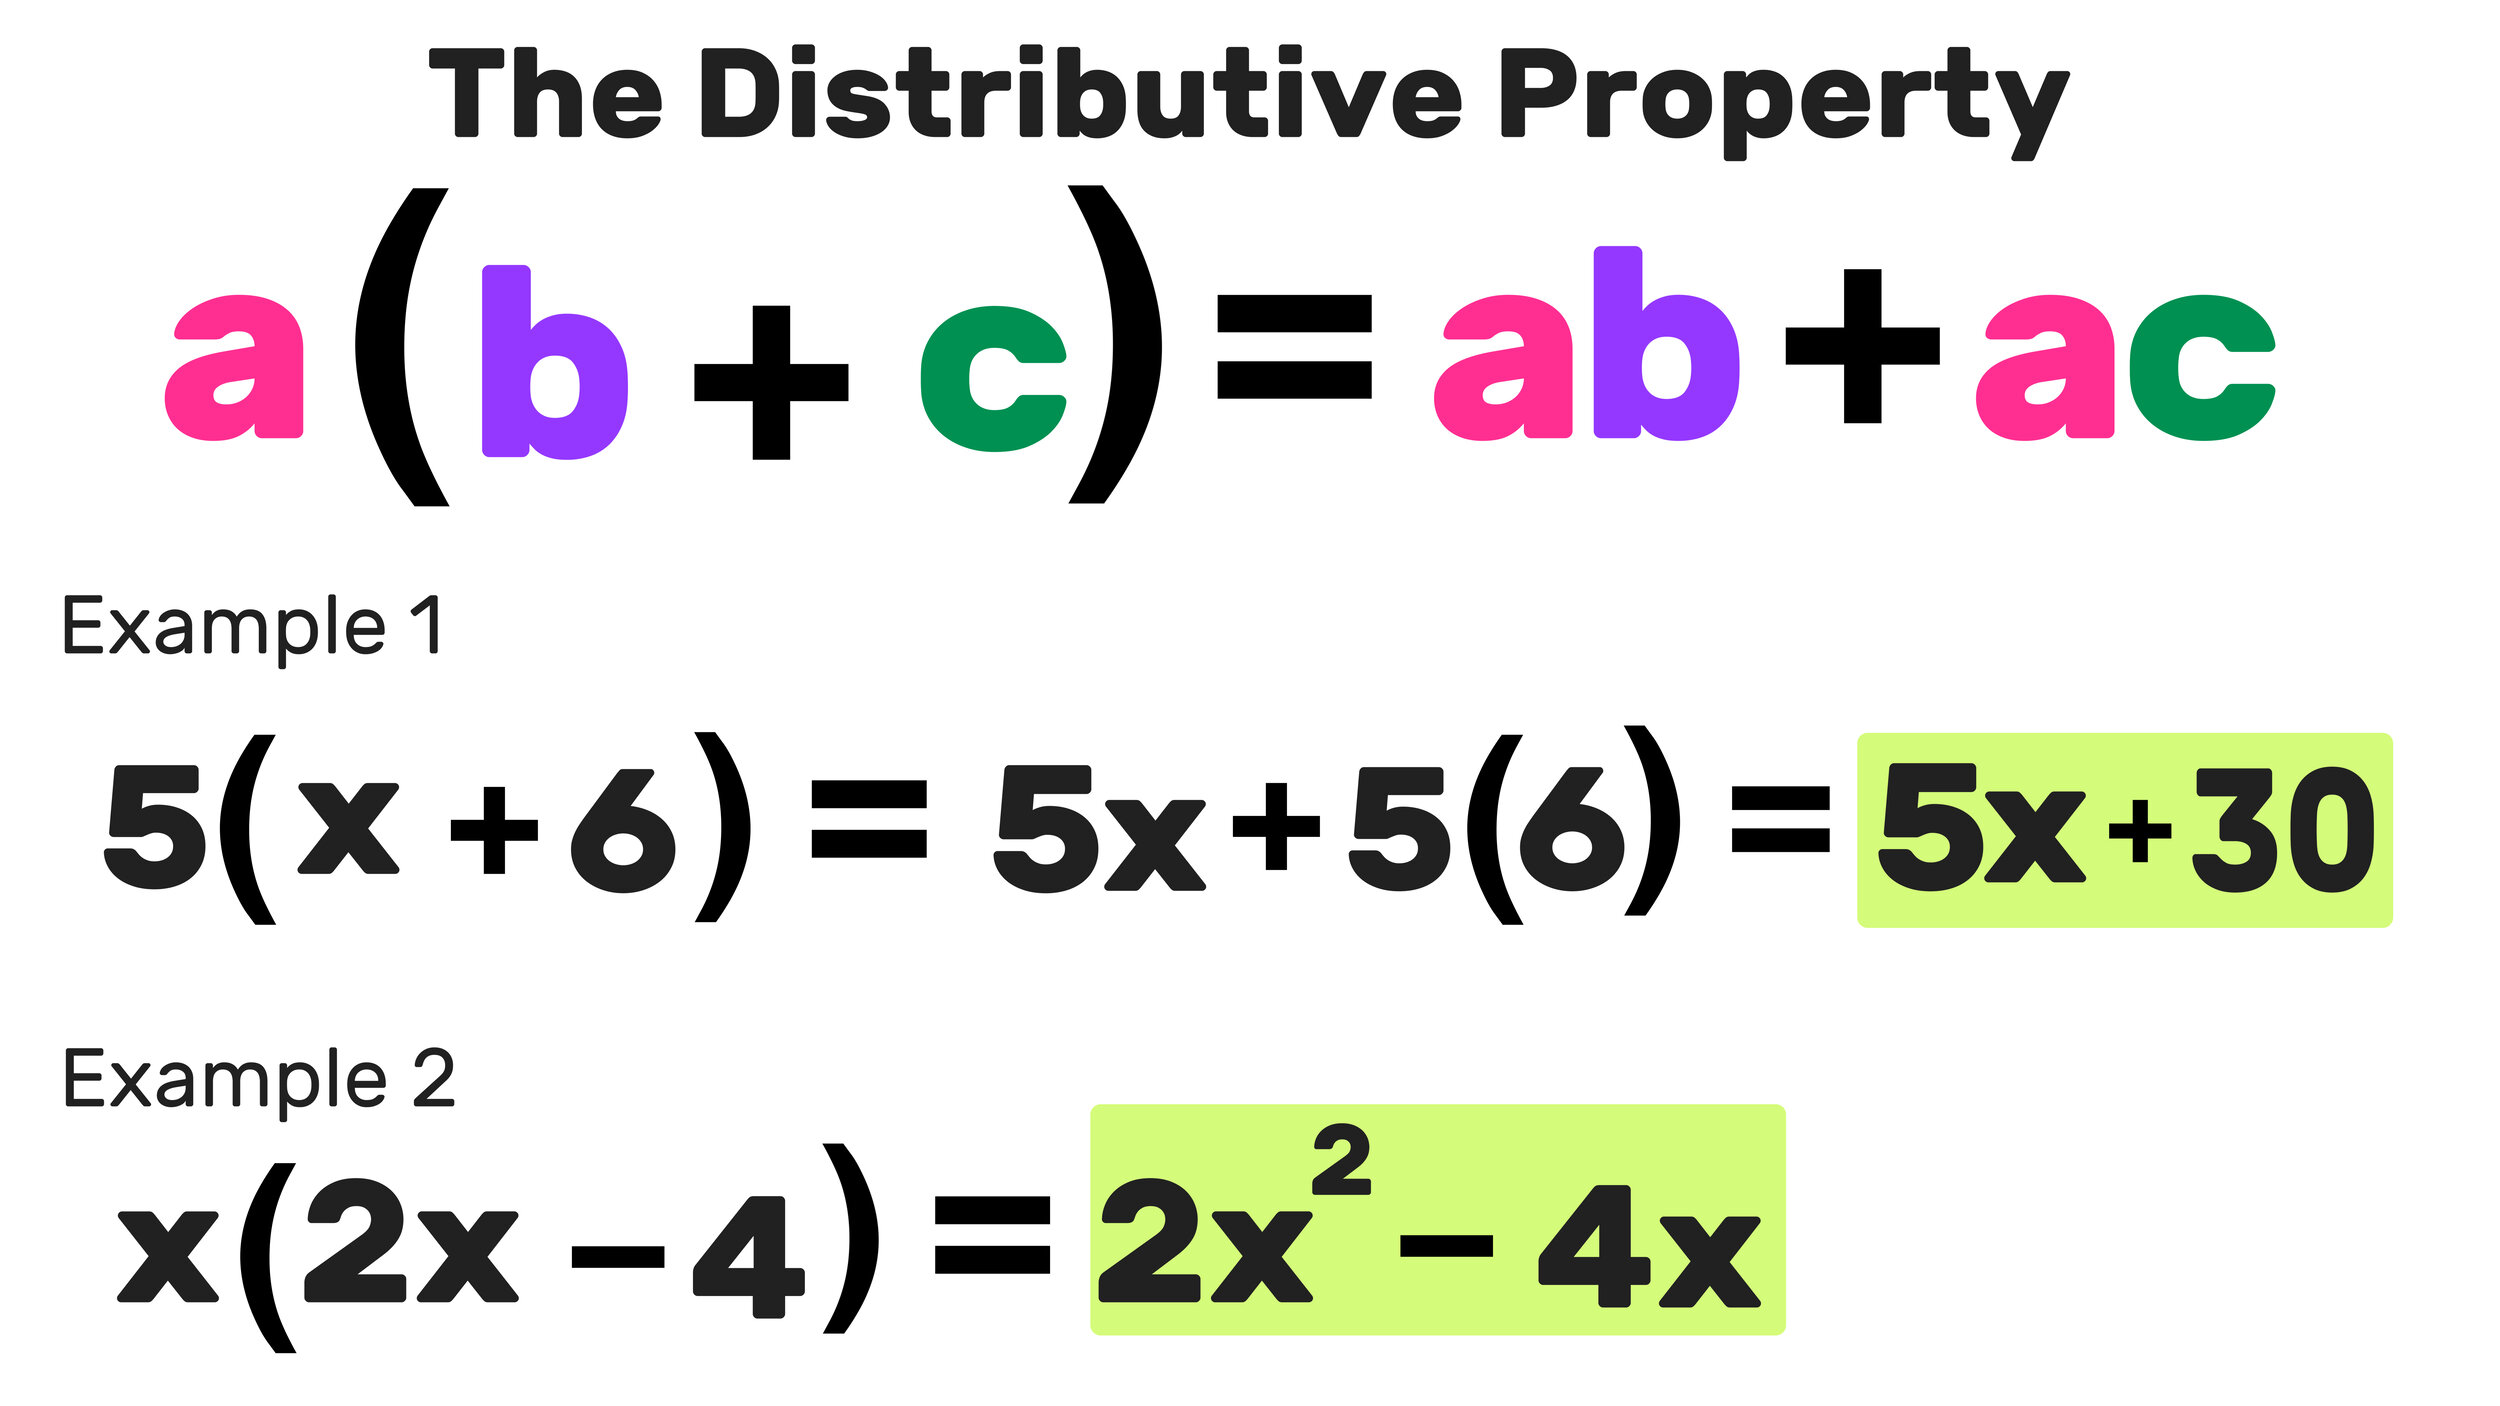
If you understand the distributive property, you will be able to multiply polynomials with ease.

Multiplying Polynomials Examples

Multiplying Polynomials Example 1: Multiplying by a Monomial

Figure 1

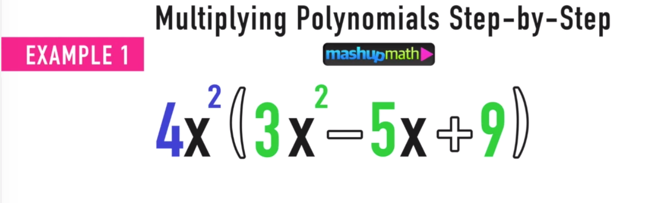
In this first example, you will be multiplying a monomial by a trinomial. You can think of this as multiplying one “thing” by “another thing” as follows:

Snip20200428_7.png

This is where using the distributive property (or distributive method) will help you!

To multiply these polynomials, start by taking the first polynomial (the purple monomial) and multiplying it by each term in the second polynomial (the green trinomial).

This can be done by multiplying 4x^2 by the first term of the green trinomial (Figure 1), then by the second term of the green trinomial (Figure 2) and finally by the third term of the green trinomial (Figure 3).

Figure 1

Figure 1

Figure 2

Figure 2

Figure 3

Figure 3

The next step is to simplify each of these new terms and find their sum:

Simplify the first term.

Simplify the first term.

Simplify the second term.

Simplify the second term.

Simplify the third term.

Simplify the third term.

The final step is to check and see if you can COMBINE LIKE TERMS. In this example, there are no like terms, so you can conclude that:

Final Answer:

Figure 2

Figure 2


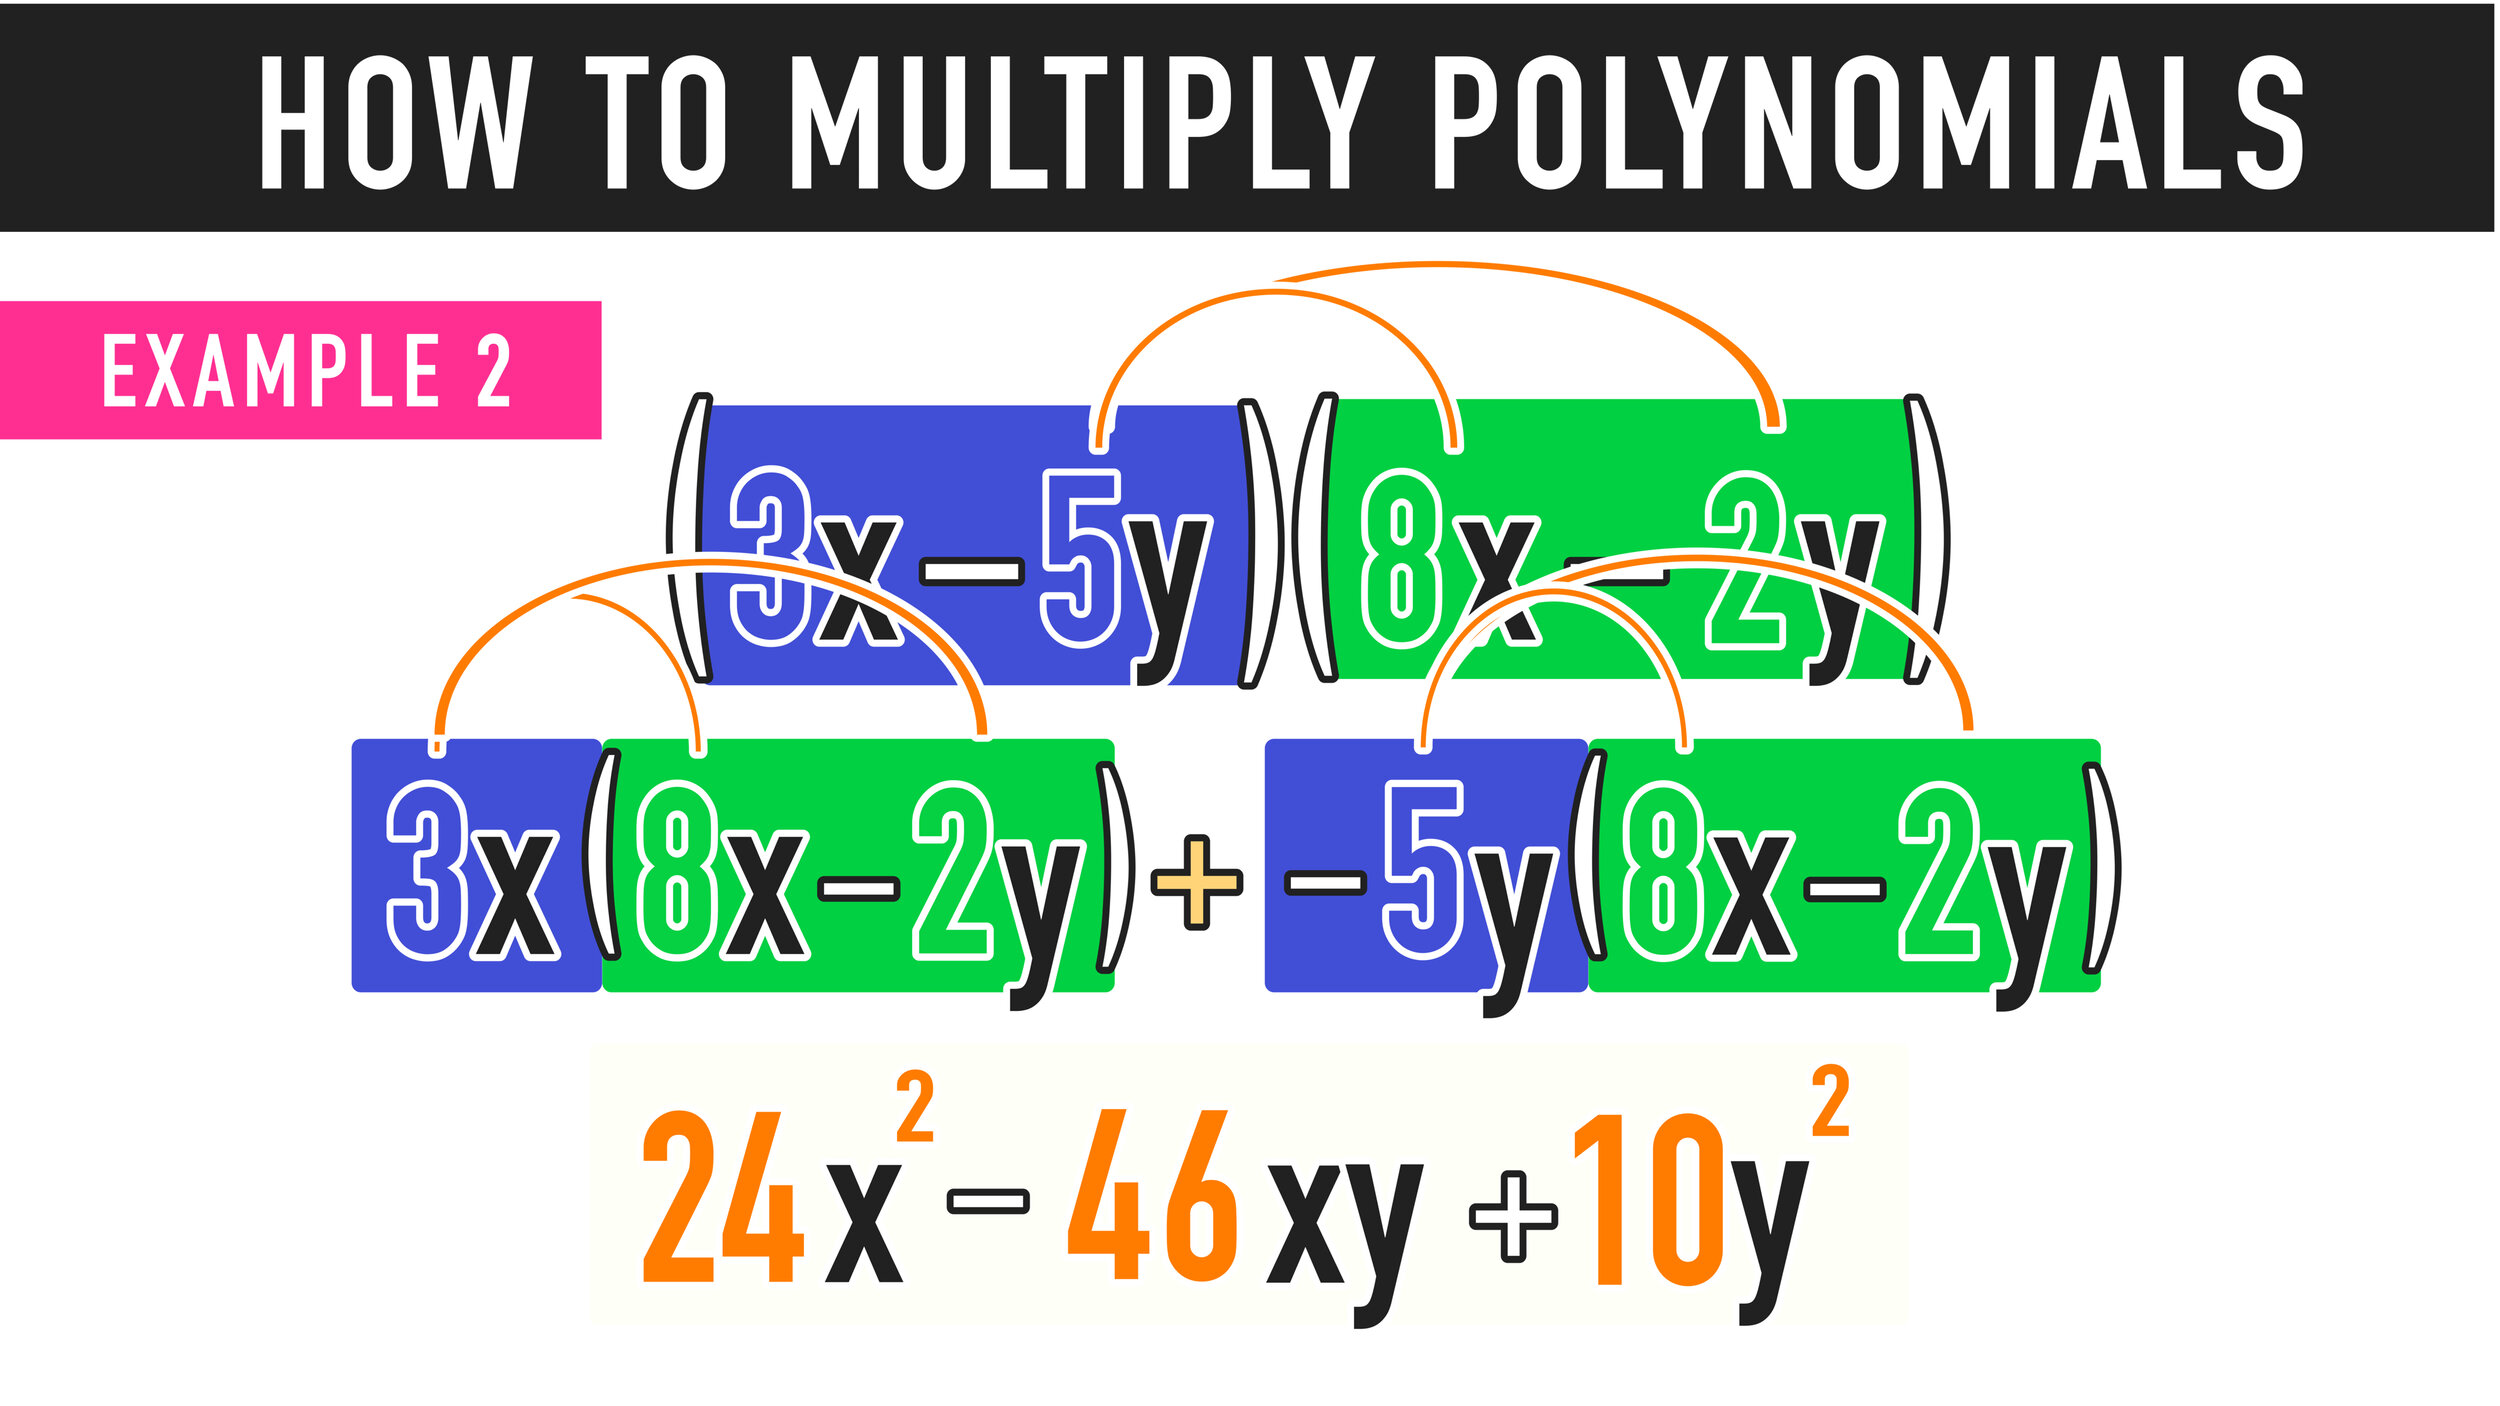
Multiplying Polynomials Example 2: Multiplying Binomials

Notice that -30x and 12 are like terms.

You can use the distributive method for multiplying polynomials just like the last example!

Start by multiplying the first term of the first binomial (3x) by the entire second binomial (Figure 1).

Then multiply the second term of the first binomial (-5y) by the entire second binomial (Figure 2).

Figure 1

Figure 1

Figure 2

Figure 2


The next step is to use the distributive property again to simplify each new term.

Set up two equations (positive and negative) and ditch the absolute value bars.
Snip20200428_27.png
Note that you do not need the plus sign between -6xy and -40xy.

Note that you do not need the plus sign between -6xy and -40xy.


The final step is to COMBINE LIKE TERMS and simplify:

Original Function
Snip20200428_32.png
Snip20200428_33.png
Snip20200428_36.png

Final Answer:

 
Left: replace x with 3. Right: replace x with -9


Multiplying Polynomials Example 3: Multiply a Binomial by a Trinomial

Figure 1

Figure 1


Remember that you are still just multiplying two things together! And you can do that by using the distributive method again as follows:

Figure 3
Snip20200428_43.png
 

Now you can use the distributive method again to simplify the new terms:

Snip20200428_44.png
Snip20200428_45.png
Snip20200428_47.png

The final step is to COMBINE LIKE TERMS and simplify:

Snip20200428_49.png
-42x^2 and -27x^2 combine to make -69x^2

-42x^2 and -27x^2 combine to make -69x^2

+14x and +54x combine to make +68x

+14x and +54x combine to make +68x

Snip20200428_55.png

Now that you have combined like terms, you can conclude that:

Final Answer:

Snip20200428_54.png
 

Still Confused?

Check out this animated video tutorial on multiplying polynomials:


Looking for more practice with multiplying polynomials?

Check out the following free resources:

Free Tutorial

Free Tutorial

Have thoughts? Share your thoughts in the comments section below!

(Never miss a Mashup Math blog--click here to get our weekly newsletter!)

By Anthony Persico

Anthony is the content crafter and head educator for YouTube's MashUp Math. You can often find me happily developing animated math lessons to share on my YouTube channel . Or spending way too much time at the gym or playing on my phone.

Comment

Free Math Activities to Celebrate National Pizza Party Day!

1 Comment

Free Math Activities to Celebrate National Pizza Party Day!

Are You Ready to Celebrate Pizza Party Day?

Did you know that National Pizza Party Day is celebrated on the third Friday of May each year?

You can celebrate at home by ordering a pizza with your favorite toppings for dinner this Friday night.

And you can celebrate in your classroom with some brand new and super fun Pizza Party Two Truths and One Lie! Math Activities for Grades 3-8.

Go ahead and use these activities as warm-ups, transitions, extra credit homework, or just for fun. They are great for boosting student engagement and adding some extra fun to your lesson plans. You may also like our 17 Days of Free Math Challenges and these 10 Super Fun Math Riddles for Kids (with Answers). Enjoy!

36.jpg

The following Pizza Party Math Activities for elementary and middle school students are samples from my best-selling PDF math workbooks: 101 Two Truths and One Lie! Math Activities for Grades 3-5 and 101 Two Truths and One Lie! Math Activities for Grades 6-8.

Two Truths and One Lie (2T1L) math activities revolve around your students being presented with three facts, images, or statements (only two of which are true). The objective is for students to identify which statement is false and justify why (verbally, in writing, or both).

2T1L activities are an excellent strategy for boosting student engagement, sparking mathematical thinking, and opening small-group or full-class discussions. They are great for warm-up and cool-down activities during the first or final minutes of class.

Click here to learn more about how you can use two truths and one lie math activities to engage your students.

HowToDownload.jpg

Free Pizza Party Math Activities for Grades 3, 4, and 5

(keep reading to get puzzles for grades 6, 7, and 8)

3rd Grade

4th Grade

5th Grade

Answer Key: 3rd Grade: 2 | 4th Grade: 1 | 5th Grade: 2

You can learn more about 2T1L activities and access more free samples here.


Wait! Get 100+ More Two Truth and One Lie Math Activities for Your Students!

Grades 3, 4, & 5

Grades 6, 7, & 8


Free Pizza Party Math Activities for Grades 6, 7, and 8

6th Grade

7th Grade

8th Grade

Answer Key: 6th Grade: 2 | 7th Grade: 2 | 8th Grade: 1

You can learn more about 2T1L activities and access more free samples here.

Looking for more Two Truths and One Lie Math Activities?

You can now share 101 Daily Two Truths & One Lie! Math Activities for Grades 3, 4, & 5 OR Grades 6, 7, & 8 with your kids with our brand new PDF workbooks!

Here are a few more free samples that you can download and share with your kids (right-click to download each graphic and save it to your computer):

Looking for more for grades 3, 4, & 5? Download your 101 ‘Two Truths and One Lie!’ Math Activities for Grades 3, 4, & 5 eBook!


Of course, sharing math puzzles with your students is just one effective strategy for boosting engagement in your classroom. Subscribe to our mailing list here to get more free daily resources, lesson plans, ideas, and insights for K-12 math teachers in your inbox every week.

Read More Posts About Math Education:


Bitmoji.png

By Anthony Persico

Anthony is the lead educator and founder of Mashup Math. He lives in Denver, Colorado and is also a YouTube for Education partner. Follow him on Twitter at @mashupmath.

HalloweenPin_3.jpg
HalloweenPin_6.jpg
HalloweenPin_4.jpg
HalloweenPin_7.jpg
HalloweenPin_5.jpg
HalloweenPin_8.jpg
 

1 Comment

Geometry Transformations: Dilations Made Easy!

Comment

Geometry Transformations: Dilations Made Easy!

Performing Geometry Dilations: Your Complete Guide

The following step-by-step guide will show you how to perform geometry dilations of figures and to understand dilation scale factor and the definition of geometry in math! (Free PDF Lesson Guide Included!)

 
maxresdefault.jpg
 

Welcome to this free lesson guide that accompanies this Geometry Dilations Explained Video Tutorial where you will learn the answers to the following key questions and information:

  • What is the geometry dilation definition and what is definition of dilation in math?

  • What is a dilation scale factor?

  • How can you dilate a figure like a triangle on the coordinate plane?

  • Several dilation geometry examples

This Complete Guide to Geometry Dilations includes several examples, a step-by-step tutorial, a PDF lesson guide, and an animated video tutorial.


*This lesson guide accompanies our animated Geometry Transformations: Dilations Explained! video.

Want more free math lesson guides and videos? Subscribe to our channel for free!


Dilation Geometry Definition

Before you learn how to perform dilations, let’s quickly review the definition of dilations in math terms.

Dilation Geometry Definition: A dilation is a proportional stretch or shrink of an image on the coordinate plane based on a scale factor.

  • Stretch = Image Grows Larger

  • Shrink = Image Grows Smaller

Note that a geometry dilation does not result in a change or orientation or shape!

Dilation Scale Factor

The following notation is used to denote dilations based on a scale factor of K:

Snip20200423_1.png

K represents a number. When K=1 (the dilation scale factor is 1), the image does not change:

A scale factor one 1 is uncommon, because it doesn’t change anything!

A scale factor one 1 is uncommon, because it doesn’t change anything!

But when K>1 (the dilation scale factor K is a number that is larger than 1), the image will be stretched!

If K=2, the image is stretched twice as large as the original!

If K=2, the image is stretched twice as large as the original!

And when K<1 (the dilation scale factor K is a number less than 1), the image will shrink. Note that the scale factor cannot be less than or equal to zero (this would completing eliminate the figure).

If K=1/2, the image shrinks to half of its original size.

If K=1/2, the image shrinks to half of its original size.

When shrinking a figure, the scale factor is greater than zero, but less than one.

When shrinking a figure, the scale factor is greater than zero, but less than one.


Now you are ready to try a few geometry dilation examples!


Geometry Dilation Examples

Example 1: Dilation Scale Factor >1

Notice that -30x and 12 are like terms.

In this example, you have to dilate ▵OMG by a scale factor of 2 to create a new triangle: ▵O’M’G’.

Start by writing down the coordinates of the vertices of ▵OMG as follows:

Snip20200423_9.png

The next step is to take the scale factor (2 in this example) and multiply it by the x and y-value of points O, M, and G, as follows:

Snip20200423_10.png
Now you have the coordinates of O’, M’, and G’

Now you have the coordinates of O’, M’, and G’

You can now draw ▵O’M’G’ on the coordinate plane by plotting the points that you just found:

 
Set up two equations (positive and negative) and ditch the absolute value bars.
 

You have just constructed ▵O’M’G’, which is the image of ▵OMG after a dilation of 2.

<><><>


Example 2: Dilation Scale Factor <1

Left: replace x with 3. Right: replace x with -9

In this example, you have to dilate figure MASH by a scale factor of 1/3 to create a new figure: M’A’S’H’

Since the dilation scale factor is less than one, the new figure will be smaller version of the original (shrink).

Start by writing down the coordinates of the vertices of figure MASH as follows:

Both equations are true.

The next step is to take the scale factor (1/3 in this example) and multiply it by the x and y-value of points M, A, S, and H, as follows:

Snip20200423_18.png
Now you have the coordinates of M’, A’, S’, and H’

Now you have the coordinates of M’, A’, S’, and H’

You can now draw figure M’A’S’H’ on the coordinate plane by plotting the points that you just found:

Snip20200423_20.png

You have just constructed M’A’S’H’, which is the image of MASH after a dilation of 1/3.

<><><>


Free Geometry Dilations Lesson Guide

Free PDF Lesson Guide

Free PDF Lesson Guide

Looking for more help with geometry dilations?

Click the link below to download your free PDF lesson guide that corresponds with the video lesson below!

Click here to download the Your Free PDF Lesson Guide

Still Confused?

Check out this animated video tutorial on geometry dilations and scale factors:


Looking for more practice with Geometry Transformations?

Check out the following free resources:

Free Tutorial on Reflections!

Free Tutorial on Reflections!

Have thoughts? Share your thoughts in the comments section below!

(Never miss a Mashup Math blog--click here to get our weekly newsletter!)

By Anthony Persico

Anthony is the content crafter and head educator for YouTube's MashUp Math. You can often find me happily developing animated math lessons to share on my YouTube channel . Or spending way too much time at the gym or playing on my phone.

Comment

Finding Slope of a Line: 3 Easy Steps

3 Comments

Finding Slope of a Line: 3 Easy Steps

Snip20200422_2.png

Finding Slope of a Line in y=mx+b Form: Everything You Need to Know

Are you ready to learn how to understand and identify the slope of a line and how to find the slope of a line?

Before you learn an easy method for finding slope (with and without a calculator), let’s make sure that you understand a few basics of slope, including the slope definition.

Slope Definition:

  •  The slope of a line refers to its direction and steepness.

 
Snip20200422_3.png
 
 
Snip20200422_5.png
 

Note that positive slopes increase from left to right and negative slopes decrease from left to right.

Finding Slope: Rise Over Run

The slope of a line is expressed as a fraction that is commonly referred to as rise over run.

The numerator (rise) refers to how many units up or down and the denominator (run) refers to how many units left or right. The direction will depend on whether or not the slope is positive or negative.

Positive Slope: Rise Over Run

Rise: UPWARDS Run: TO THE RIGHT

Snip20200422_6.png

Negative Slope: Rise Over Run

Rise: DOWNWARDS Run: TO THE RIGHT

Snip20200422_7.png
 

How to Find the Slope of a Line: 3 Easy Steps

You can find the slope of any line by following these three easy steps:

Step One: Determine if the slope if positive (increasing) or negative (decreasing)

Step Two: Using two points on the line, calculate the rise and the run and express it as a fraction (rise over run).

Step Three: Simplify the fraction if possible.

Let’s take a look at a few examples!

EXAMPLE: Find the slope of the line below.

Snip20200422_9.png
 

Step One: Determine if the slope if positive (increasing) or negative (decreasing)

Notice that the line is increasing from left to right, so we know that this line has a positive slope!

Snip20200422_13.png
 

Step Two: Using two points on the line, calculate the rise and the run and express it as a fraction (rise over run).

For this example, let’s start by choosing the left farthest point (-9,-6) and the right farthest point (9,6).

To find rise over run, draw a vertical line that rises from (-9,6) and a horizontal line that runs to (9,6), then count how many units you had to travel upward (rise) and how many to the right (run) and express it as a fraction as follows:

Rise over run is like building a staircase!

Rise over run is like building a staircase!

Snip20200422_18.png
 

Step Three: Simplify the fraction if possible.

Right now, you can say that the slope of the line is 12/18. But 6/9 is also equivalent to 12/18, so let’s see what that would look like on the graph by starting from the first point (-9,-6) and this time rising up 6 and running to the right 9 units repeatedly as follows:

Notice how you end up in the same spot!

Notice how you end up in the same spot!


At this point, it is clear that the line has a slope of 12/18 and a slope of 6/9.

But we don’t want to have multiple slopes for the same line, so you will always express the slope of a line in simplest or reduced form.

In this example, the slopes of 12/18 and 6/9 can be simplified to 2/3 as follows:

Snip20200422_21.png
 

And since 2/3 can not be simplified further, you can conclude that:

Final Answer: The line has a slope of positive 2/3


Finding Slope of a Line Examples

EXAMPLE #1: Find the Slope of the Line

Step One: Determine if the slope if positive (increasing) or negative (decreasing)

Notice that the line is increasing from left to right, so we know that this line has a positive slope!

Step Two: Using two points on the line, calculate the rise and the run and express it as a fraction (rise over run).

In this example, use the two given points as follows:

The rise is 6 and the run is 3.

The rise is 6 and the run is 3.

Step Three: Simplify the fraction if possible.

You should know that 6/3 is equal to 2 (six divided by three). Since we want to think about slope as the fraction rise over run, we can express 2 as 2/1:

Notice that 6/3 reduces to 2/1 or just 2.

Notice that 6/3 reduces to 2/1 or just 2.

You can see that 2/1 is equivalent to 6/3 since the pink staircase on the graph above still gets you to the same point.

So now you can express your answer as follows:

Snip20200422_27.png

Final Answer: The line has a slope of positive 2.


Finding Slope of a Line Examples

EXAMPLE #2: Find the Slope of the Line

Snip20200422_30.png

Step One: Determine if the slope if positive (increasing) or negative (decreasing)

Notice that the line is decreasing from left to right, so we know that this line has a negative slope!

Step Two: Using two points on the line, calculate the rise and the run and express it as a fraction (rise over run). Remember that you have to rise down when dealing with negative slopes.

In this example, use the two given points as follows:

The slope is negative!

The slope is negative!

Step Three: Simplify the fraction if possible.

Notice that the fraction -3/8 can not be simplified further, so you can conclude that:

Final Answer: The line has a slope of - 3/8.


Looking to Learn More About Slope?

Check out these free video tutorials:

Free Slope Calculator

Snip20200422_33.png

If you need a fast and easy way to find the slope of a line, then you can take advantage of the many free online slope calculators that are available.

Snip20200422_34.png

This free slope calculator from calculator.net not only finds slope but it expresses it in reduced form and includes whether the slope is positive or negative.

To use the slope calculator, simply input the x and y-values for any two points on the line and press calculate.


Finding Slope of a Line Worksheet

Free PDF Worksheet!

Do you need more practice with finding the slope of a line? The following finding slope worksheet and answer key will give you plenty of opportunities to practice using the three-step process!

Click here to download your free Finding Slope Worksheet with Answers.

And if you are looking for a more in-depth lesson on how to find the slope of a line, check out this free Finding Slope Video Lesson:

Read More Posts About Math Education:


Share your ideas, questions, and comments below!

(Never miss a Mashup Math blog--click here to get our weekly newsletter!)

NewBlogImage.png

By Anthony Persico

Anthony is the content crafter and head educator for YouTube's MashUp Math . You can often find me happily developing animated math lessons to share on my YouTube channel . Or spending way too much time at the gym or playing on my phone.

 
8th.jpg
Algebra1.jpg

3 Comments

Parallel Slopes and Perpendicular Slopes: Complete Guide

Comment

Parallel Slopes and Perpendicular Slopes: Complete Guide

Finding Slopes of Parallel and Perpendicular Lines (and Graphing): Complete Guide

The following step-by-step guide will show you how to use parallel slope and perpendicular slope to graph parallel and perpendicular lines

 
Insert.jpg
 

Welcome to this free lesson guide that accompanies this Graphing Parallel and Perpendicular Lines Using Slope Tutorial where you will learn the answers to the following key questions and information:

  • What is parallel slope?

  • What is perpendicular slope?

  • How can I graph parallel lines?

  • How can I graph perpendicular lines?

This Complete Guide to Parallel and Perpendicular Lines and Slope includes several examples, a step-by-step tutorial and an animated video tutorial.


*This lesson guide accompanies our animated Graphing Parallel and Perpendicular Lines Using Slope video.

Want more free math lesson guides and videos? Subscribe to our channel for free!


Parallel Slope and Perpendicular Slope

Before you learn how to graph parallel and perpendicular lines, let’s quickly review some important information:

Parallel Lines

  • Never intersect

  • Have the SAME SLOPE (m)

For example, observe the purple line and the green line in Figure 1 below. These lines are parallel and have the same slope of m=3/5.

This is true for all parallel lines.

Figure 1

Figure 1

Perpendicular Lines

  • Intersect to Form Right Angles

  • Have the NEGATIVE RECIPROCAL SLOPES (m)

For example, observe the purple line and the green line in Figure 2 below. These lines are perpendicular and have negative reciprocal slopes.

Another way of saying negative reciprocal is FLIP AND SWITCH, which means to take the slope of the first line, flip the fraction and switch the sign (positive to negative or vice versa).

In this case, the green line slope is -(6/7) and the purple line slope is +(7/6)

This is true for all perpendicular lines.

Figure 2

Figure 2


Parallel Slope Example

Example:

Notice that -30x and 12 are like terms.

Let’s start by identifying the key information:

Snip20200418_15.png
 

Since you have to graph a line through point J that is PARALLEL to line S, then you know that you will be dealing with SAME SLOPE.

Start by finding the slope of line S by finding the slope between the two given points (-4,0) and (5,2). You can find the slope by counting “rise over run” or by using the slope formula.

In this example, Line S has a slope of m=2/9.

Set up two equations (positive and negative) and ditch the absolute value bars.
 

Again, since parallel lines have the same slope, you can build your new line through point J by repeating the slope m=2/9 starting at point J as follows:

Original Function
 

Now that you have plotted a new point using the same slope, the final step is to construct a line that passes through the new point and point J as follows:

Left: replace x with 3. Right: replace x with -9
Both equations are true.

And you have graphed your parallel line using slope!


Perpendicular Slope Example

Example:

Figure 1

Figure 1


Start by identifying the key information.

Figure 3
 

Since you have to graph a line through point K that is PERPENDICULAR to line T, then you know that you will be dealing with NEGATIVE RECIPROCAL SLOPES (also known as “flip and switch”).

Start by finding the slope of line T by finding the slope between the two given points (-3,-1) and (-1,7). You can find the slope by counting “rise over run” or by using the slope formula.

In this example, Line T has a slope of m= +8/2, which simplifies to m=+4/1

Snip20200418_26.png
Snip20200418_27.png
Snip20200418_28.png

Now that you know that the slope of Line T is m=+(4/1), you are ready to find the slope of the new line by finding the negative reciprocal.

You can do this taking the slope of Line T and doing “flip and switch”.

To do this, flip the fraction and switch the sign as follows:

Snip20200418_29.png

The las step is to use the negative reciprocal to build your new line. You can do this by starting at point K and going down one unit and to the right four units (rise: -1, run: +4) and then plot a new point.

Snip20200418_30.png

Now that you have plotted a new point using the negative reciprocal slope, the final step is to construct a line that passes through the new point and point K as follows:

Snip20200418_31.png

And you have graphed your parallel line using slope!


End.jpg

Still Confused?

Check out this animated video tutorial on slopes of parallel and perpendicular lines and graphs:


Looking for more practice with graphing and slope?

Check out the following free resources:

Free Tutorial

Free Tutorial

Have thoughts? Share your thoughts in the comments section below!

(Never miss a Mashup Math blog--click here to get our weekly newsletter!)

By Anthony Persico

Anthony is the content crafter and head educator for YouTube's MashUp Math. You can often find me happily developing animated math lessons to share on my YouTube channel . Or spending way too much time at the gym or playing on my phone.

Comment