Division Word Problems—Free Worksheets for Grades 3-5

Comment

Division Word Problems—Free Worksheets for Grades 3-5

Division Word Problems—Free PDF Worksheets

Do your students need extra practice working on division word problems?

 
Division Word Problems Grade 3, Division Word Problems Grade 4, and Division Word Problems Grade 5

Free Division Word Problems Worksheets (Printable) for 3rd graders, 4th graders, and 5th graders.


Once your elementary math students learn how to perform division and become more comfortable with dividing numbers, the next step is to have them extend their understanding of division to solving real-world problems. By giving your students opportunities to work on word problems that require the use of division to find a solution, they must engage in higher-level thinking that will help them to not only better understand how to divide, but become better mathematical problem solvers as well.

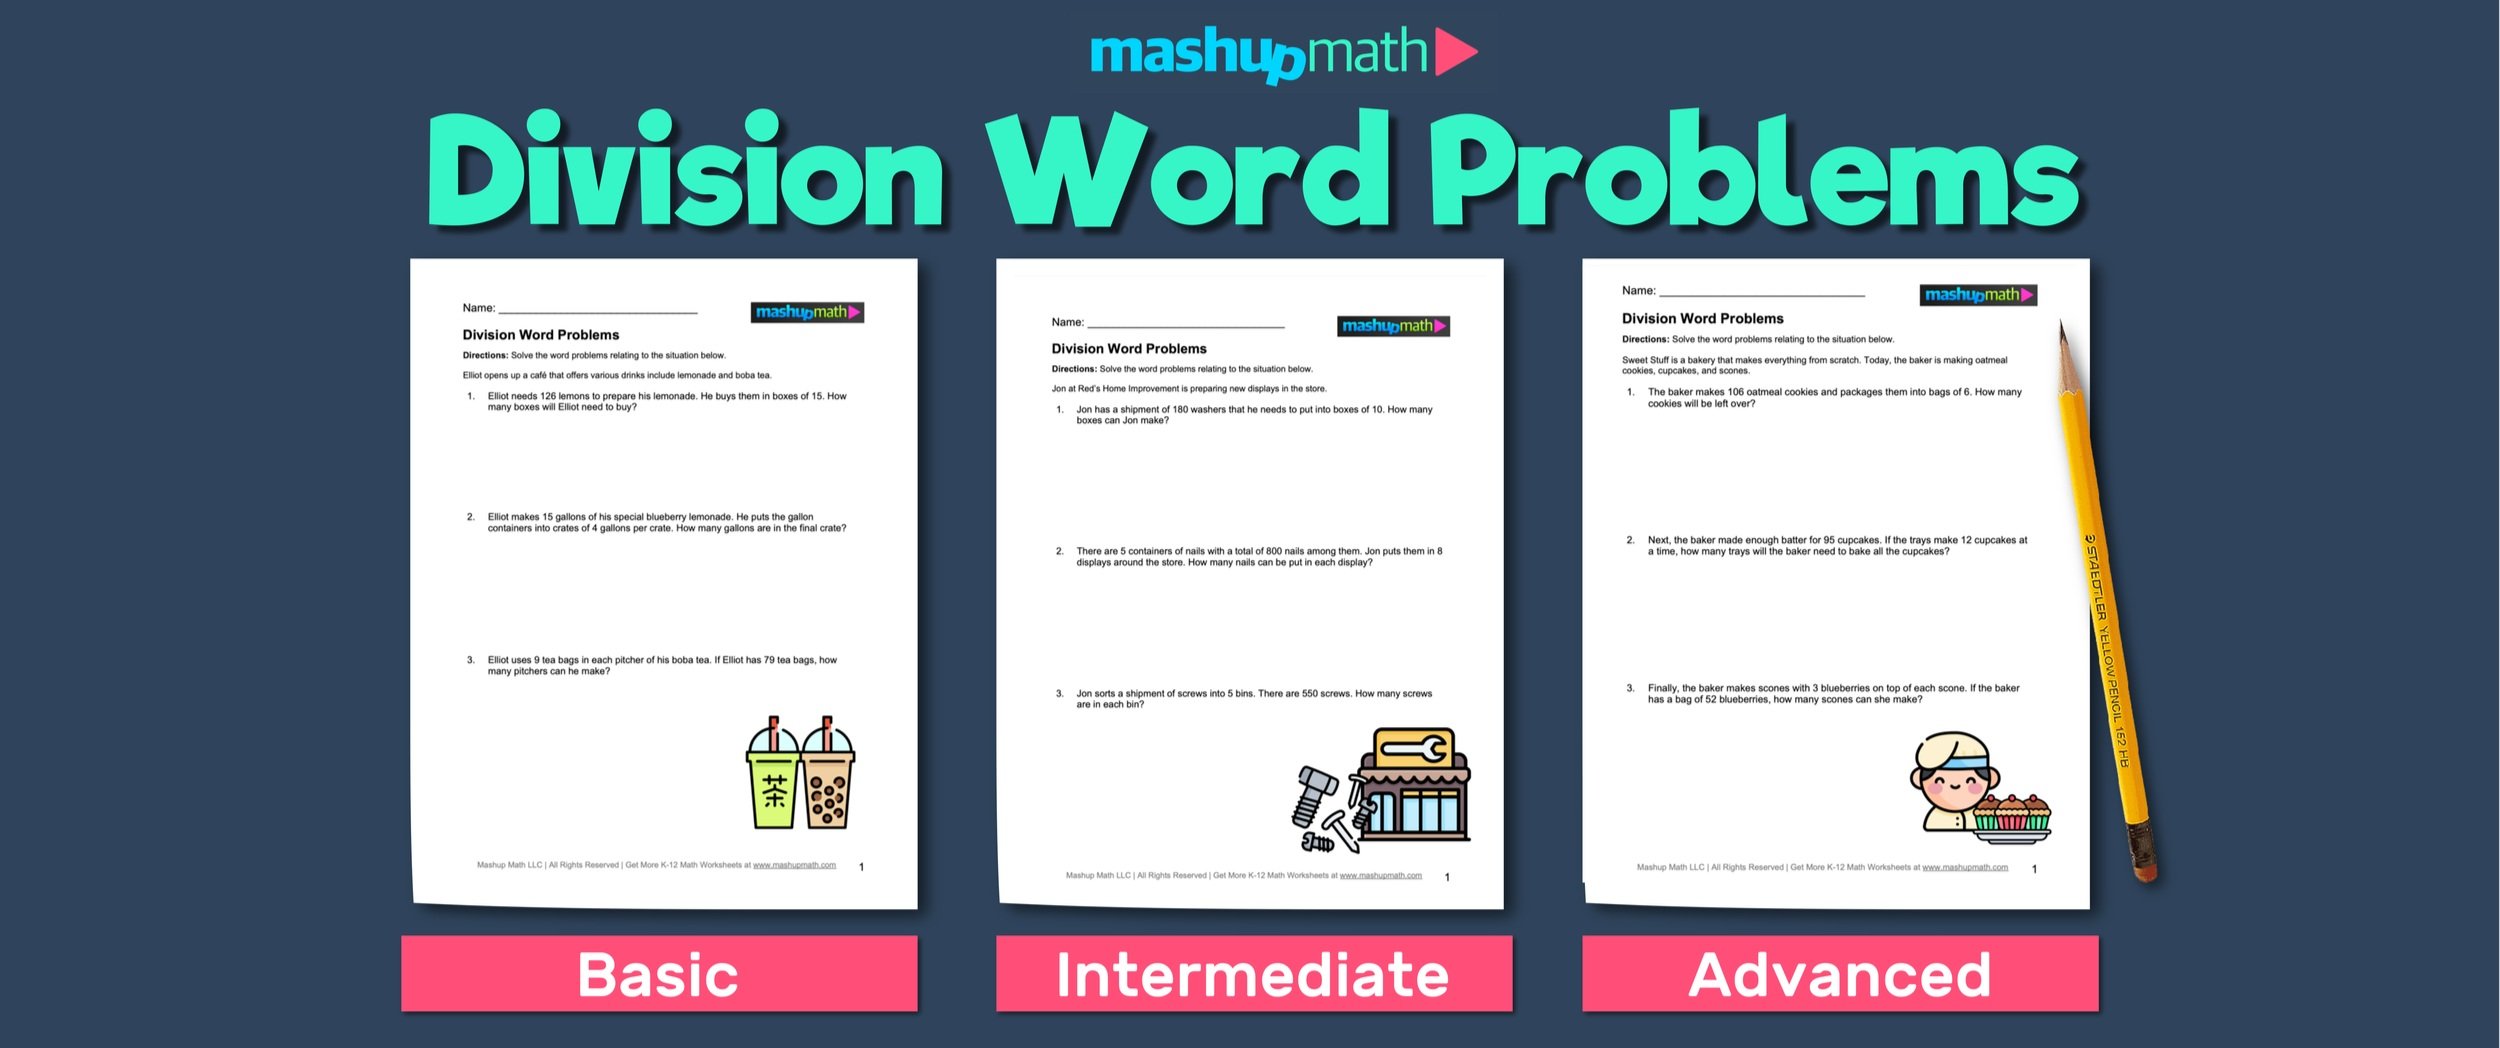
If you are looking for free division word problems to share with your students in grades 3-5, then you will love the our free collection of Division Word Problems. Below, you will find previews and download links for 12 different division word problems worksheets (with answer keys included) that are divided into three categories based on difficulty levels:

Each worksheet is available as a PDF download that is printable and also easy to share on online learning platforms like Google Classroom.

To download any of the division word problems worksheets below, simply click on text link to access the pdf file, which you can print and/or save to your device to use with your students however you see fit. Enjoy!

(Do you want free K-8 math resources and activities in your inbox every week? Click here to sign up for our free math education email newsletter)


Division Word Problems: Basic

Suggested Grade Level(s): Grade 3, Grade 4

The following division word problems focus on beginner/basic applications of division to solve word problems.

Click any of the preview image boxes below to preview the word problems and click on the blue text link below any of the images to download the corresponding pdf worksheet and answer key.


Division Word Problems: Intermediate

Suggested Grade Level(s): Grade 3, Grade 4, Grade 5

The following division word problems focus on intermediate applications of division to solve word problems.

Click any of the preview image boxes below to preview the word problems and click on the blue text link below any of the images to download the corresponding pdf worksheet and answer key.


Do you want more free K-8 math activities in your inbox every week?


Long Division Word Problems: Advanced

Suggested Grade Level(s): Grade 3, Grade 4, Grade 5

The following division word problems focus on advanced applications of division (and long division) to solve word problems.

Click any of the preview image boxes below to preview the word problems and click on the blue text link below any of the images to download the corresponding pdf worksheet and answer key.


Tips for Solving Division Word Problems

Our free division word problems grade 4 and division word problems grade 5 worksheets allow students to practice and apply their understanding of division to real-world scenarios. However, even if your students have a strong understanding of division and long division, they may struggle to solve word problems since they require additional skills such as identifying key information, picking up on context clues, and answering in complete sentences.

If your students struggle with word problems, here are some helpful tips for being successful:

  • Always read the problem carefully: The first step to solving any of the division word problems is to carefully read the question, identify key information, and know exactly what the question is asking. It is helpful to look for and even highlight key words and phrases related to division such as split equally, divided evenly, left over, etc.

  • Draw diagrams to help you: Many students will benefit from using diagrams as visualize aids for understanding a given problem and how to solve it. For example, if a problem involves 24 apples divided evenly amongst 3 people, you could draw 24 circles (each representing one apple) and then divide that group into 3 equal parts to see how many apples are in each group.

  • Always ask yourself “what is this question asking me to do?”: By identifying exactly what a question is asking you to do, you will have a better idea of what the answer will look like and how you can find it.

  • Write your answer using complete sentences and double-check that it makes sense: Once you've solved a division word problem, write your final answer in a complete sentence that makes sense in the context of the problem. For example, if a question is about equally distributing 100 cupcakes between four people, it wouldn’t make sense if you concluded that each person receives 75 cupcakes (meaning that you should go back and try the problem again).

(Do you want free K-8 math resources and activities in your inbox every week? Click here to sign up for our free math education email newsletter)

More Math Education Resources You Will Love:


Search Tags: division word problems, division word problems grade 4, division word problems grade 3, 3rd grade division word problems, division word problems for 3rd graders, division word problems grade 5, long division word problems, division word problem, division word problems for 4th graders, division word problems for 5th graders, 4th grade division word problems, division word problems 4th grade, long division worded problems

Comment

What is the Easiest Math in College?

What is the Easiest Math in College?

What is the Easiest Math in College?

How to Choose College Math Courses That Work for You


What is the easiest math in college? While the answer depends on your skill level and career interests, there are several college math courses that are manageable and generally easy for students who want to avoid highly challenging courses like calculus.

(Image: Mashup Math via Getty)


Choosing college math classes that are appropriately challenging for you can be tricky. On one hand, you never want to put yourself in a math class that is extremely difficult where you are not in a position to be successful, which only wastes your time and money. On the other hand, it may not be valuable for you to take a college math class that is too easy or that focuses on material that you have mastered or is not useful to your potential career path.

It can be tricky to enroll in math classes that are a good fit for you, which is why so many students wonder what is the easiest math in college? If you find yourself asking this question as you begin to make your schedule, then continue reading for some solid advice and tips that will help you moving forward.

For starters, you are not alone. Many college students struggle with mathematics and want to enroll in courses that are manageable and not overly challenging. But determining the easiest math in college is not a simple determination, as the word “easiest" typically means something different for every student. However, in this post, we will explore some great options for students who are looking for a math class that is considered easy (i.e. less challenging) along with some helpful tips on how to pick math courses that will be a good fit for you.

Now, let's talk about what is meant by the easiest math in college. For some, easy math means courses that are appropriately challenging based on your individual skill level. These “Goldilocks” math classes are not too hard or too easy, instead, they are just right. For others, easy math means classes that require very little effort and often are not very challenging or interesting. Before moving forward, you will have to determine which definition of “easy math” applies to you.

Making this distinction is important because, just because a math class is considered easy, it doesn’t necessarily mean that the course will be a good fit for you and your potential career path. As a student, it is in your best interest to select math courses that are not only manageable, but also appropriately challenging, interesting, and engaging.

With this in mind, here are a few options for math classes that are generally considered to be easy and manageable for college students:


Statistics courses can be more manageable for some students because the material is less theoretical and more applied than more complicated math courses such as differential equations. Photo by Sam Balye on Unsplash


What is the Easiest Math Class in College?

  • Statistics: Statistics is a branch of mathematics dealing with the collection, analysis, and interpretation of numerical data. Statistics is often used in career fields including business, finance, research, and healthcare. Statistics courses can be more manageable for some students because the material is less theoretical and more applied than more complicated math courses such as differential equations.

  • Finite Math: Finite math refers to a variety of math courses that do not involve calculus. These types of course typically cover topics such as linear algebra and probability. This type of math is often used in business and the social sciences. Finite math classes are often a good option for students who want to avoid calculus.

  • Business Math: Business math courses focus on all of the practical applications of mathematics in business, such as finances, forecasting, and management. Business math topics often include percentages, interest, and applied algebra. Such courses can be a great option for students who are interested in business careers, but want to avoid abstract math courses that are overly challenging.

  • Applied Math: Also known as “Real-World Math,” applied math courses are designed to give students experience with math skills that are applicable to real life. These courses include topics such as logic, probability, and personal finance. Applied math courses are a good option for students who want to fulfill a math requirement, but are not interested in further pursuing any advanced math courses.


What is the easiest math class in college? The math classes you choose will be based on your personal goals and career aspirations. Photo by Desola Lanre-Ologun on Unsplash


What is the Easiest Math in College: Tips and Pointers

Now that you have a few good options for math courses that are generally considered to be easy, we can take a look a few pointers for college students on how to select math courses that will be a good fit for them:

  • Work with your advisor: Your academic advisor or guidance counselor can be a great resource for guiding you when choosing a math course that is appropriately challenging for your skill level and personal interests. Advisors can provide guidance on which math courses are requirements for your desired major and which courses could potentially be a good fit for you based on your interests.

  • Do your research: Before you enroll in any math class, it is important to do some research to find out what the course covers and what the course requirements are. This information can often be found in your school’s course catalog or website. This information will give you a better idea of whether or not a math class is a good fit for you and your interests.

  • Look for Reviews: Whenever possible, read course reviews online or talk to other students who have already taken the course. This type of feedback will give you insight into the what you will learn, the course’s difficulty level, and the teaching style of the professor.

  • Be Goal-Oriented: Choosing courses is often based on whatever major or minor you are pursuing, many of which include required math courses. Whenever you are choosing a math class to enroll in, think about why you are taking the course and what you hope to gain from being enrolled. You may simply be looking to fulfill a requirement, but you may also be interested in pursuing a career that requires strong math skills and you want to be more well-rounded.

  • Be Honest: Finally, always be honest with yourself and your skill level and comfort with mathematics. It’s okay to avoid math classes that may be too challenging for you or way too high above your skill level, but it’s never recommended to set your bar too low and choose math classes only because they are considered easy. Rather, if a math class that may be a requirement for a career path that interests you seems too challenging at the moment, talk to an advisor to find prerequisite courses that will help you develop your skills to a point where you are able to take on more challenging courses.

More Free Resources You Will Love:

Why Am I So Bad at Math? (And How to Get Better)

If you are wondering, why am I so bad at math? The fault is likely due to you having a fixed mindset for learning, which is often a product of being negatively affected by harmful misconceptions about your ability to learn math.


How to Engage Students in Math Lessons—5 Ideas

How to Engage Students in Math Lessons—5 Ideas

How to Engage Students in Math Lessons

5 Effective Ideas for How to Engage Students in Math Lessons


How to Engage Students in Math Lessons: Engagement in math starts with making the subject more interesting, relevant, and approachable for your students.

(Image: Mashup Math via Getty)


When students have negative attitudes about mathematics and its relevance to real life, they can quickly become disinterested in the subject, which often leads to disengagement and apathy in the classroom. As a teacher, you can flip the script on students’ mindset for math and its usefulness by utilizing strategies that allow them to experience math in a way that is both interesting and engaging. If you are looking for effective strategies for engaging your math students, below you will find five great ideas for making your upcoming lessons enjoyable and captivating for students at any grade level.

(Do you want free K-8 math resources, worksheets, and lesson plans in your inbox every week? Click here to receive our free newsletter in your inbox every week)

1.) Use Real-Life Examples

One of the most effective strategies you can use to engage students in math is to incorporate relatable real-life examples and applications. For example, when teaching fractions, you could use pizza slices to show how to divide a pizza into equal parts. Or when teaching geometry, you could use a map to show how streets and avenues resemble parallel lines and transversals. By using real-life examples, you can make math more tangible and relevant to your students' lives.

Suggested Link: 10 Examples of Real-World Connections in Math


How to Engage Students in Math Lessons: Use real-world examples to explore math concepts such as parallel lines and transversals.


2.) Use Technology

Technology can be a great tool to engage students in math. There are many educational apps and websites that can make learning math fun and interactive. For example, you could use online math games or interactive simulations to teach concepts such as algebra or geometry. You could also use digital tools such as graphing calculators or virtual manipulatives to help students visualize math concepts.

Suggested Link: Virtual Math Manipulatives—Free Library for Grades K-8

Suggested Link: Kid-Safe YouTube: A Safer Online Learning Experience for Students


How to Engage Students in Math Lessons: Use virtual math manipulatives to explore topics like fractions.


3.) Encourage Collaboration

Collaboration can be a powerful tool to engage students in math. By working together, students can share their ideas, learn from each other, and build confidence in their math skills. You could encourage collaboration by having students work in pairs or small groups on math problems or projects. You could also create a class math challenge or competition to encourage teamwork and friendly competition.

Suggested Link: How to Boost Student Engagement with Math Pictures


How to Engage Students in Math Lessons: Make math learning a team effort by encouraging collaboration. Photo by National Cancer Institute on Unsplash


4.) Provide Meaningful Feedback

Providing meaningful feedback can help students stay motivated and engaged in math. It also helps students to embrace a growth mindset for learning and not become easily discouraged by mistakes. When giving feedback, try to focus on specific strengths and areas for improvement. Another way to provide meaningful feedback is to give your students opportunities to reflect on how well they understand a given lesson or topic and to set personal learning goals for the future. When you provide your students with meaningful feedback, you are helping them to understand the benefits of their effort and individual progress and how it relates to the learning process.

Suggested Link: What is a Growth Mindset for Learning in Math?


How to Engage Students in Math Lessons: Meaningful feedback helps to keep students on track. Photo by Centre for Ageing Better on Unsplash


5.) Make Math Relevant

The final strategy for engaging your math students is to focus attention on how math is relevant to the real world and your students’ personal lives. When students understand how mathematics plays a role in nearly every aspect of life in some shape or form, they are much more likely to appreciate the subject and its usefulness. One way to make math relevant to your students is to incorporate real-world problems into your lessons. For example, you can combine math and finances when teaching a lesson on calculating percent increase or decrease. Another example is to share how being able to create and read data charts and graphs applies to a variety of fields including medical research, engineering, and technology.
Suggested Link: What is STEAM Education and Why is it Important?


How to Engage Students in Math Lessons: Math is all around us and it’s important for your students to understand its relevance to real life. Photo by ThisisEngineering on Unsplash


Not all math lessons are created equally. If you want to boost student participation, progress, and interest in learning, then you need to design lesson plans that are engaging and relevant to students. There are several strategies that you can use to make your math lessons more engaging for students, including:

  • Using Real-Life Examples

  • Incorporating Technology

  • Encouraging Collaboration

  • Providing Meaningful Feedback

  • Making Math Relevant

When your students are engaged and vested in learning math, they are more likely to stick with the subject as they move onto high grade levels and they will also have more career opportunities down the road.

More Free Resources You Will Love:


Where is the Bermuda Triangle?—Bermuda Triangle Map

Where is the Bermuda Triangle?—Bermuda Triangle Map

Bermuda Triangle Map—Where is the Bermuda Triangle?

Where is the Bermuda Triangle? New Detailed Bermuda Triangle Map Defines its Exact Location Using Google Maps


Where is the Bermuda Triangle located on Google Maps? (click to enlarge)


The Bermuda Triangle, also known as the Devil's Triangle, is a geographic region in the western part of the North Atlantic Ocean where many planes and ships have disappeared under mysterious circumstances.

Creating an accurate Bermuda Triangle map can be difficult because there are actually no fixed coordinates for the vertices of the Bermuda Triangle, since the region itself is not an officially recognized area, and its boundaries are not particularly well-defined.

Where is the Bermuda Triangle located on Google Maps? While the Bermuda Triangle is not an officially recognized area, it is possible to display the Bermuda Triangle on a map since its boundaries are generally considered to be between Miami, Bermuda, and Puerto Rico (each location being one of the three points of the triangle)

While the Bermuda Triangle map above (and the alternate version below) is generally considered the most accurate representation of a map of Bermuda Triangle, some sources actually consider the Triangle to extend as far north as Massachusetts and as far south as the Caribbean. However, these sources are in the minority, as the majority of accounts of ships or planes mysteriously going missing are within the boundaries of the Bermuda Triangle contained by Miami, Puerto Rico, and the island of Bermuda.


Bermuda Triangle Map: The boundaries of the Bermuda Triangle are generally considered to be between Miami, Bermuda, and Puerto Rico.


How Much Area is Occupied by the Bermuda Triangle on a Map?

Since the region that makes up the Bermuda Triangle is not well-defined, its geographic area can only be estimated. Generally speaking, it is said to cover an area of approximately 500,000 to 1.5 million square miles (or about 1.3 to 3.9 million square kilometers) of open ocean.

Despite the many claims of ships and planes mysteriously going missing within this triangular region, the scientific evidence supporting the idea that the Bermuda Triangle is supremely dangerous is lacking. In fact, most evidence suggests that the Triangle is really no more dangerous than any other part of the ocean. But the idea that the Bermuda Triangle is a relatively safe region for sea and air travel has not always been a popular belief, which is why the modern day map of the Bermuda Triangle is a product of several iterations made over the past several decades.


If there is no scientific evidence to suggest that the Triangle is dangerous compared to other areas of the ocean, then why have governments and militaries been so interested in accurately showing the Bermuda Triangle on a map?


Bermuda Triangle on a Map: History

If you were to search for the Bermuda Triangle on a map today, you would find that it is roughly bounded by Miami, Bermuda, and Puerto Rico. On a map, you can draw three lines connecting these three points to form the “Bermuda Triangle.” Within this triangular region is where the majority of incidents of missing ships and planes have been reported. However, the region known as the Bermuda Triangle is actually not officially recognized by any science, government, or military organization, and there is zero evidence to supporting the idea that the region is supernaturally dangerous.

Still, the Bermuda Triangle continues to be an area of interest and many maps of the region have been created over the years, each containing its own unique features. For example, some maps of the Bermuda Triangle plot the locations of any reported disappearances of ships or planes. Other maps try to highlight potential explanations for the phenomenon, such as atmospheric anomalies and unusual weather patterns.

One of the most famous maps of the Bermuda Triangle was created by Charles Berlitz in his 1974 book The Bermuda Triangle. Like the modern map, Berlitz’ version also has the vertices of the Bermuda Triangle at Puerto Rico, Bermuda, and Miami, Florida. His version includes red dots scatted around the region—each one representing a reported disappearance of a ship or airplane. However, from a modern lens, Berlitz’s map is not entirely accurate and it may include disappearances that are not actually verified or ones that did occur, but not inside of the Bermuda Triangle.


The 1974 book The Bermuda Triangle by Charles Berlitz. Image used as fair use to
illustrate article subject.


The U.S. Navy also created a Bermuda Triangle map in 1968. The Navy's depiction of the Bermuda Triangle is a region that is much smaller than typical maps, but with similar boundaries (the Navy also has the vertices of the Triangle being at Bermuda, Puerto Rico, and the southern tip of Florida). Interestingly, the Navy's Bermuda Triangle map includes a note saying that "the area is one of the most heavily traveled shipping lanes in the world, and commercial and pleasure craft routinely navigate through it without incident." This military version of the map stresses that the Bermuda Triangle is not an official region and or an area that is particularly dangerous.

There are also maps of the Bermuda Triangle that present potential explanations for the reported disappearances. One theory is that methane gas hydrates located beneath the ocean floor could be causing ships to sink by reducing the buoyancy of the water. Another theory suggests that unusual weather patterns or ocean currents in the area could be responsible for the incidents.


The US Navy began mapping the Bermuda Triangle in 1968. Photo by Abdullah Al Hasan on Unsplash


Whether the explanation as to why so many ships and planes have gone missing in the region known as the Bermuda Triangle is scientific or supernatural, the jury is still out. Either way, the region itself will always be a point of interest and fascination for many, which is why establishing the boundaries of the region on a Bermuda Triangle map is so important.

More Free Resources You Will Love:

Search Tags: where is the bermuda triangle, bermuda triangle map, bermuda triangle on a map, map of bermuda triangle, bermuda triangle on map, map bermuda triangle, map of the bermuda triangle, where is the bermuda triangle located on google maps, bermuda triangle location on map

How to Factorize a Cubic Polynomial

1 Comment

How to Factorize a Cubic Polynomial

How to Factorize a Cubic Polynomial

Step-by-Step Guide: How to Factor a Cubic Polynomial in 3 Easy Steps


Free Step-by-Step Guide: How to factor a polynomial with a specific number of terms


In algebra, a cubic polynomial is an expression made up of four terms that is of the form:

  • ax³ + bx² + cx + d

Where a, b, c, and d are constants, and x is a variable. Polynomials in this form are called cubic because the highest power of x in the function is 3 (or x cubed).

Unlike factoring trinomials, learning how to factorize a cubic polynomial can be particularly tricky because using any type of guess-and-check method is extremely difficult. However, you can easily learn how to factor a cubic polynomial by using the grouping method described in this guide.

This free Step-by-Step Guide on How to Factorize a Cubic Polynomial will cover the following key topics:

While learning how to factor cubic polynomials can be challenging at first, you can develop your skills pretty quickly just by working through practice problems step-by-step until you become more comfortable with factoring cubic polynomials. So, this guide was designed to teach you everything you need to know about how to factor a cubic polynomial. We recommend that you read through this guide from start to finish and work through each example by following along step-by-step. By the end, you will be able to quickly and accurately factorize a cubic polynomial.


Figure 01: How to Factorize a Cubic Polynomial


What is a cubic polynomial?

As previously mentioned, a cubic polynomial is a math expression that is of the form ax³ + bx² + cx + d, where a, b, c, and d are all constants and x is a variable, and typically has four terms. Note that x is not the only letter that can be used as a variable in a cubic polynomial. Also, the number in front of any variable is referred to as a coefficient.

Additionally, the terms of a cubic polynomial are the individual “pieces” of the expression, separated by an addition or subtraction sign.

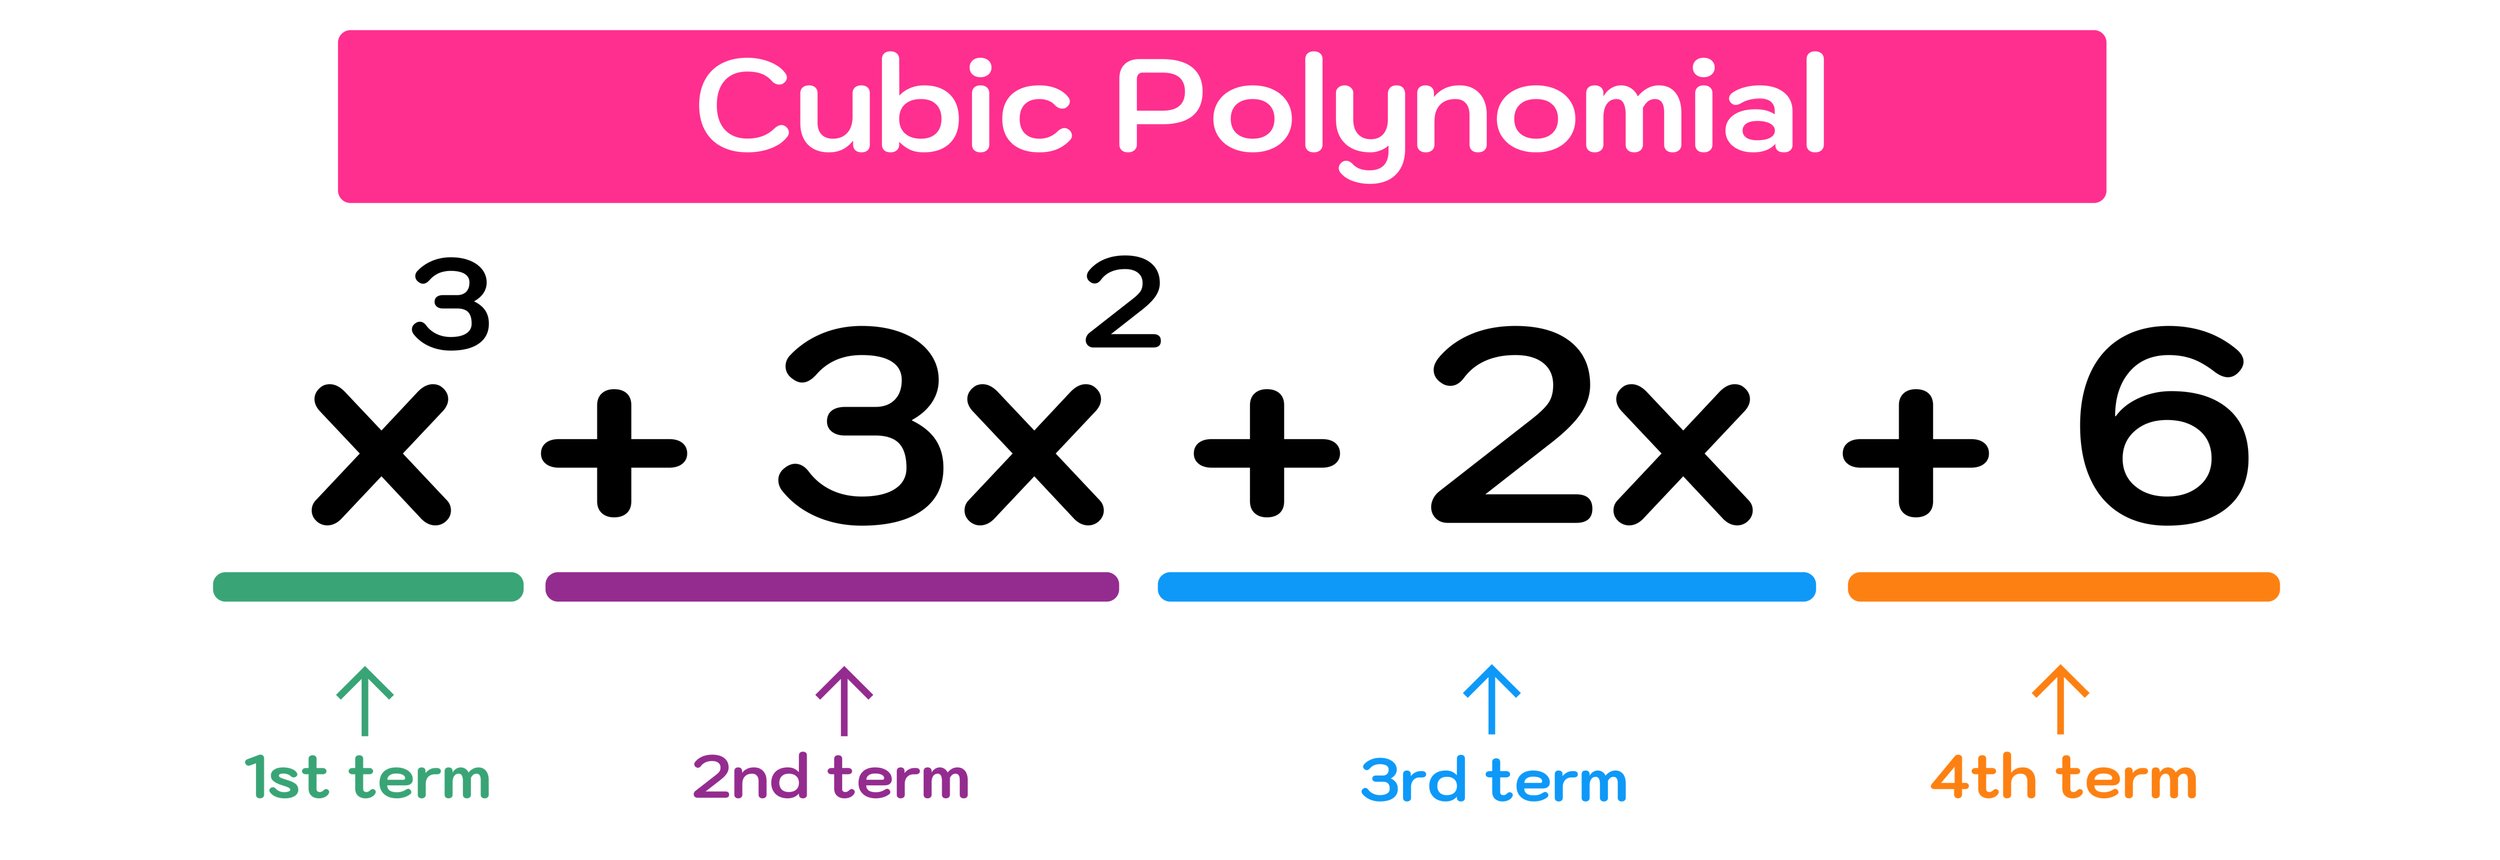
For example, the cubic polynomial in Figure 01 above, x³ + 3x² + 2x + 6 has four terms:

  • 1st Term:

  • 2nd Term: 3x²

  • 3rd Term: 2x

  • 4th term: 6

Before you can learn how to factor a cubic polynomial, it is extremely important that you know how to recognize that given polynomial is cubic, so make sure that you deeply understand what a cubic polynomial is before moving forward in this guide.


Figure 02: Factoring a Cubic Polynomial


What does it mean to factorize a cubic polynomial?

In math, the factors of any polynomial represent components or “building blocks” of the polynomial. Whenever you factor a polynomial (cubic or otherwise), you are finding simpler polynomials whose product equals the original polynomial. Each of these simpler polynomials is considered a factor of the original polynomial.

For example, the binomial x² - 100 has two factors (x + 10) and (x-10).

Why? Lets take a look at what happens when we find the product of the factors by double distributing:

  • (x+10)(x-10) = x² + 10x - 10x - 100 = x² + 0 - 100 = x² - 100

Notice that the result was the original polynomial, x² - 100.

Since cubic polynomials (four terms) are more complex than binomials (two terms), their factors will also be a little more complex, but the idea is still the same—factoring a cubic polynomial involves finding simpler polynomials or “building blocks” whose product is the original cubic polynomial.

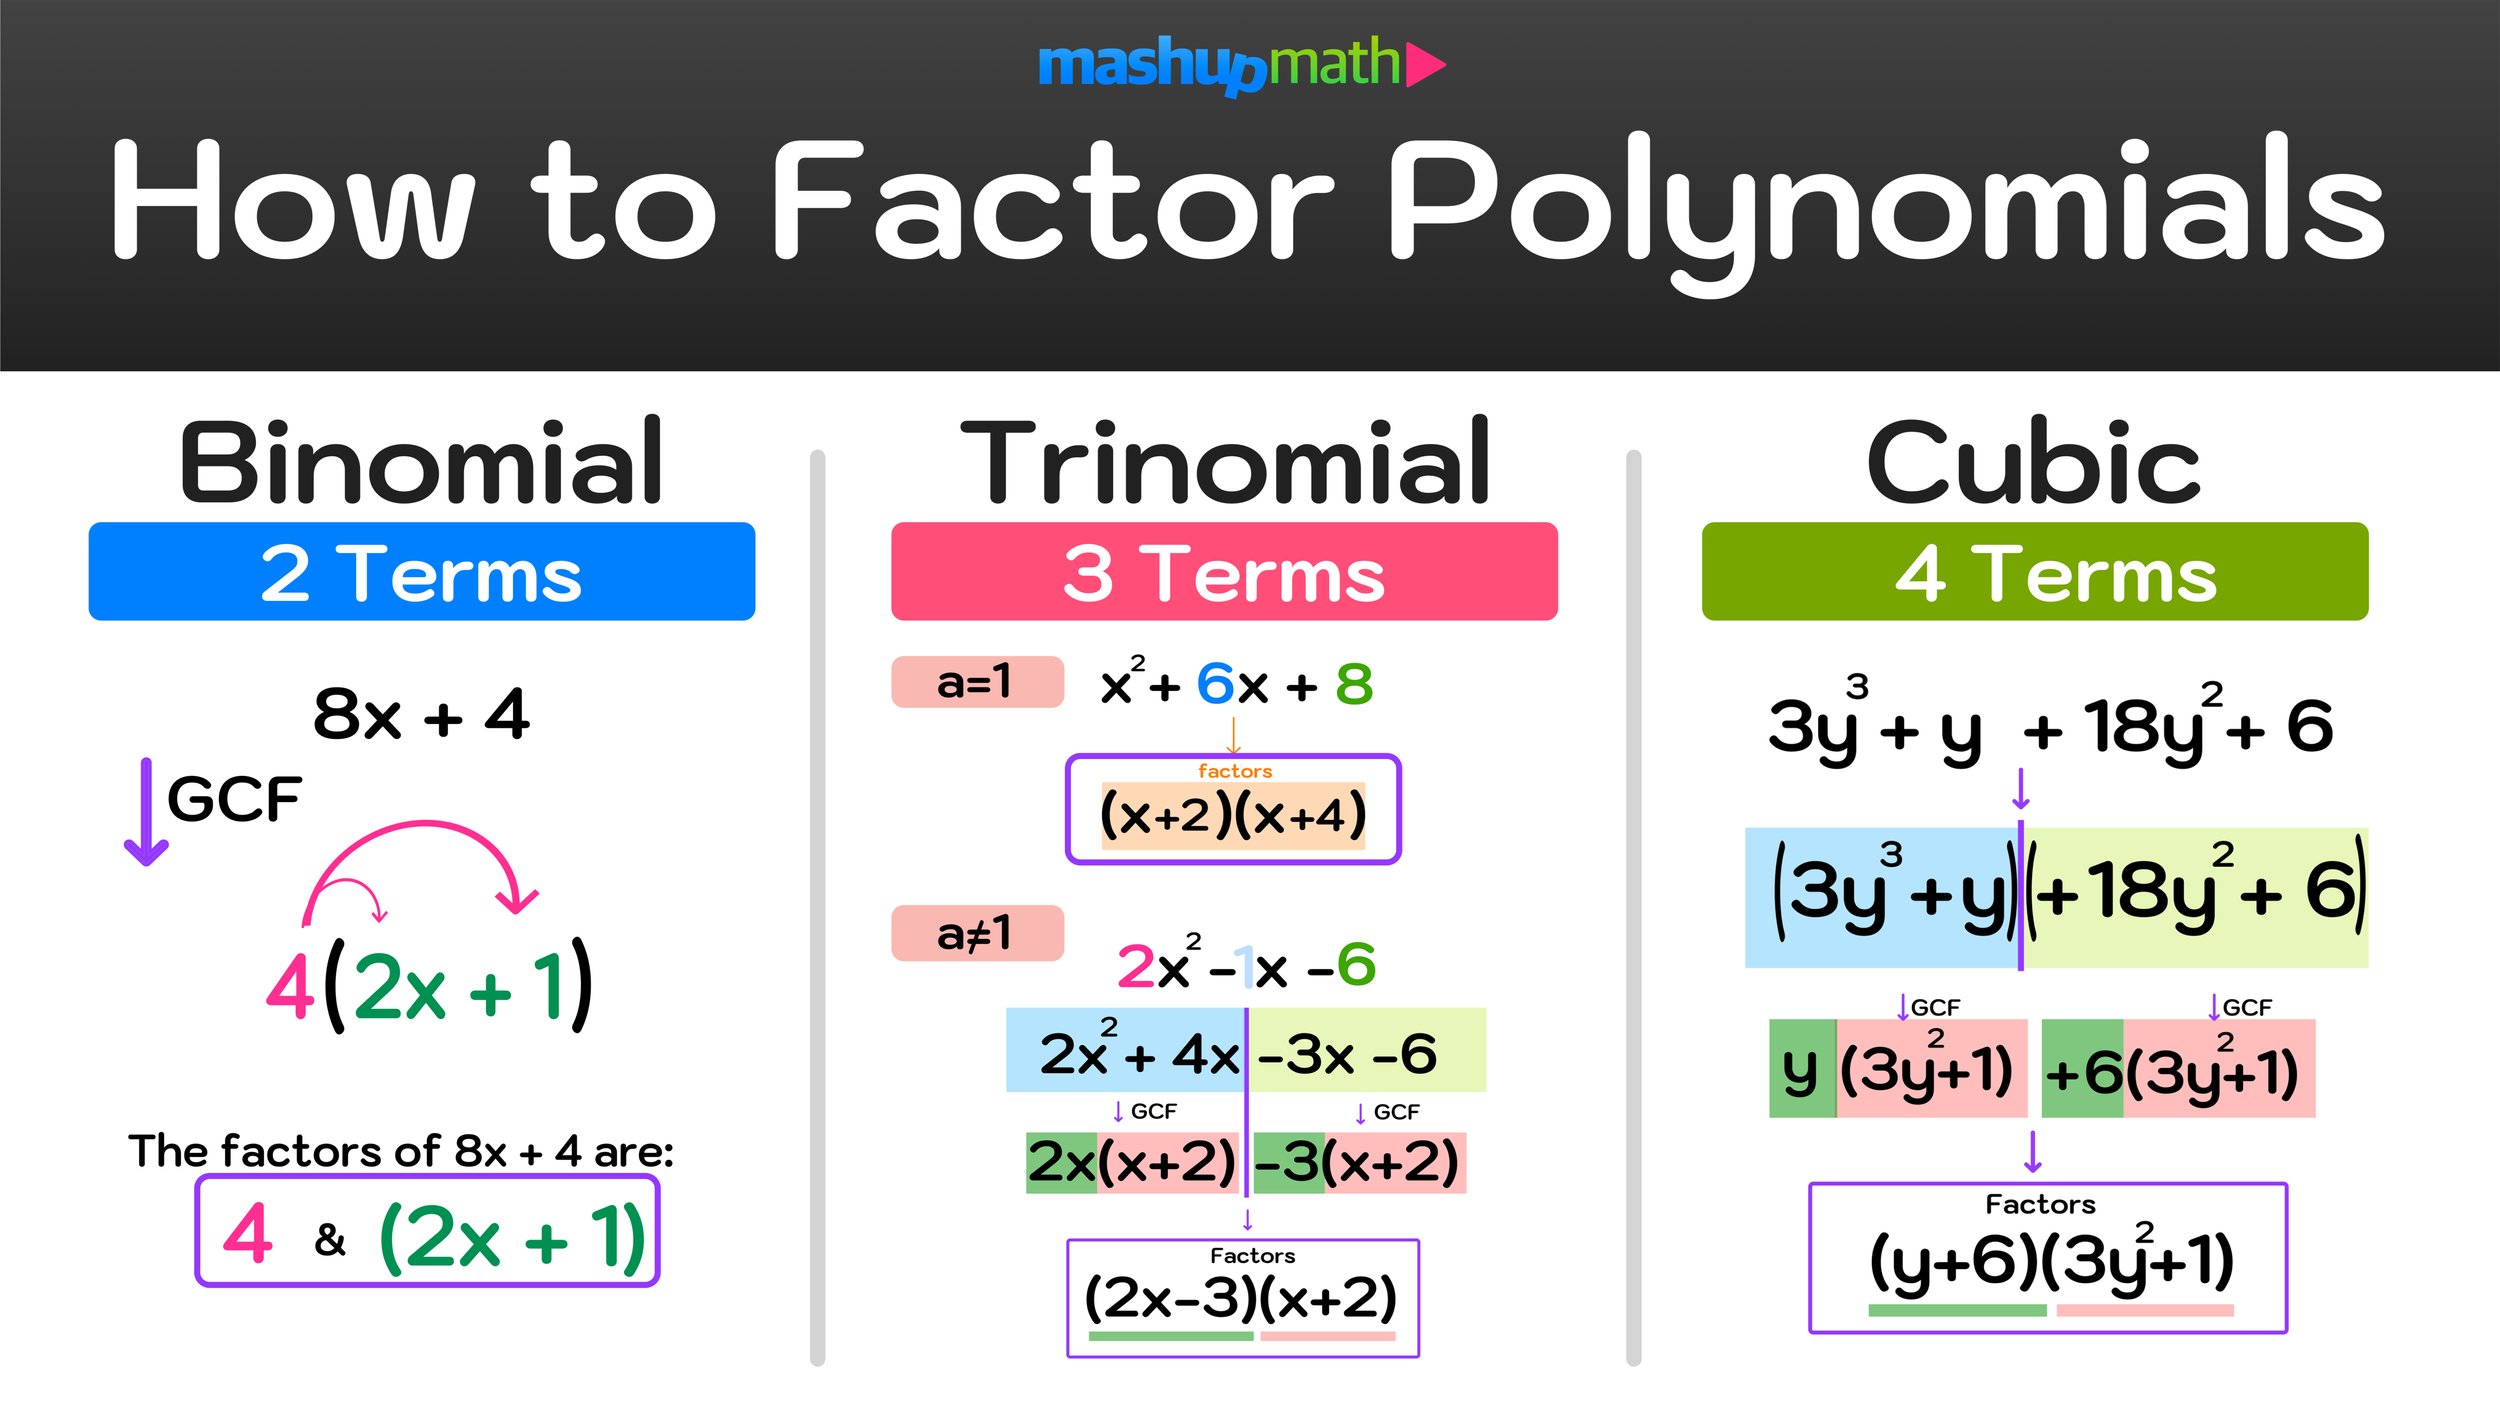
And, to factorize a cubic polynomial, we will be using a strategy called grouping that will allow you to factor any cubic polynomial (assuming that it is factorable at all) using 3 easy steps. So, lets go ahead and work three practice problems to give you some experience with factoring cubic polynomials by grouping.

Now that you understand the key terms and the difference between a polynomial with 2 terms, 3 terms, and 4 terms.

For factoring each type of polynomial, we will look at two methods: GCF, direct factoring, and, sometimes, a combination of the two.

Let’s get started!


How to a Factorize a Cubic Polynomial Examples

Now, you will learn how to use the follow three steps to factor a cubic polynomial by grouping:

Step One: Split the cubic polynomial into two groups of binomials.

Step Two: Factor each binomial by pulling out a GCF

Step Three: Identify the factors

As long as you follow these three steps, you can easily factor a given polynomial, though note that not all cubic polynomials are factorable."

We will start by factoring the cubic polynomial shown in Figure 01: x³ + 3x² + 2x + 6

Example #1: Factor x³ + 3x² + 2x + 6


Figure 03: We have to find the factors of x³ + 3x² + 2x + 6


To factorize this cubic polynomial, we will be applying the previously mentioned 3-step method as follows:

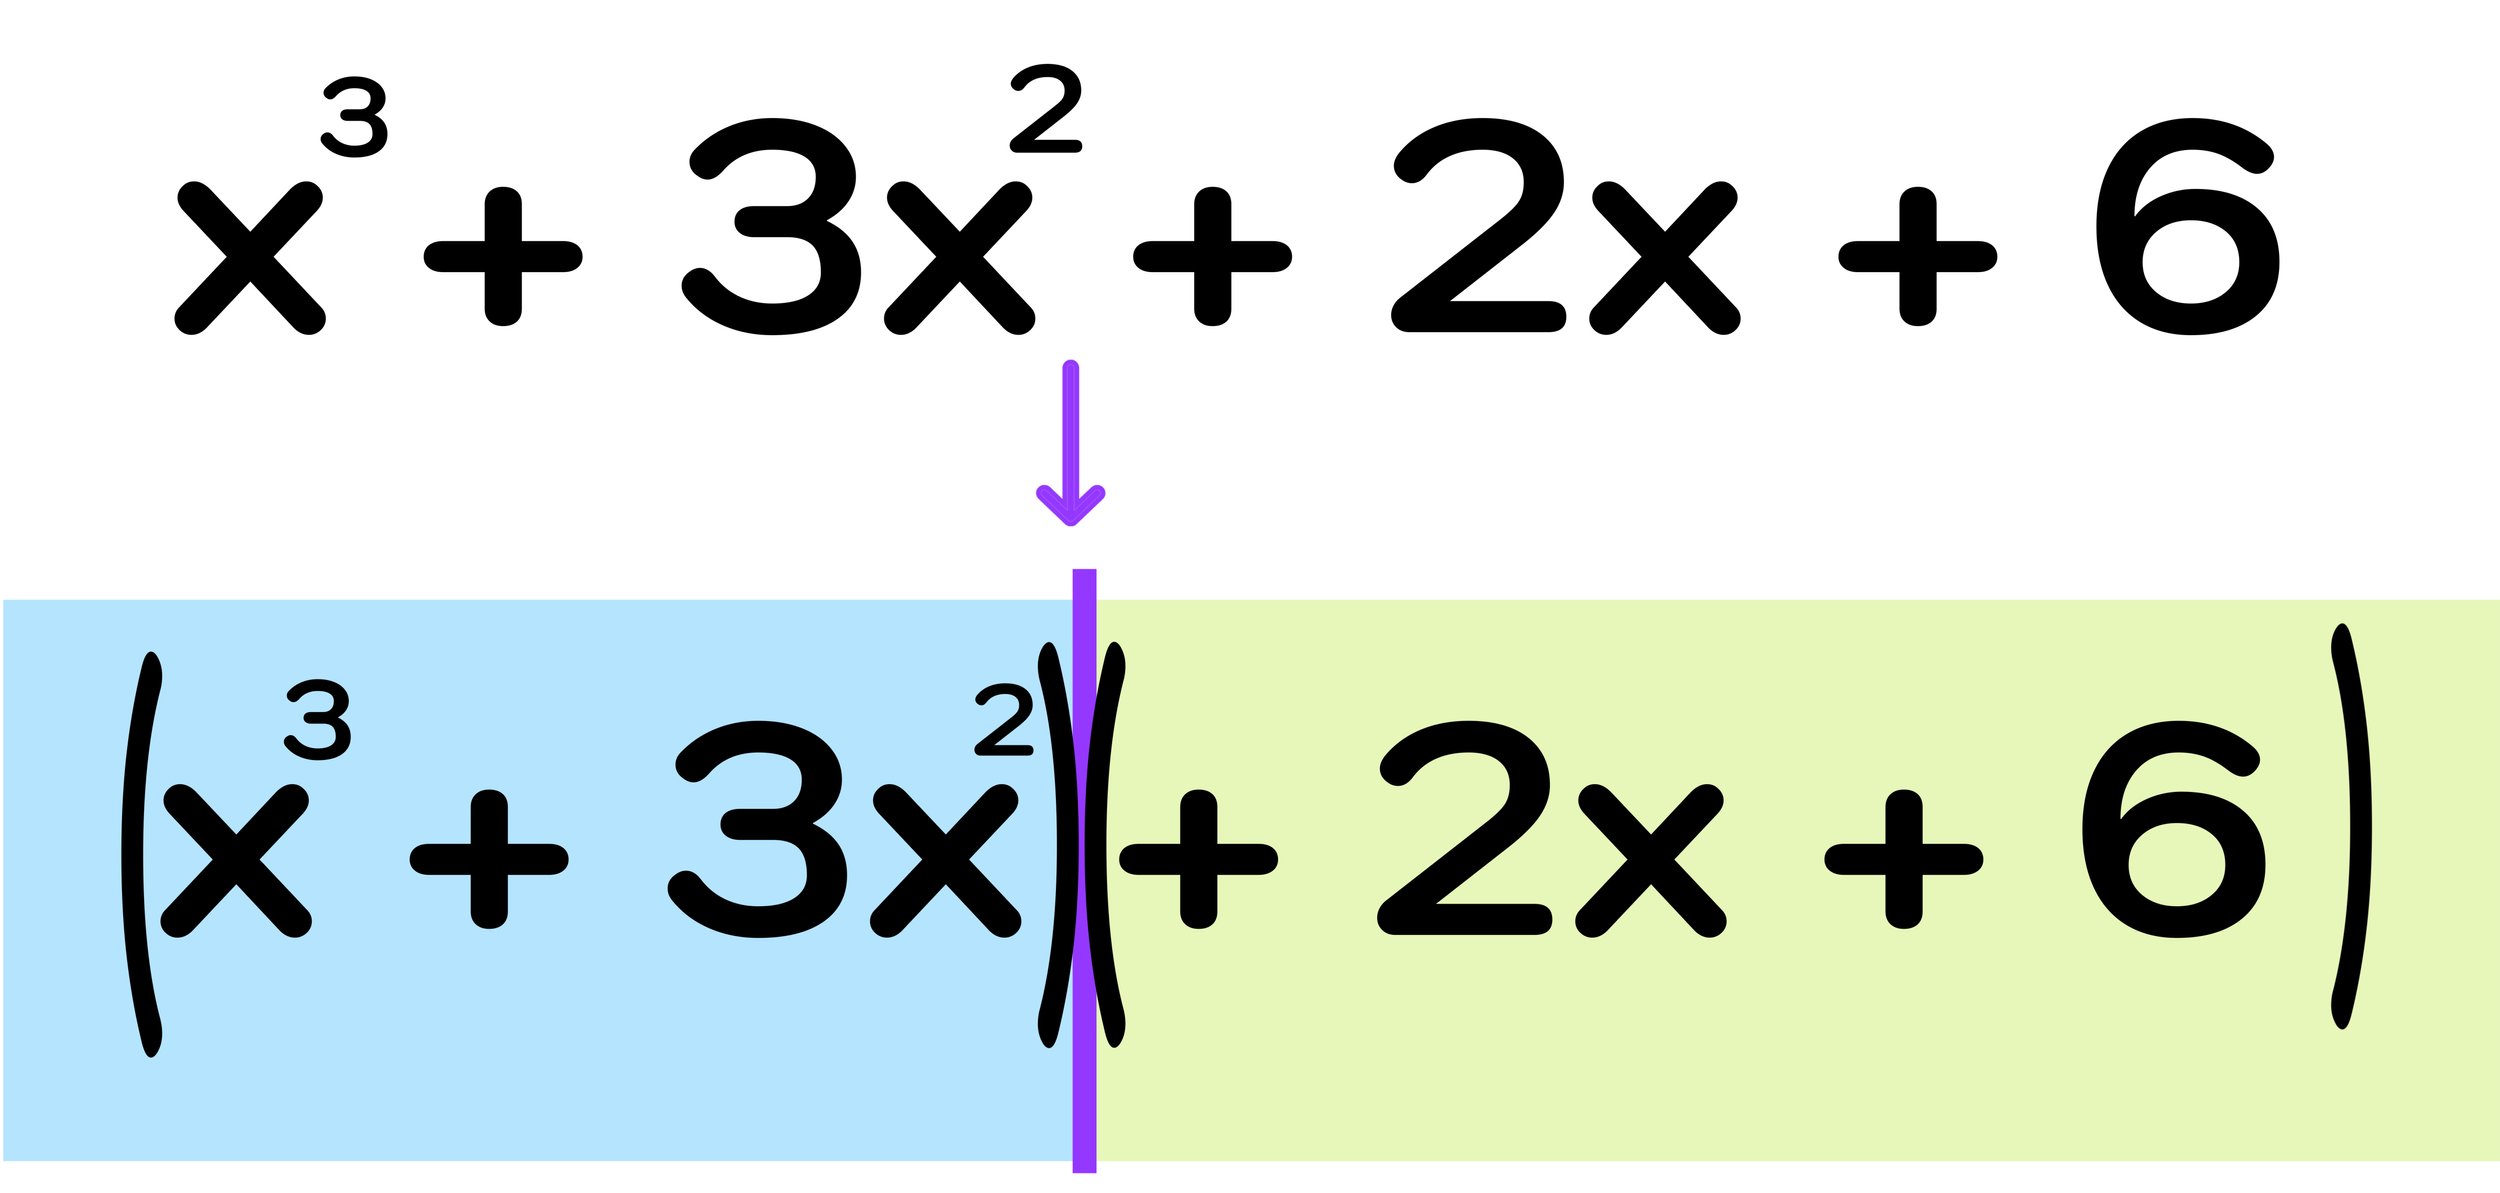
Step One: Split the cubic polynomial into groups of two binomials.

To factor this cubic polynomial, we will be using the grouping method, where the first step is to split the cubic polynomial in half into two groups.


Figure 04: The first step to factoring a cubic polynomial is to split it into groups of two binomials.


For Example #1, at the end of the first step, you have split the cubic binomial down the middle to form two groups of binomials:

  • (x³ + 3x²)

  • (2x + 6)

Why are you splitting the cubic polynomial like this? Notice that it is not possible to pull a Greatest Common Factor (GCF) out of the original cubic polynomial x³ + 3x² + 2x + 6. The goal of the first step is to create two separate binomials, each with a GCF that can be “pulled out.”


Figure 05: Make sure that each individual binomial has a GCF before moving onto the next step.


Step Two: Factor each binomial by pulling out a GCF

Again, the purpose of the first step is to split the cubic polynomial into two binomials, each with a GCF. Before moving forward, ensure that each individual binomial has a GCF; otherwise, you may need to swap the positions of the middle terms (3x² and 2x). Swapping these middle terms is not required for this first example; however, we will work through an example later on where this is required.

Now, for step two, you can divide the GCF out of each grouping as follows:

  • (x³ + 3x²)→ x²(x +3)

  • (2x + 6) → 2(x + 3)

This process of pulling the GCF out of each binomial is illustrated in Figure 05 below.


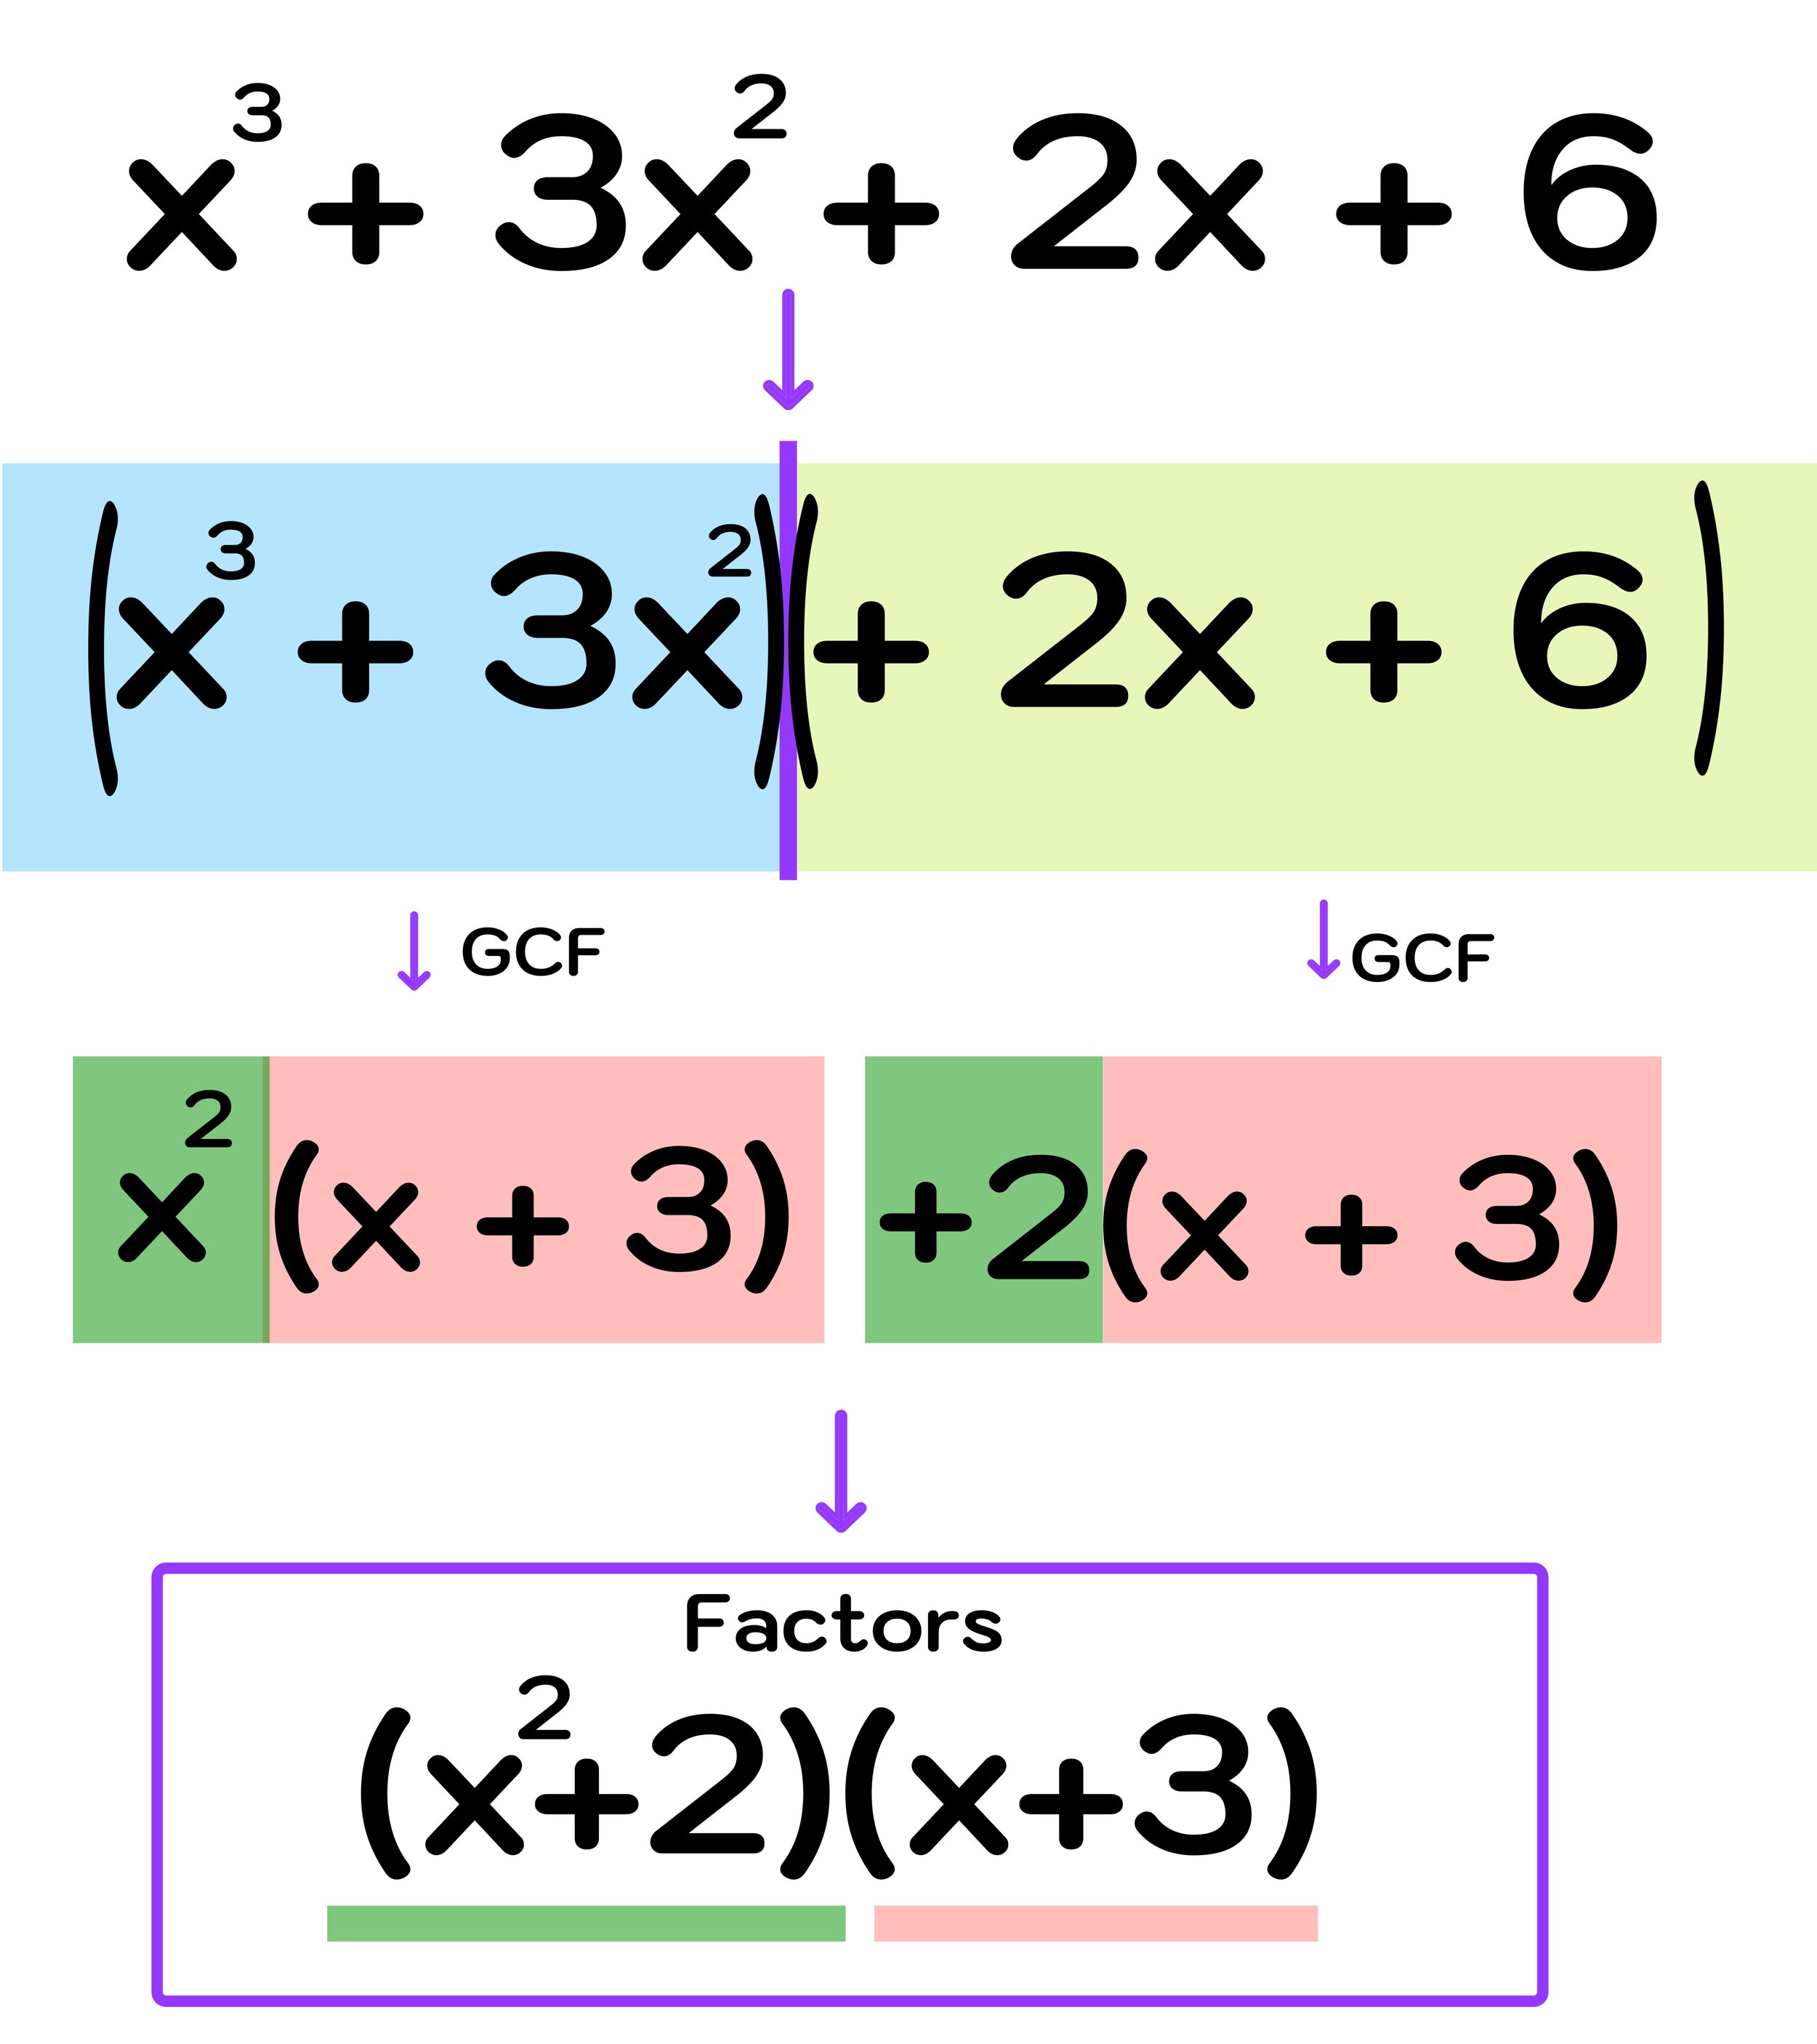
Figure 06: To factorize a cubic function, split it into two groups and then pull a GCF out of each group.


Step Three: Identify the factors

After completing the second step, you are left with:

  • x²(x +3) + 2(x+3)

Notice that both groups share a common term, which, in this case, is (x+3). This result is expected and is a signal that you are factoring the cubic polynomial correctly. If the groups do not share a common terms, then it is likely that the cubic polynomial is not factorable or that you made a mistake pulling out the GCF.

However, since you factored each group and ended up with a common factor of (x+3), you can move on to determining the factors of the cubic polynomial.

The illustration in Figure 06 above color-codes how you use the results from step two to determine the factors of the cubic polynomial.

You already know that one of the factors is (x+3). To find the other factor, you can simply take the two “outside” terms, in this case, x² and +2.

  • (x +3) + 2(x+3) → (x²+2)(x+3)

Final Answer: The factors of x³ + 3x² + 2x + 6 are (x²+2) and (x+3)

The entire 3-step method that we just used to factor a cubic polynomial by grouping is shown in Figure 07 below:


Figure 07: How to factorize a cubic polynomials step-by-step


How can you check if your factors are actually correct? You can perform double distribution to multiply the binomials together to see if the result is indeed the cubic polynomial that you started with. If it is, then you know that you have factorized correctly.

You can see in Figure 08 below that multiplying the factors together does indeed result in the original cubic polynomial, so you know that your factors are correct:

  • (x²+2)(x+3) = x³ + 3x² + 2x + 6


Figure 08: Check your answer using double distribution


Now, lets go ahead and work through another example of how to factor a cubic polynomial.


Example #2: Factor 2x³ - 3x² + 18x - 27

Just like in the first example problem, you can use the 3-steps for factoring a cubic polynomial by grouping as follows:


Figure 09: Find the factors of the cubic polynomial 2x³ - 3x² + 18x - 27


Step One: Split the cubic polynomial into groups of two binomials.

After splitting this cubic polynomial, you end up with these two groups: (2x³ - 3x²) and (18x-27)


Figure 10: Step One: Split the cubic polynomial into two groups


Step Two: Factor each binomial by pulling out a GCF

Next, divide a GCF out of each group (if possible) as follows:

  • (2x³ - 3x²) → x²(2x - 3)

  • (18x - 27) → 9(2x - 3)

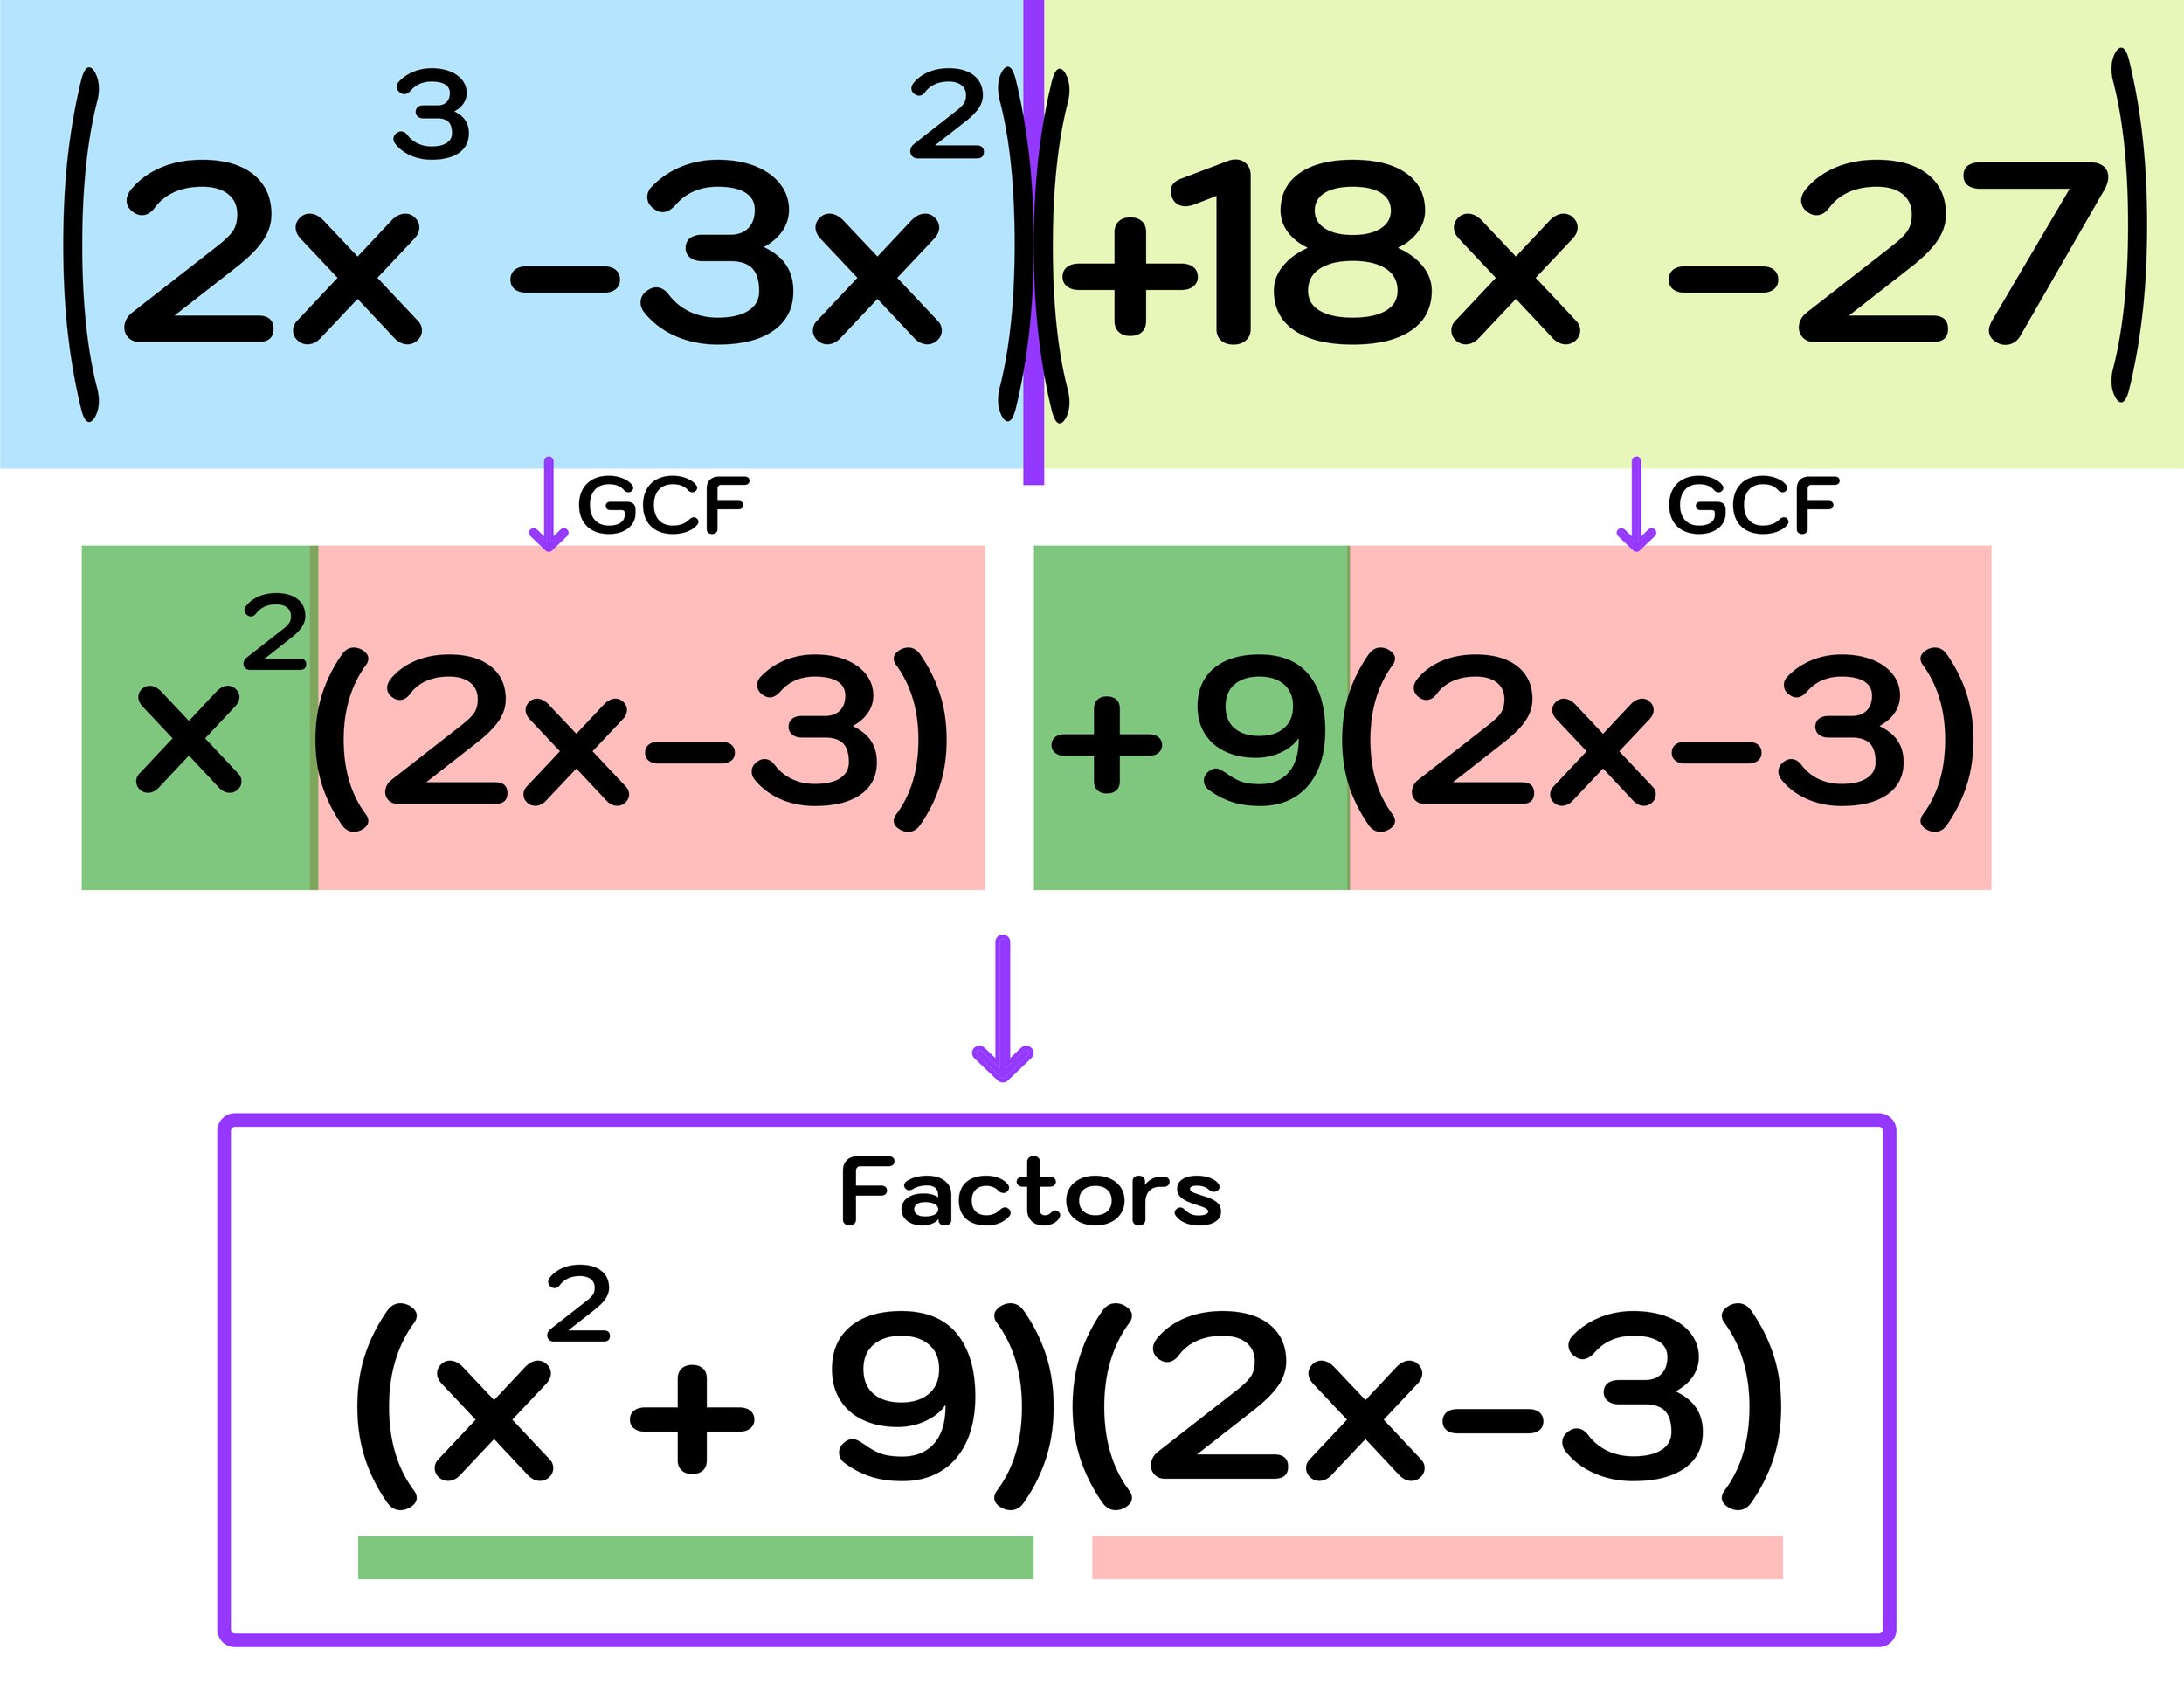
This process of pulling a GCF out of each group is illustrated in Figure 11 below:


Figure 11: Factorize a cubic polynomial


Step Three: Identify the factors

Since both factors have a common term, (2x-3), you know that you have likely factored correctly and you can move onto identifying the factors.

Final Answer: (x²+9) and (2x-3) are the factors of the cubic polynomial 2x³ - 3x² + 18x - 27.

All of the steps for solving Example #2 are illustrated in Figure 12 below.


Figure 12: The factors are (x²+9) and (2x-3)


Just like the last example, you can check to see if your final answer is correct by multiplying the factors together and seeing if the result equals the original cubic polynomial.

Example #3: Factor 3y³ + 18y² + y + 6

Finally, lets work through one more example where you have to factorize a cubic polynomial.

Step One: Split the cubic polynomial into groups of two binomials.

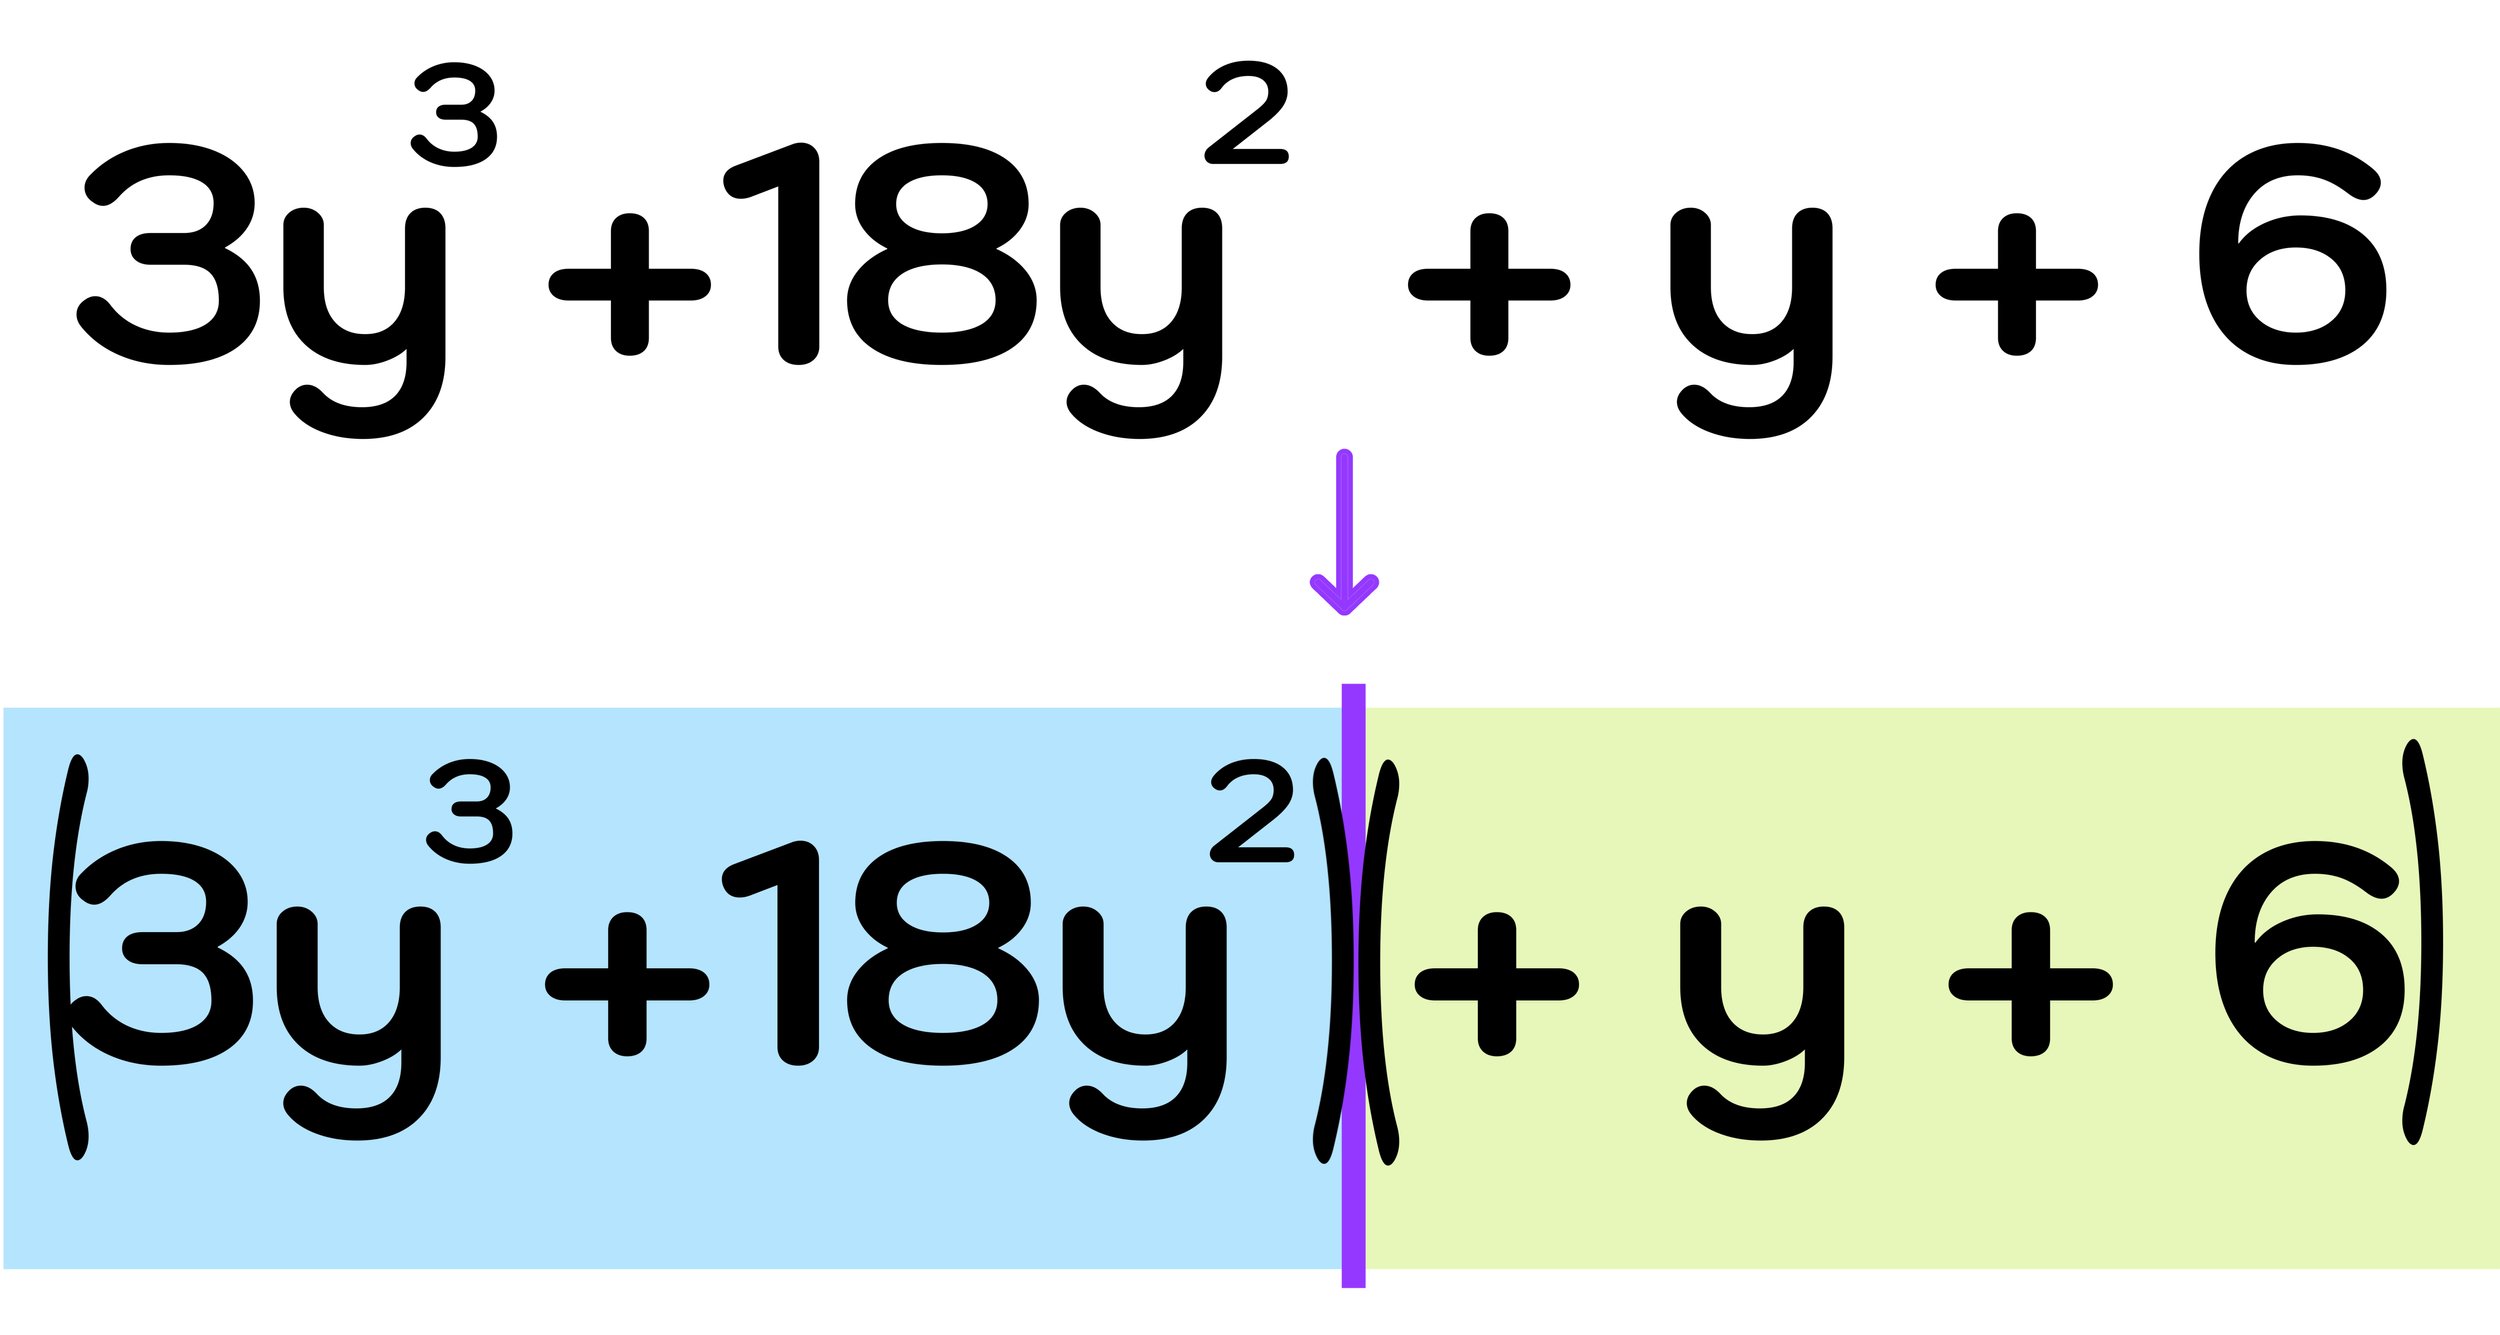
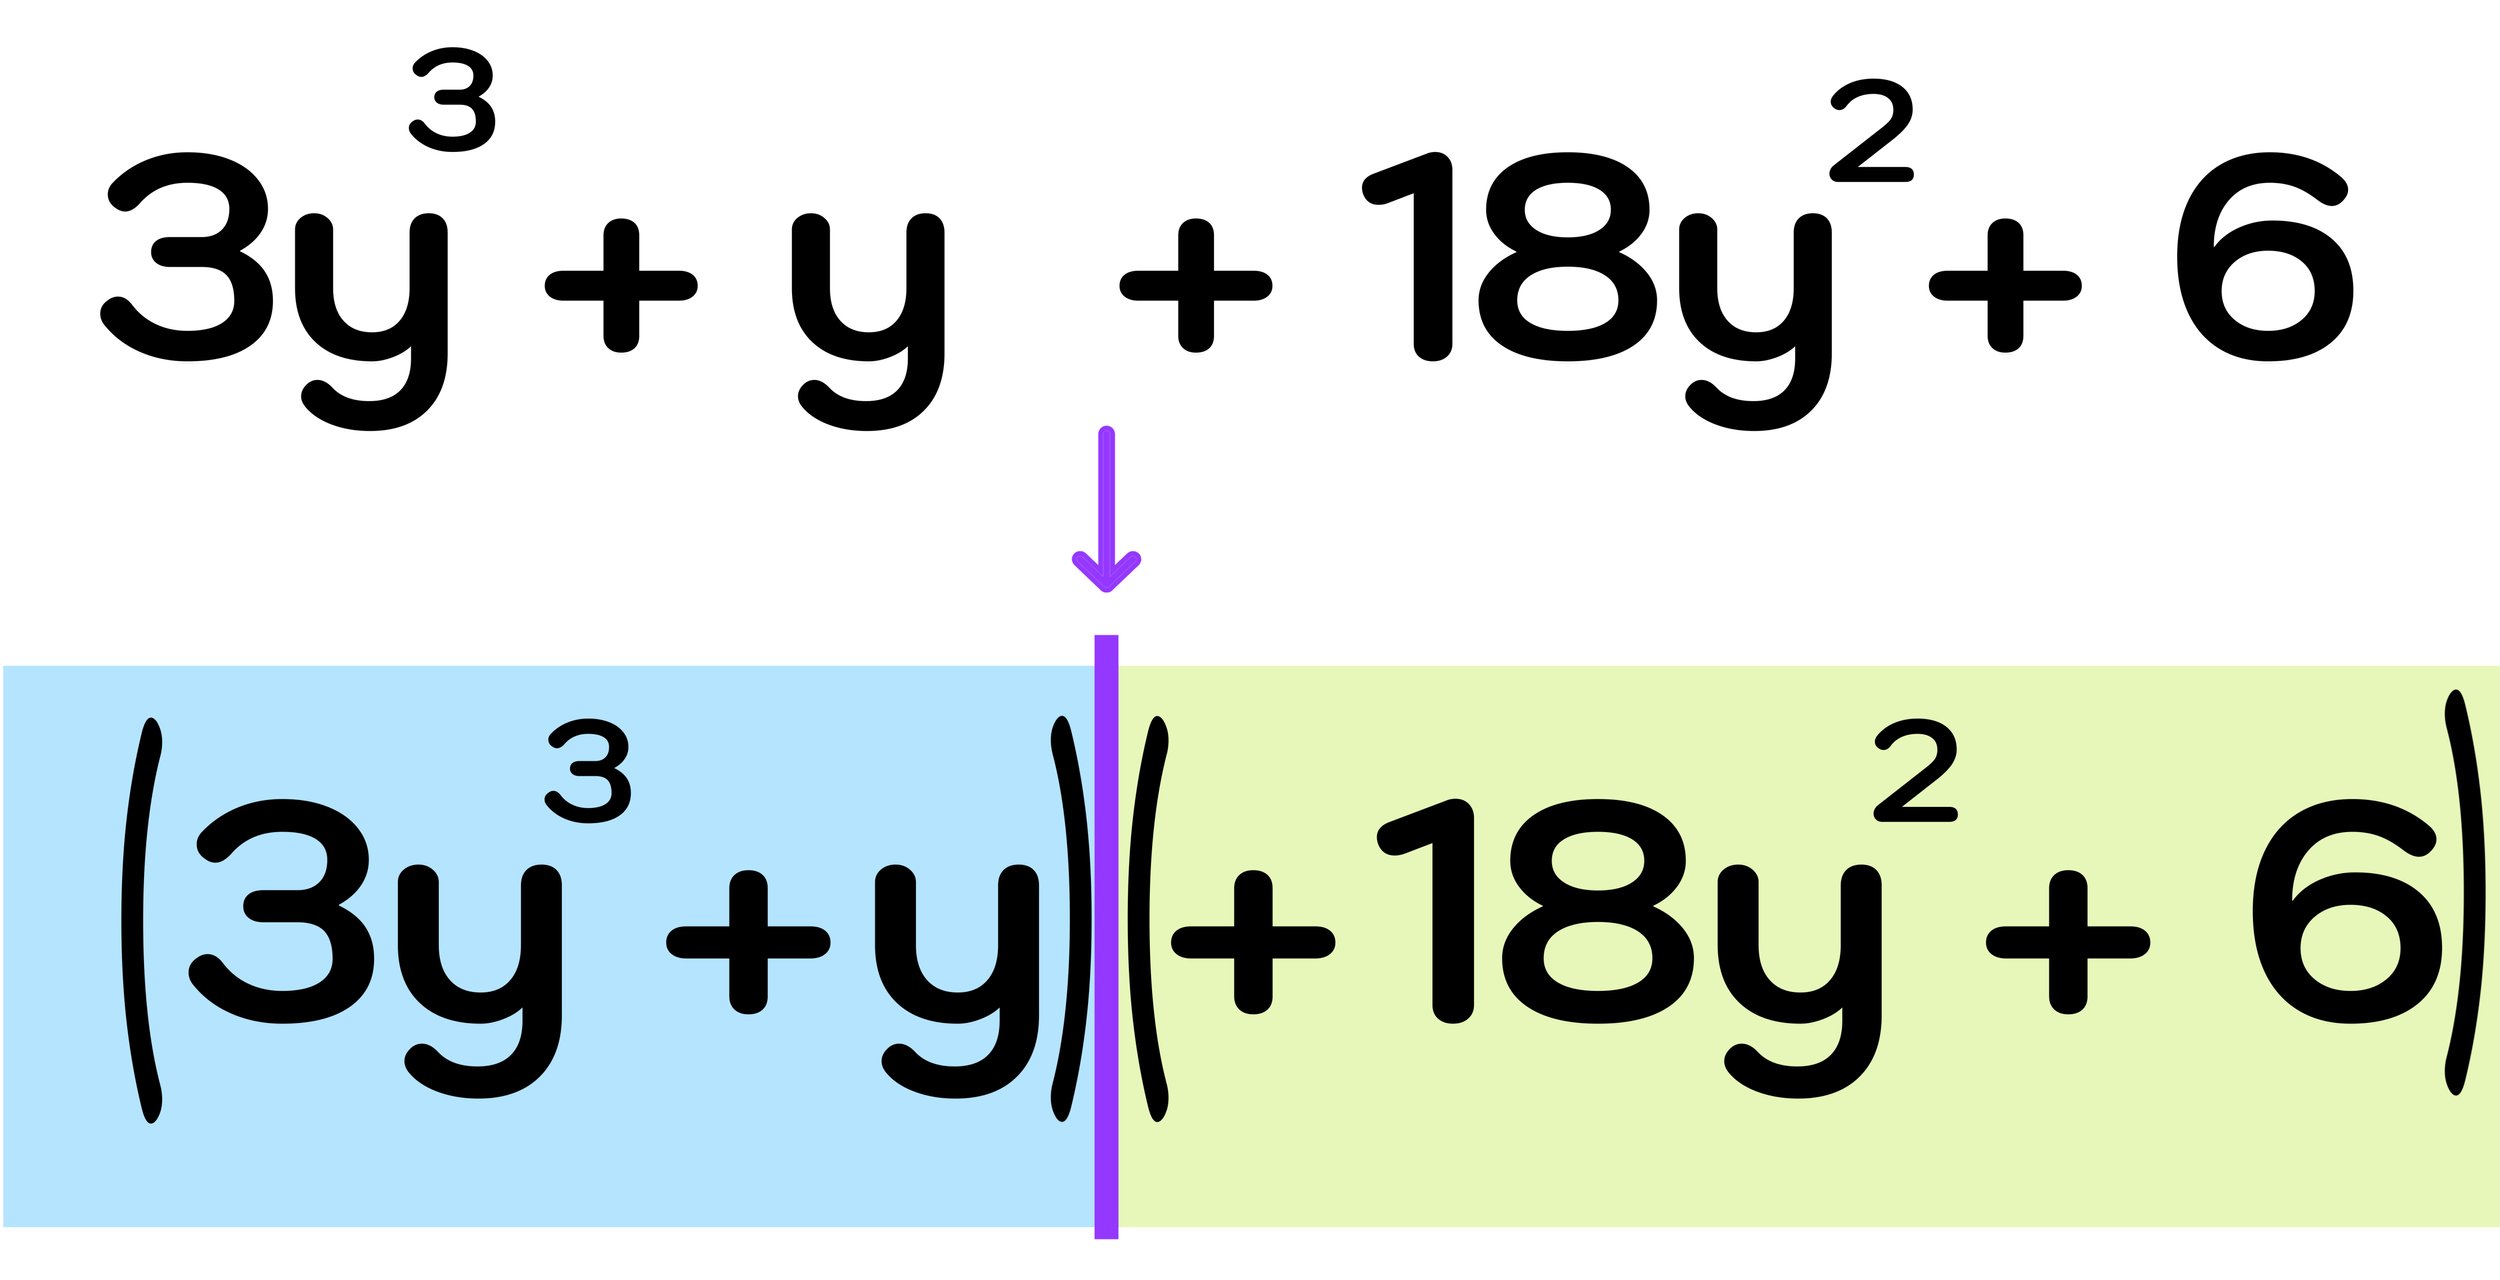
Again, the first step is to split the cubic polynomial down the middle into two binomials as shown in Figure 13 below.


Figure 13: Factoring a cubic polynomial by grouping.


As shown in Figure 13 above, splitting the polynomial down the middle leaves you with these two groups: (3y³ +18y²) and (y+6)

Remember that the whole point of splitting the cubic polynomial is to create two binomials that each have a GCF. But notice that the second binomial, (y+6), is not factorable because there is no GCF between +y and +6.

But, as previously mentioned, this doesn’t mean that you can not solve this problem further. In fact, the commutative property of addition allows you to swap the positions of the two middle terms (18y² and +y).

This extra step of swapping the two middle terms is illustrated in Figure 14 below.


Figure 14: Sometimes you have to swap the positions of the middle terms in order to factorize a cubic polynomial.


After swapping the positions of the middle terms, you can now apply the 3-step method to factoring the equivalent polynomial: 3y³ + y + 18y² + 6 (this new cubic polynomial is equivalent to the original because the commutative property of addition allows you to rearrange the terms without changing the value of the expression).

Now, you actually can split the new cubic polynomial into groups that can be factoring by dividing out a GCF: (3y³ + y) and (18y² + 6)


Figure 15: After swapping the positions of the middle terms, you can continue on with factoring the cubic polynomial.


Step Two: Factor each binomial by pulling out a GCF

As shown in Figure 15 above, you can factor each group by pulling out a GCF as follows:

  • (3y³ + y) → y(3y² + 1)

  • (18y² + 6) → 6(3y² + 1)

Step Three: Identify the factors

Finally, you can conclude that:

Final Answer: The factors are (y+6) and (3y² + 1)

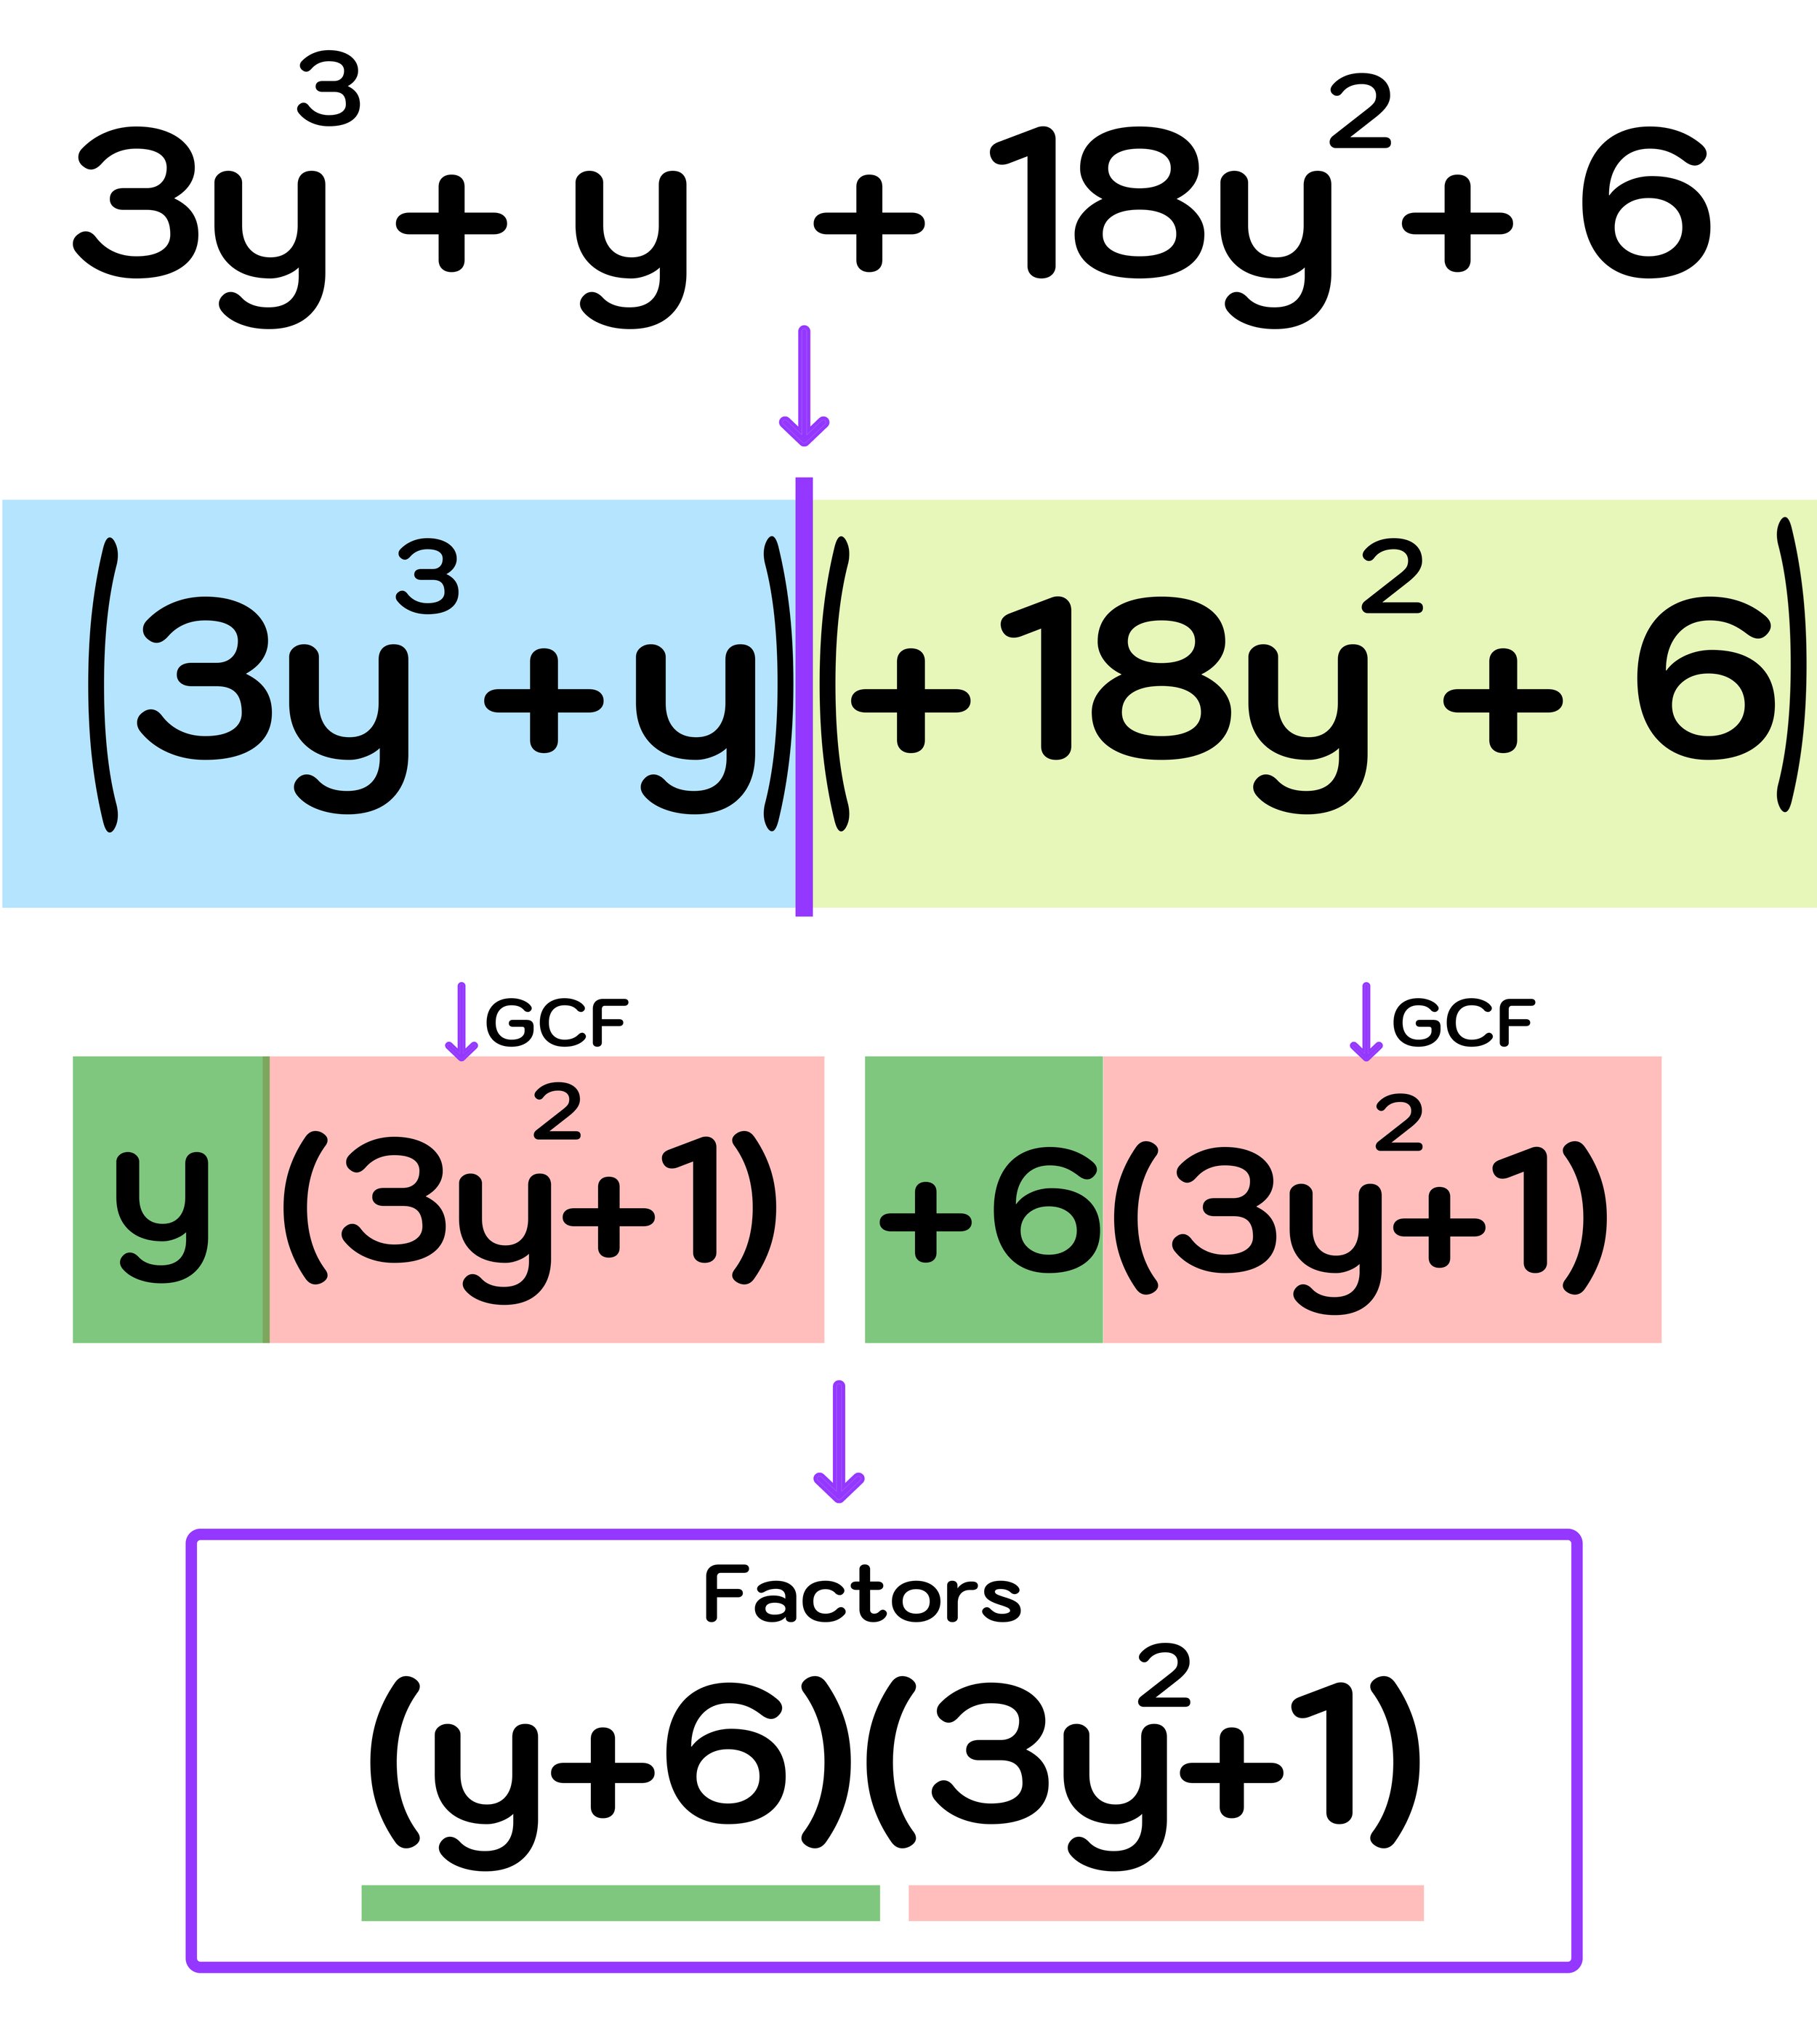
The step-by-step process to solving this 3rd example are shown in Figure 16 below. Again, you can make sure that your final answer is correct by multiplying the factors together and verifying that their product is equivalent to the original cubic polynomial.


Figure 16: How to factorize a cubic polynomial when you have to swap the middle terms.


How to Factorize a Cubic Polynomial: Conclusion

It is beneficial to understand how to factorize a cubic polynomial because the skill will allow you to simplify and understand the behavior of cubic functions as you continue onto higher levels of algebra and begin to explore topics like finding roots, analyzing graphs, and solving cubic equations.

Factoring cubic functions can be challenging, but you can always use the following 3-step grouping method described in this guide to successfully factor a cubic polynomial (assuming that it is factorable in the first place):

Step One: Split the cubic polynomial into groups of two binomials.

Step Two: Factor each binomial by pulling out a GCF

Step Three: Identify the factors

Keep Learning:


1 Comment