Combining Like Terms Explained—Examples, Worksheet Included

Comment

Combining Like Terms Explained—Examples, Worksheet Included

Combining Like Terms Explained

How to Combine Like Terms Quickly and Easily (Worksheet Included)


Free Step-by-Step Guide: Combining Like Terms


Combining like terms is an important math skill that involves simplifying an expression by combining terms that have the same variables and/or exponents. You combine like terms when you want to make an expression simpler and easier to read and solve.

This free Step-by-Step Guide to Combining Like Terms will walk you through how to quickly and easily combine like terms and it includes examples and a free practice worksheet. This guide will cover the following topics:

Before we dive into how to combine like terms, lets do a quick review of some important math vocabulary related to combining like terms (this quick recap will help you to better understand the examples in this guide).

What are Terms in Math?

In math, a term is one single number or algebraic expression that is part of a larger expression or equation.

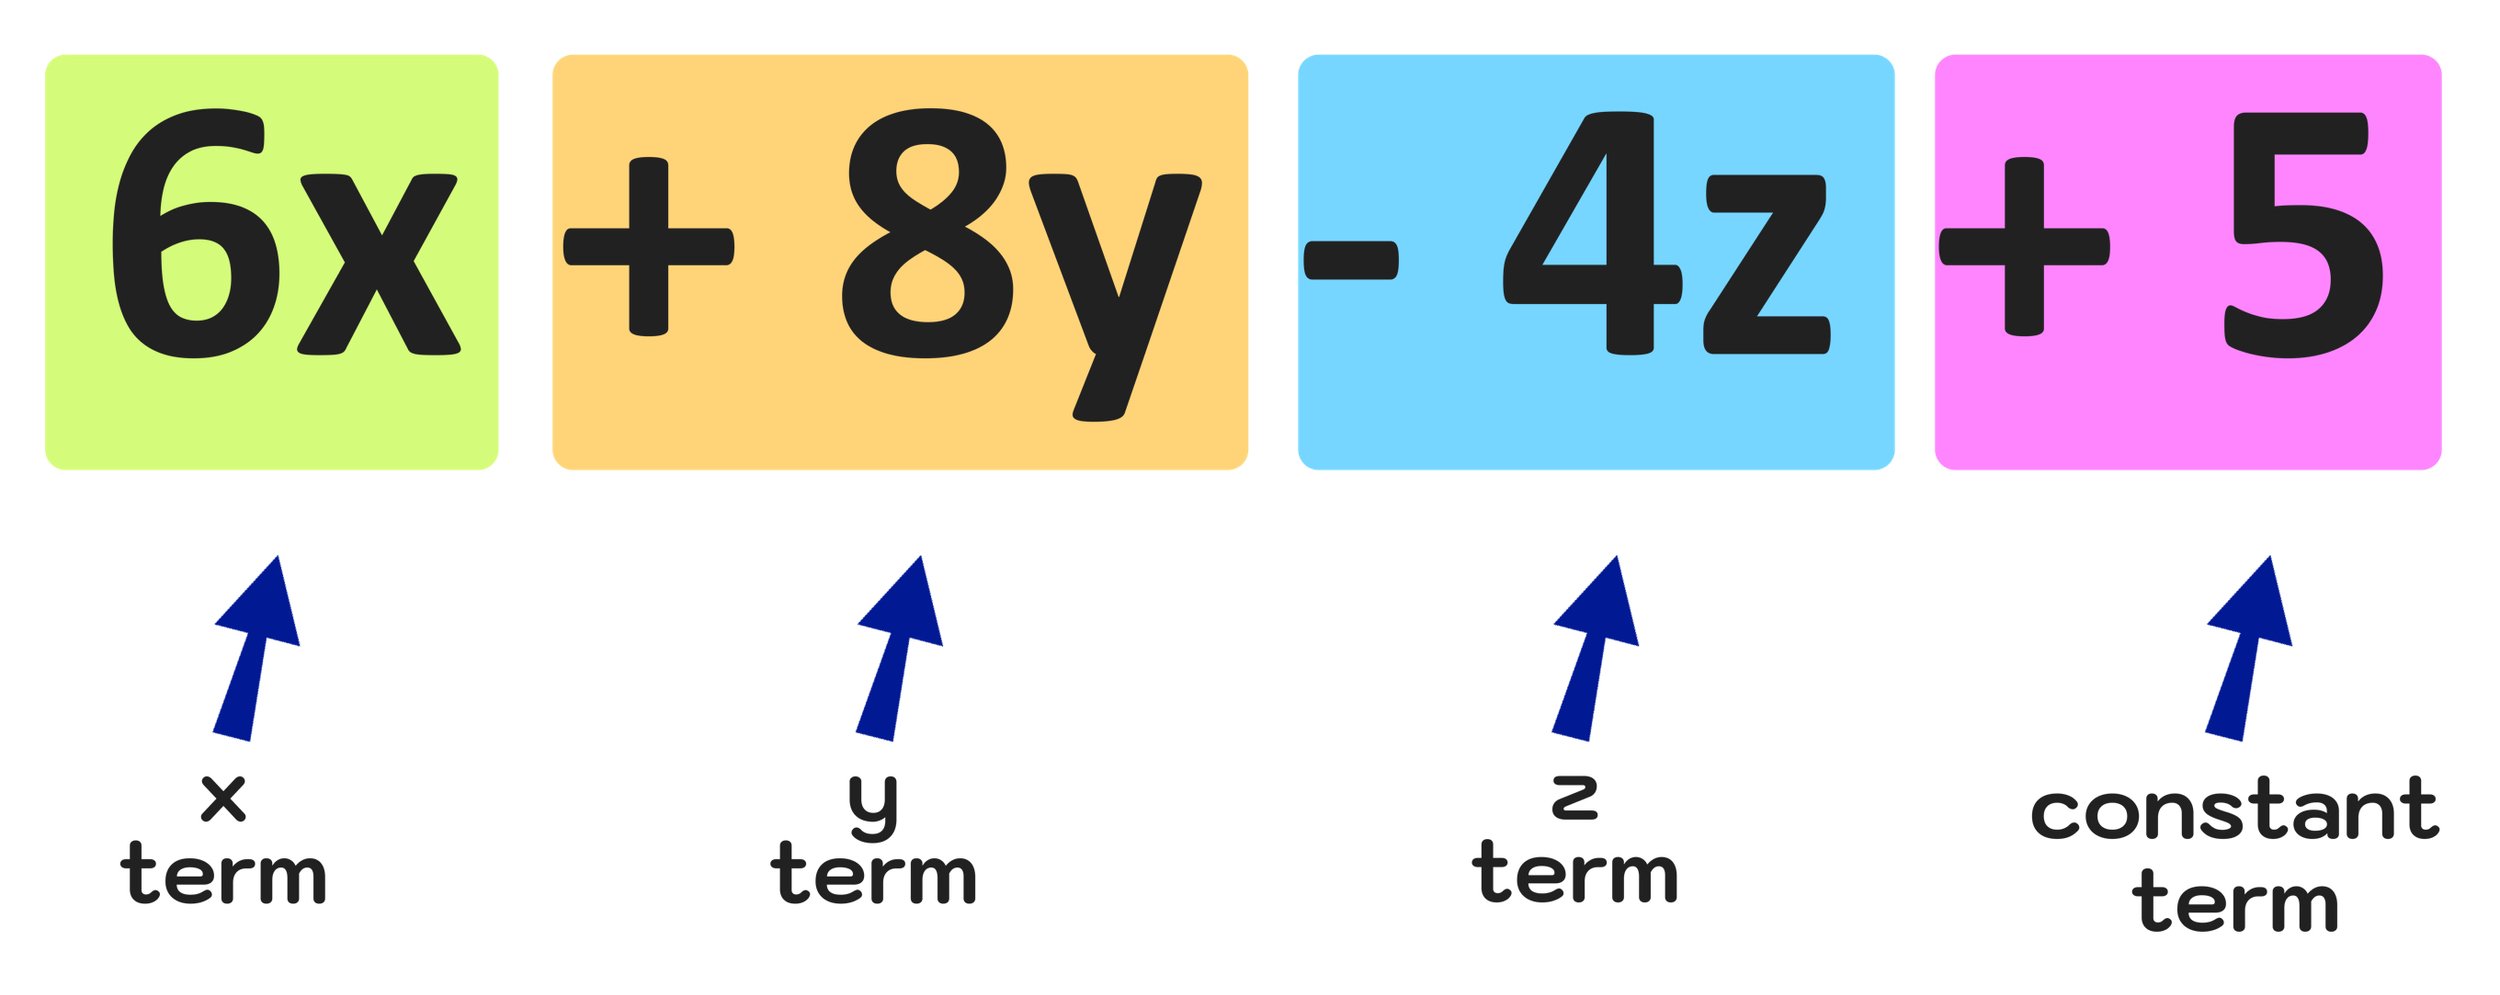
For example, the mathematical expression 6x + 8y - 4z + 5 has four terms:

  • 6x

  • 8y

  • -4z

  • 5


What are Terms in Math?


Each of the first three terms consists of a coefficient (a number in front of a variable) and variable letter (x, y, or z in this example). The fourth term is called a constant because it is a single number without a variable.

It is also important to note that a term can have multiple variables as well. For example, 6xy or 10xyz could be terms (more on this later on).

What are terms in math? The important thing to understand right now is that each individual part of an expression (separated by mathematical operation signs like + or -) is a term and, when terms are like, they can be combined to create a simpler result that is easier to work with.


Combining Like Terms Definition

Now that you understand what are terms in math, you are ready to learn how to combine like terms.

Combining Like Terms Definition: Combining like terms is the act of simplifying an algebraic expression by either adding or subtracting terms that have the same variables and/or exponents.

Before we look at a simple numerical example, lets take a look at the fruit expression in Figure 01 below.


Figure 01: The fruit expression has three terms: pomegranates, avocados, and lemons.


The fruit expression has three terms: pomegranates, avocados, and lemons.

You can read this expression verbally as: 14 pomegranates plus 8 lemons plus 5 avocados minus 6 pomegranates plus 4 avocados minus 2 lemons.

By looking at this expression, it should be clear that you can make it simpler by combining like fruits. We can easily do this by color coding the terms as follows:

  • Highlight pomegranates in pink

  • Highlight lemons in yellow

  • Highlight avocados in green

Now, you can make the following combinations of like fruits:

  • Pomegranates: 14 + - 6 = 8 pomegranates*

  • Lemons: 8 + -2 = 6 lemons

  • Avocados: 5 + 4 = 9 avocados

*Note that you simplify an expression like 8+-2 as 8-2.

So, after combining like terms, the new expression would be: 8 pomegranates plus 6 lemons plus 9 avocados

Figure 02 below illustrates how we just combined like terms (fruit) to simplify a complicated expression by using color-coding.


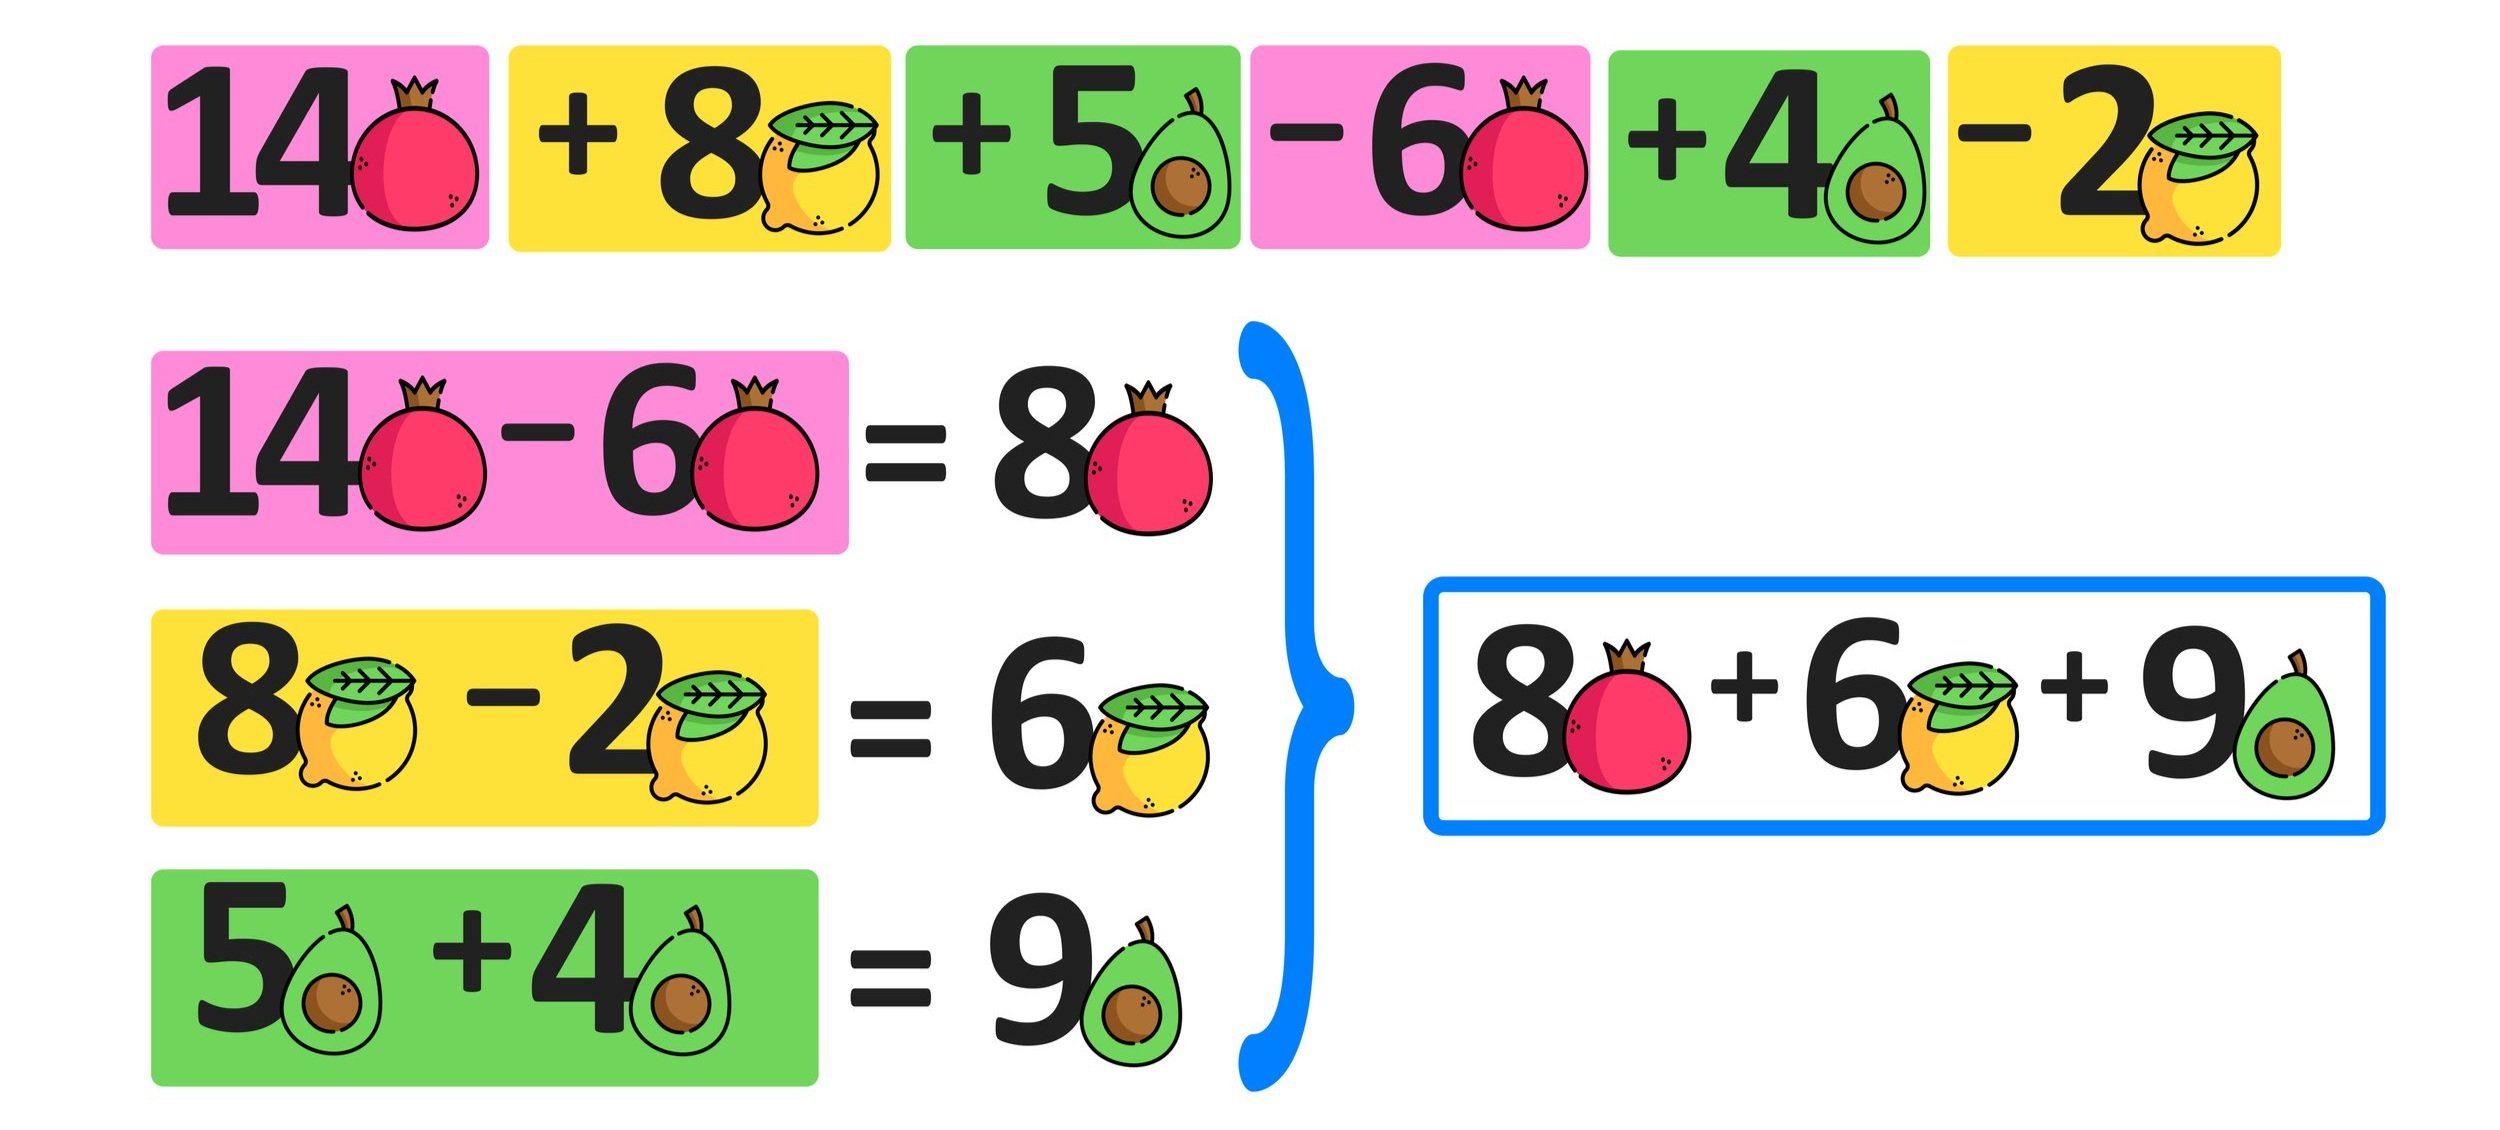
Figure 02: Combine Like Terms Using Color Coding


How to Combine Like Terms

The fruit expression is a good first introduction to combining like terms. Obviously, in math, you won’t be dealing with fruit, but variables like x, y, and z instead.

For example, consider the expression 3x + 2y + 5x -3z + 7y + z

To combine like terms, we can color coordinate the x-terms, y-terms, and z-terms and then combine them together group by group as follows:

  • x-terms: 3x + 5x = 8x

  • y-terms: 2y + 7y = 9y

  • z-terms: -3z + z = -2z

After combining like terms, the new expression would be: 8x +9y - 2z.

This example is illustrated in Figure 03 below.


Figure 03: How to combine like terms.


Now, lets work through 3 more step-by-step examples of combining like terms.


Combining Like Terms Examples

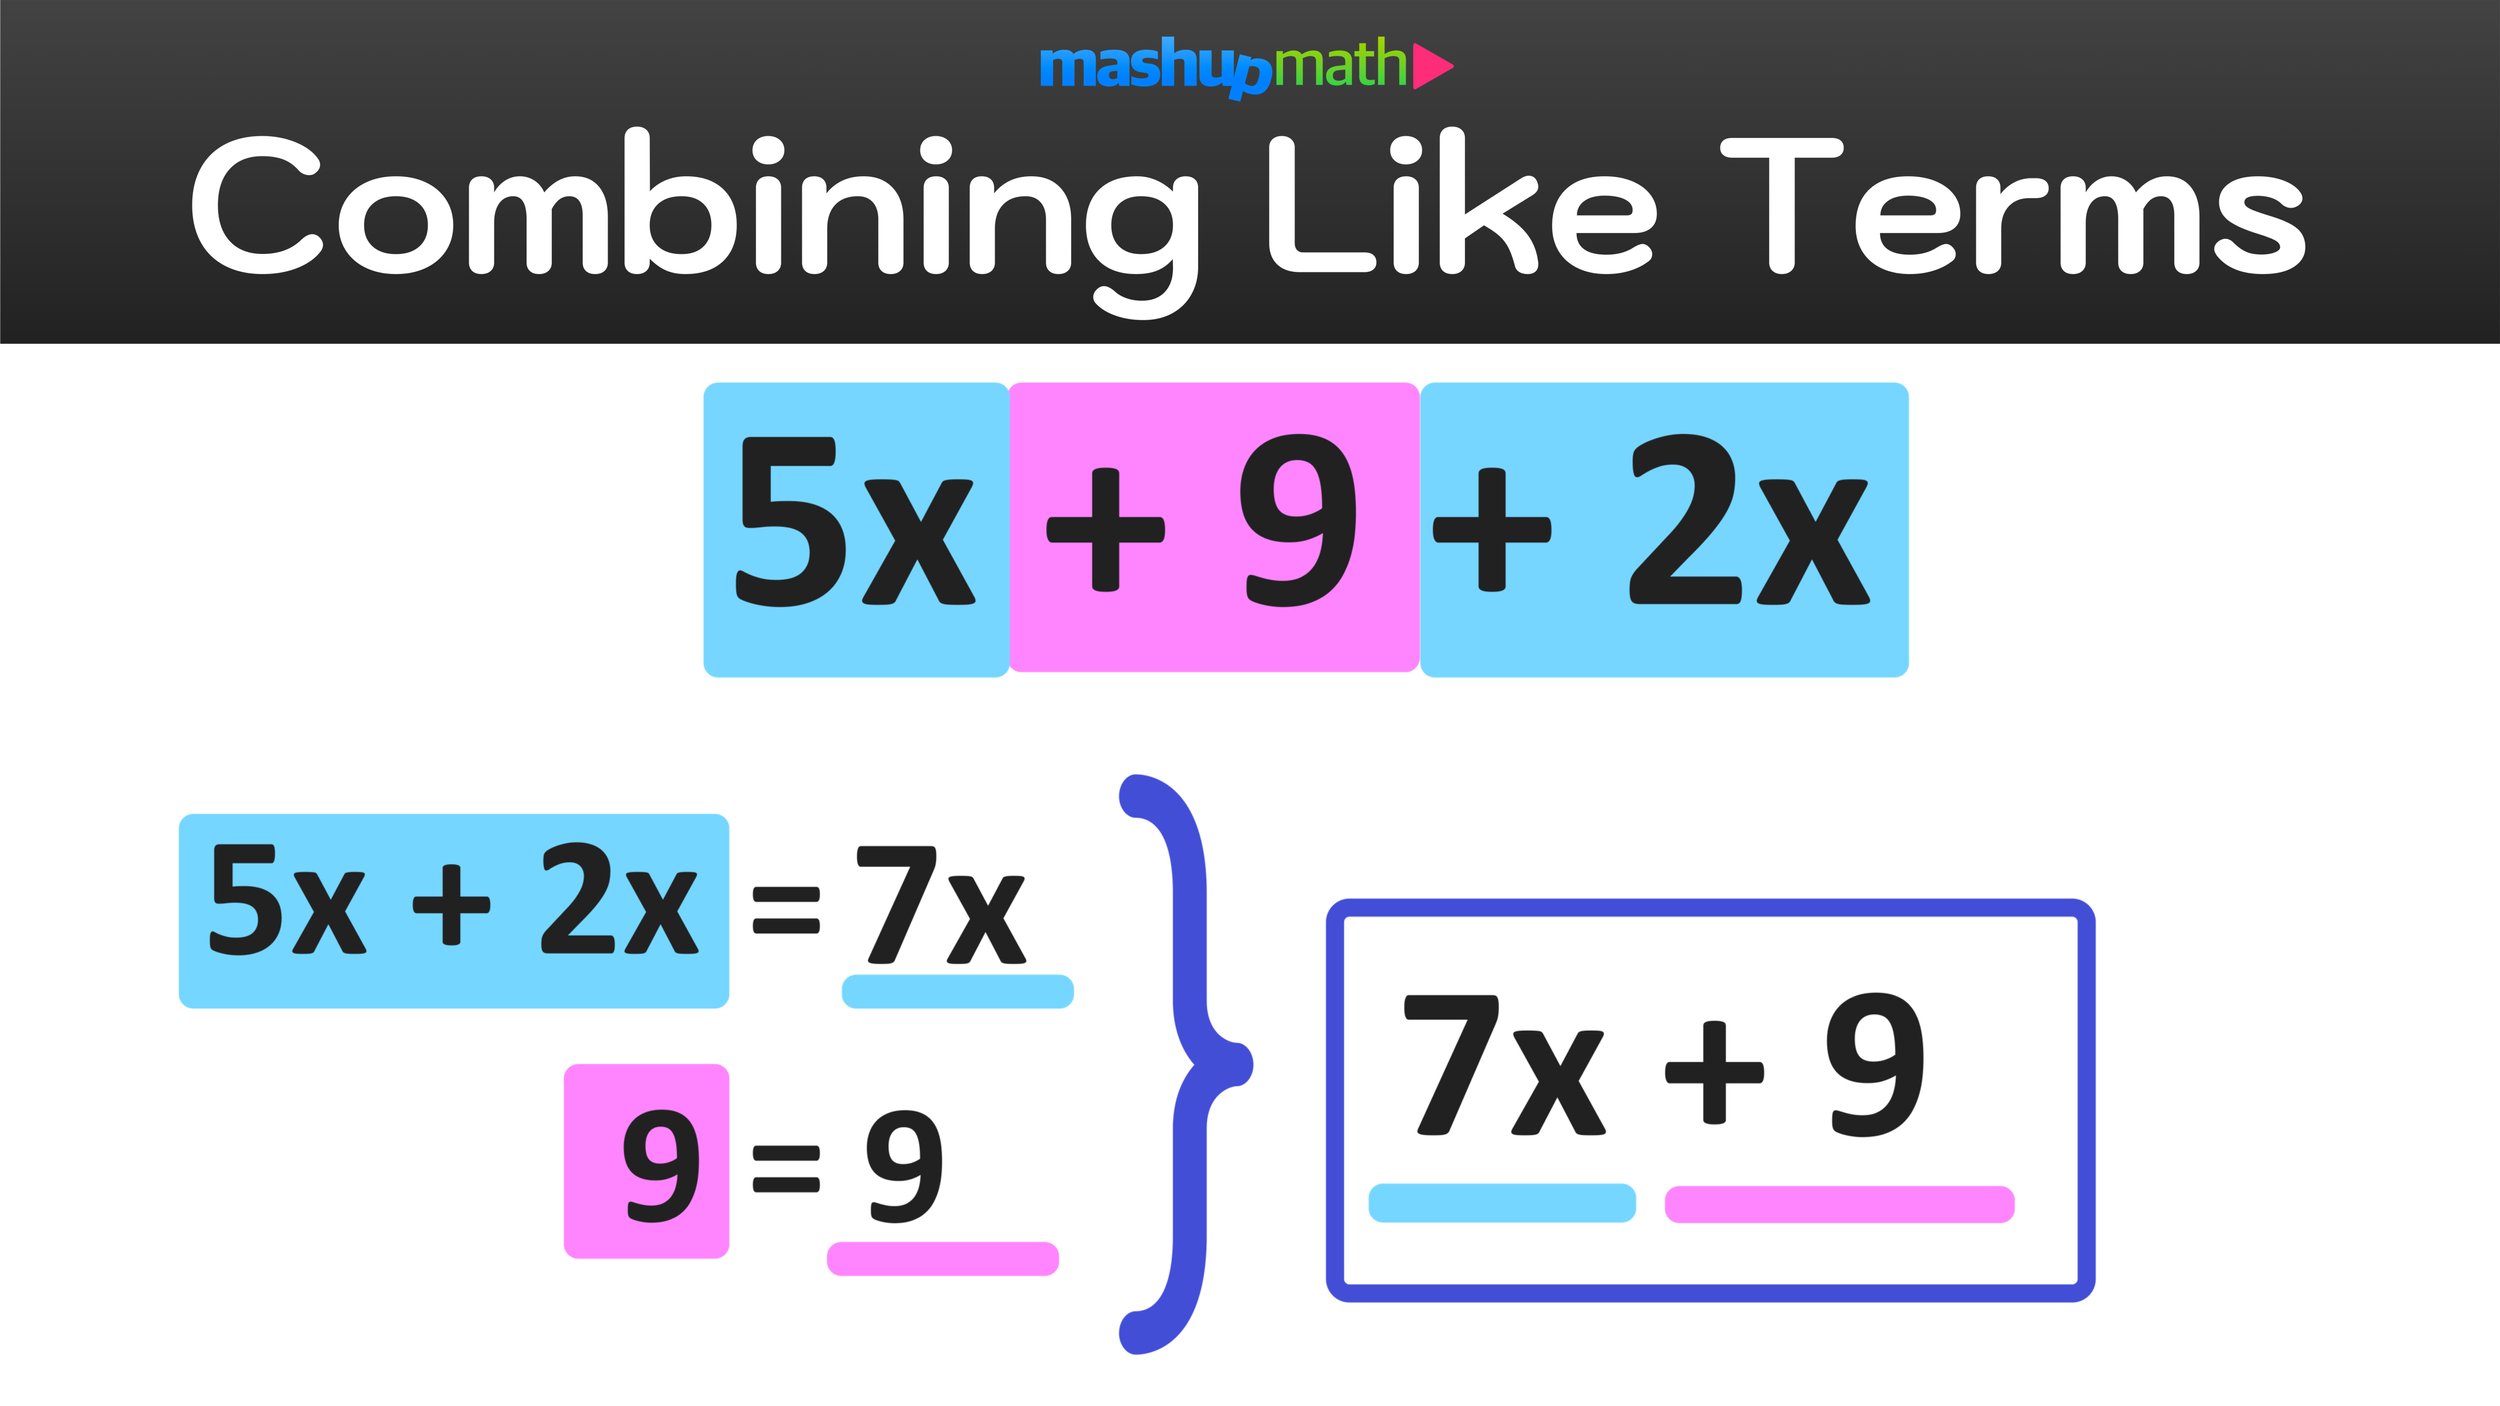
Example #1: Combine Like Terms 5x + 9 + 2x

For this first example, you have to combine like terms 5x + 9 + 2x

This expression has 2 terms. To combine like terms, we can color coordinate the x-terms and constant terms, and then combine them together group by group as follows:

  • x-terms: 5x + 2x = 7x

  • constant terms: 9

After combining like terms, the new expression would be: 7x + 9

This example is illustrated in Figure 04 below.


Figure 04: Combine Like terms 5x + 9 + 2x


Example #2: Combine Like Terms: 7q + 5r -4 +3s -3q +5r - 3

This expression has 4 terms. To combine like terms, we can color coordinate the q-terms, r-terms, s-terms, and constant terms, and then combine them together group by group as follows:

  • q-terms: 7q + (-3q) = 4q

  • r-terms: 5r + 5r=10r

  • s-terms: 3s

  • constant terms: -4 + (-3) = -7

Notice that there is only one s term, so you can not combine it with another like term.

After combining like terms, the new expression would be: 4q+10r+3s-7

This example is illustrated in Figure 05 below.


Figure 05: How to Combine Like Terms


Example #3: Combine Like Terms: -5xy^2 +2x^2 + 4xy^2 - 2x^2 - y

This expression has 3 terms. To combine like terms, we can color coordinate the xy^2-terms, x^2 terms, and y-terms, and then combine them together group by group as follows:

  • xy^2-terms: -5xy^2 + 4xy^2 = -1xy^2

  • x^2-terms: 2x^2 + (-2x^2) = 0 (they cancel each other out)

  • y-terms: -y

After combining like terms, the new expression would be: -xy^2 - y

This example is illustrated in Figure 06 below.


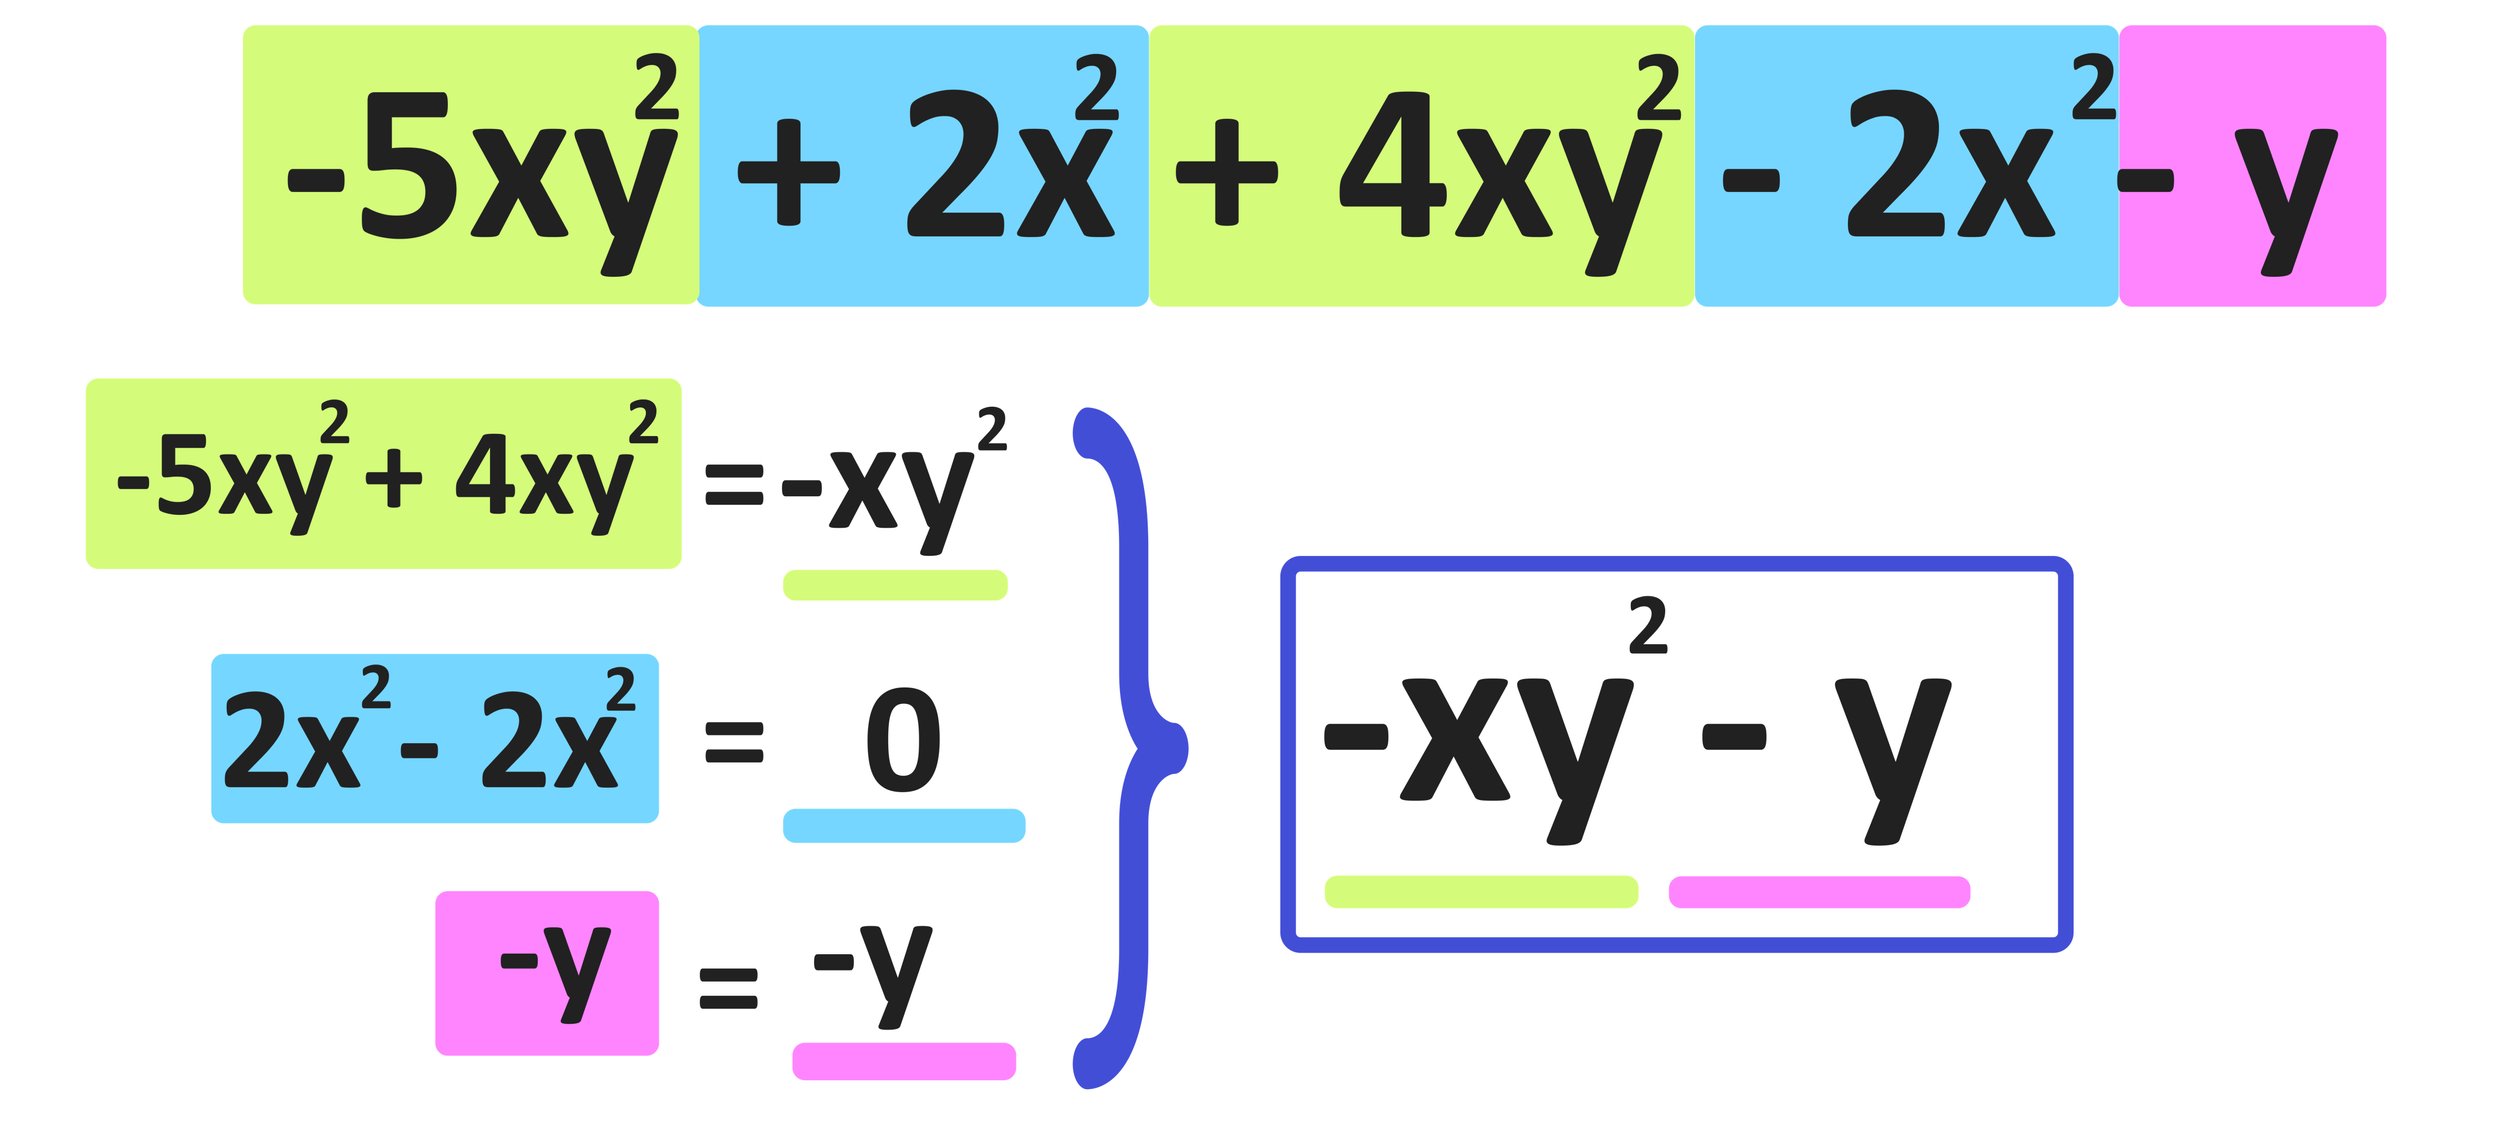
Figure 06: Combining Like Terms


Free Combining Like Terms Worksheet

Combining Like Terms Worksheet Preview

Are you looking for more practice with combining like terms?

Click the link below to download our free Combining Like Terms worksheet as a pdf file (full answer key included). We highly recommend using colored pencils or highlighters to color code the terms in each example.

→ Download your free Combining Like Terms Worksheet PDF File (with Answer Key)

Keep Learning:


Search Tags: combining like terms, combine like terms, combining like terms worksheet, how to combine like terms, combine like terms worksheet, combine line terms 5x + 9 + 2x, combine like terms definition, combining like terms examples, combining like terms worksheet pdf

Comment

Is a Rhombus a Parallelogram? Yes or No?

2 Comments

Is a Rhombus a Parallelogram? Yes or No?

Is a Rhombus a Parallelogram? Yes or No?

Explore the unique features of a rhombus and a parallelogram to determine whether or not a rhombus is both


Is a rhombus a parallelogram? Is a parallelogram a rhombus? Let’s explore!


It’s time to explore and answer the controversial math question: Is a rhombus a parallelogram? Yes or No? This short guide will help you to understand the following concepts:

What is a Rhombus?

Why was the geometry student late for school? Because he took the rhombus!

Okay, jokes aside, let’s quickly explore the features and characteristics of a rhombus and a parallelogram.

In geometry, a rhombus is a four-sided figure (quadrilateral) where all four sides have the same length and opposite sides are parallel to each other. Additionally, the opposite interior angles of any rhombus are equal to each other (congruent).


Is a rhombus a parallelogram? Start by knowing exactly what a rhombus is.


What is a Parallelogram?

In geometry, a parallelogram is a four-sided figure (quadrilateral) where opposite sides have the same length and are parallel to each other, but all four sides do not have to be equal. Similar to a rhombus, the opposite interior angles of any parallelogram are congruent.

The key feature of a parallelogram is that the opposite sides are both equal in length and parallel to each other—hence the name parallelogram.


Is a rhombus a parallelogram? Continue by learning the definition of a parallelogram.


What is the Difference Between a Rhombus and a Parallelogram?

Now that you know the key characteristics of a rhombus and a parallelogram, let’s explore what sets them apart.

For starters, a rhombus and a parallelogram are similar in that they are both quadrilaterals, meaning that they are four sides figures. They also both have opposite sides that are equal in length to each other and they both have sets of opposite interior angles that are congruent to each other.

However, the key differences between a rhombus and a parallelogram are that a parallelogram has two sets of parallel sides that are equal in length, while a rhombus has four sides that are all equal in length.

So, a parallelogram is like a rectangle that doesn’t have right angles, while a rhombus is like a square that doesn’t have right angles.


What is the Difference Between a Rhombus and a Parallelogram?


The key takeaway concerning the difference between a rhombus and a parallelogram is that they both have opposite sides that are parallel and congruent (and opposite interior angles that are congruent), but a rhombus has to have four equal sides, but a parallelogram does not.


Is a Rhombus a Parallelogram? Yes or No?

The answer is YES—by definition, a rhombus is a parallelogram.

Again, by definition, a parallelogram is quadrilateral with two pairs of parallel sides with opposite interior angles that are congruent. A rhombus is just a special type of parallelogram where all four of the sides are equal in length. As for interior angles, the opposite interior angles of a rhombus are congruent just as they are in a parallelogram.

Is a rhombus always a parallelogram?

To say that every rhombus is a parallelogram would be true.

Since the properties of a rhombus satisfy the definition of a parallelogram and we can conclude that:

  • Is a rhombus always a parallelogram? Yes!

  • A rhombus is a special type of parallelogram—namely, one where all four sides are equal in length.

  • All rhombuses are parallelograms.


Is a rhombus always a parallelogram? Yes, a rhombus is a special type of parallelogram—namely, one where all four sides are equal in length.


It is important to note that the conclusion that we just made is not an opinion, but a mathematical fact.

All rhombuses are parallelograms. In fact, a rhombus is a subset of a parallelogram in that it is special because it is a parallelogram with four congruent sides.

This explanation is very similar to our exploration of the question is a square a rectangle?, where we similarly concluded that a square is a special type of rectangle and that all squares are rectangles.

Next, let’s consider if the opposite is true: is a parallelogram a rhombus?


Is a Parallelogram a Rhombus? No. All Oreos are cookies, but not all cookies are Oreos (because Oreos are a special type of cookie). Similarly, every rhombus is a parallelogram, but every parallelogram is not necessarily a rhombus.


Is a Parallelogram a Rhombus? Yes or No?

We have just applied the mathematical definition of a rhombus and parallelogram to prove that a rhombus is indeed a parallelogram. We concluded that a rhombus is a special type of parallelogram that has all of the characteristics of a parallelogram and four congruent sides.

But, is a parallelogram a rhombus?

No. By definition, a parallelogram does not necessarily have to be a rhombus.

Remember that a parallelogram is a quadrilateral with two pairs of sides that have to be parallel and equal in length, but it does not need to have all four sides be congruent.

Again, a rhombus is like a square and a parallelogram is like a rectangle. Similarly, all squares are rectangles, but not all rectangles are squares.

To say that every parallelogram is a rhombus would be false.

Therefore, while every rhombus is a parallelogram, not all parallelograms are rhombuses.

Conclusion: Is a Rhombus a Parallelogram?

In this short lesson, you learned that both a rhombus and a parallelogram are quadrilaterals with opposite sides that are equal in length and opposite interior angles that are congruent. You also learned that a rhombus is a special type of parallelogram—namely one that has four congruent sides.

As for the question, is a rhombus a parallelogram? The answer is yes! All rhombuses are parallelograms, but not all parallelograms are rhombuses.

More Math Education Insights You Will Love:

2 Comments

Kid Safe YouTube: A Safer Online Experience for Students

Comment

Kid Safe YouTube: A Safer Online Experience for Students

How to Implement Kid Safe YouTube at Home and In Your Classroom

YouTube’s Kids Feature is a Safer and Simpler Version of the Platform that Allows Kids to Explore Their Interests by Watching Online Videos


Kid Safe YouTube is a specialized version of the YouTube platform that aims to provide a safe browsing and viewing experience for children.


YouTube may be the single most powerful educational tool available to parents and teachers. The Google-owned search engine hosts a limitless collection of kid-friendly educational video content from respected outlets including Google Education, NASA, TED, and PBS.

But despite YouTube being host to the internet’s greatest collection of educational video content, many parents and school administrations are fearful of giving kids access to the platform given negative aspects including inappropriate content, advertisements, misinformation, cyberbullying, algorithm bias, and possibly dangerous interactions in the comment sections.

In fact, many school districts block student access to YouTube altogether, which prevents teachers from using YouTube videos or clips to supplement their lessons.

However, Google has recently unveiled a new specialized Kid Safe version of YouTube that removes the negative aspects of the platform and allows for a much safer online environment for children. In this post, we will dive into the following features of YouTube for Kids:


A screenshot of the new YouTube Kids website.


Did You Know That There is a Kid-Safe YouTube?

While it is easy to understand why many teachers and parents do not want their kids to have access to YouTube given its negative aspects and potential for exposing kids to inappropriate content.

But, before you or your school gives up on the platform, you should know that Google has recently released a special Kid Safe YouTube version called YouTube Kids.

Kid Safe YouTube is a specialized version of the traditional YouTube platform that was designed to provide a safe browsing and viewing experience for kids by preventing their exposure to inappropriate or unsuitable content.

Some of the features of Kid Friendly YouTube that differentiate it from traditional YouTube include:

  • All Kid Friendly YouTube videos must adhere to content policies and quality principles to ensure that they are appropriate and beneficial for kids.

  • The Kid Friendly YouTube app has as a full suite of parental controls that will allow you to customize your child’s experience however you see fit.

  • The App features a built-in timer feature that allows you to limit screen time.

  • While the app does include limited paid advertisements, all ads must friendly and be in strict compliance with YouTube Kids' policies.

  • The videos do not allow viewers to leave comments, so there is no comment section.

  • Enhanced content filters and privacy settings.


YouTube Kids shares a free tutorial for setting up profiles for your kids so that you have control over things like screen time and what content they can access.


These range of features on Kid Safe YouTube are designed to protect children and allow them to experience and learn from YouTube content in a safe way.

By allowing parents and teachers to set filters and controls to limit the types of videos that kids can access on YouTube, the negative aspects of the platform can be removed, and students can gain the educational benefits of all the excellent learning content YouTube has to offer.

My School Blocks YouTube. How Can I Convince Them Not To?

Does your school block YouTube as a safety precaution?

If so, your district likely does not know about Kid Safe YouTube. By making this version of YouTube accessible to students, you can enjoy the pros of YouTube in your classroom without any of the cons.

This simple fix will open your classroom to hundreds of thousands of hours of amazing educational video content.

To learn more about YouTube Kids’ safety and security features, access FAQs, and learn how to setup the app in your home or school, click here to visit the YouTube Kids website.


Is YouTube Kids Safe? Yes! The app was designed to give kids a safer and more contained opportunity to explore video content.


Looking to Have YouTube Unblocked for School Use?

Is YouTube Kids Safe and is it Worth Implementing in Your Home or School?

Yes. Here are a few reasons to help convince you or your school’s administration that implementing Kid Safe YouTube is a great idea that will highly benefit students:

  • YouTube is easily the most powerful online education tool available todayand it's free!

  • Students are more engaged by video content than by verbal explanations alone.

  • Students can create and share videos on YouTube to demonstrate their understanding of a topic.

  • Any lesson can be supplemented with the inclusion of high-quality video content.

  • Teachers can access a large library of Professional Development content.

  • YouTube for schools is safe for the classroom and free and easy to implement.

 
Teachers use YouTube videos to help students engage more deeply in a lesson.

YouTube Unblocked for School Use: Teachers use YouTube videos to help students engage more deeply in a lesson.


How Can Teachers Use Kid Safe YouTube in Their Classroom?

If you are a teacher or homeschool parent looking for ways to use YouTube videos in your classroom, here are a few examples:

  • Educational Video Content: YouTube shares a massive selection of high-quality educational videos on all subjects and topics that teachers can use to supplement/enhance their instruction.

  • Bring Concepts to Life: YouTube videos can be excellent for animated difficult concepts in fields such geometry, biology, and astronomy.

  • Flipped Classroom: YouTube is a great platform for creating and sharing instructional videos that students can watch at home, which is a key component of the Flipped Classroom Model.

  • Audio Features: YouTube is also an extremely useful tool for accessing audio content that can help students with things like learning a new language or studying the history of music.

  • Projects: Teachers can also give their students opportunities to create and upload their own videos to complete a project or presentation—which allows them to be creative and learn digital skills such as video editing and graphic design.

While the traditional YouTube platform has tons of amazing educational content, its negative features led many parents and teachers to avoid using the platform, which is why Google has recently implemented YouTube Kids, which was designed to provide a safe and enjoyable environment for children to explore and learn about the world around them, without exposing them to any harmful or inappropriate content. So, if you want to reap all of the benefits of YouTube without any of the negative aspects of the traditional platform, then give YouTube kids a try today.

More Teaching Insights You Will Love:

Search Tags: YouTube Kids, kids youtube, youtube for kids, youtube kids app, kid youtube, youtube videos for kids, kid safe youtube, is youtube kids safe, kid-safe youtube, safe youtube for kids, how to make youtube safe for kids, is youtube safe for kids, youtube unblocked for school

Comment

Why Virtual Reality in Education Will Change Everything

Comment

Why Virtual Reality in Education Will Change Everything

Virtual Reality in Education

How Can VR Technology Transform the Way Students Learn?

Virtual Reality in Education

The future is now.

Are you ready to take look into the role of virtual reality in education? In this post, we will dive into the exciting possibilities that VR technology can bring to your classroom.

Virtual Reality (VR) is a three-dimensional simulated experience that can be similar to or completely different from the real world. VR can be used to create and share an environment that is both immersive, interactive, and highly realistic.

As VR technology continues to become more mainstream, more and more students will be able to access new and exciting digital educational content.

What are the benefits of VR in education?

One of the most prominent benefits of virtual reality in education is that it can make learning more engaging, accessible, and interactive. By using VR technology, teachers can create a learning environment that is not only dynamic and interactive, but incredibly captivating and interesting.

And the applications of VR in education apply to all STEAM fields.

One of the most exciting applications of virtual reality in education is in science. In a virtual setting, students can explore complex scientific environments and concepts in a way that was previously impossible. For example, students can explore the inner workings of the human body, travel through the solar system, or even dive into the depths of the ocean to study marine life without ever having to leave the classroom.

For example, the free YouTube video below by Crash Course allows students to take a 360-degree tour of our universe and learn about each planet while floating in outer space.


Virtual Reality can also be incredibly useful for learning mathematics. VR can give students opportunities to visualize and interact with abstract concepts in ways that had previously not been possible. For example, students can explore geometrical shapes and figures in 3-dimensions, visualize and solve complex math equations, and even explore the behavior of mathematical functions in a way that is both interactive and engaging.

For example, the free YouTube video below by Mashup Math allows elementary math students to solve an order of operations math puzzle by finding clues within a 360-degree VR environment.


What’s Exciting About Virtual Reality Education?

One of the most exciting applications of VR in education is that the technology allows students to learn at their own pace. Using VR technology as a learning aide, students can explore and experiment with new concepts without the fear of failure. They can be experimental, take risks, and learn from their mistakes—all of which are desirable attributes of learning with a growth mindset.

Additionally, Virtual Reality can help students develop their critical thinking and problem-solving skills in a variety of ways. When using VR as a learning tool, students can explore complex scenarios and analyze the consequences of different actions. In the virtual environment, students are free to experiment with different approaches and see the results in real-time, allowing them to develop their analytical skills and think critically about complex problems.


There are tons of exciting applications for virtual reality in education.


Another exciting application of VR in education is that the technology can help students develop empathy and cultural understanding. Students can explore different cultures and perspectives using VR in a way that is both immersive and interactive. For example, they can explore different historical events, experience different lifestyles, and learn about different cultures in a way that is both engaging and informative.

Finally, VR can also be incredibly useful for students with disabilities or learning difficulties. With VR, students can access new learning opportunities that may be difficult or impossible to access in traditional classroom settings. For example, students with physical disabilities can explore and interact with virtual environments in a way that is not possible in the real world.

For example, this free YouTube video from VisitJapan allows students to explore Japanese architecture, cuisine, and cultural traditions.


VR in Education: Conclusion

Virtual Reality technology has the potential to revolutionize education and the way that students learn. By using VR to create and/or share immersive and interactive learning environments with their students, teachers can provide unique and truly engaging opportunities for developing critical thinking and problem-solving skills. Whether it's exploring complex scientific ideas or concepts, visualizing geometrical shapes, or experiencing a new geographic location or culture, VR has the potential to positively enhance education for learners of all ages and ability levels. While the role of VR in education is still in its infancy, the future is extremely exciting!

Keep Learning:

Nurturing a Growth Mindset for learning—where mistakes are celebrated as learning opportunities—is a key component of the STEAM Education movement. To learn more about how you can nurture a growth mindset in your classroom, check out our free Growth Mindset guide for teachers and parents.


More Education Resources You Will Love:

Search Tags: virtual reality in education, virtual reality education, virtual reality for education, benefits of virtual reality in education, virtual reality and education, vr in education, benefits of vr in education, education in VR

Comment

How to Subtract Fractions in 3 Easy Steps

2 Comments

How to Subtract Fractions in 3 Easy Steps

How to Subtract Fractions in 3 Easy Steps

Math Skills: How do you subtract fractions with the same denominator and how to subtract fractions with different denominators


Free Step-by-Step Guide: How do you subtract fractions?


Having the knowledge of how to subtract fractions is a crucial and fundamental math skill that every student must learn, as it serves as a foundational element for comprehending more advanced math ideas that you may come across in the future.

(Looking to learn how to add fractions? Click here to access our free guide)

Fortunately, subtracting fractions, regardless of whether the denominators are the same (like) or different (unlike) can be done using a straightforward and uncomplicated three-step process.

This free Step-by-Step Guide on How to Subtract Fractions will walk you through the process of subtracting fractions with like and unlike denominators, including detailed examples for each scenario.

This step-by-step guide will focus on teaching you the following math skills:

  • How to subtract fractions with the same denominator?

  • Subtracting Fractions with Unlike Denominators: How to subtract fractions with different denominators?

Before we cover how to subtract fractions and work through a few examples, let’s do a fast recap of some key characteristics and vocabulary terms related to subtracting fractions.

Let’s get started!

Subtracting Fractions: Definitions and Vocabulary

Before you can learn how to subtract fractions, it’s important for you to know two key vocabulary terms (and the difference between them):

Definition: The top number of a fraction is called a numerator. For example, the fraction 5/6 has a numerator of 5.

Definition: The bottom number of a fraction is called a denominator. For example, the fraction 5/6 has a denominator of 6.

Again, the numerator is the top number of a fraction, and the denominator is the bottom number. These terms are further illustrated in Figure 01 below. While these two math vocabulary terms are simple, it is crucial that you are able to understand and correctly identify the numerator and denominator of fractions in order to master the skill of subtracting fractions.


Figure 01: Fraction Subtraction Key Terms: The numerator of a fraction is the top number, and the denominator is the bottom number.


Moving on, you are ready to take the next step towards mastering fraction subtraction. Next, you will need to be able to determine when a fraction subtraction problem falls into one of the following two categories:

  • Subtracting Fractions with Like Denominator (the denominators equal the same number)

  • Subtracting Fractions with Unlike Denominator (the denominators are different)

Fractions that have like denominators have bottom numbers that equal the same value.

  • Example: 3/5 - 1/5 → This would be a case of subtracting fractions with like denominators since both fractions have a denominator of 5.

Alternatively, fractions that have unlike denominators have bottom numbers that do not equal the same value.

  • Example: 1/2 - 3/7 →This would be a case of subtracting fractions with unlike denominators since both fractions have different bottom numbers (one has a denominator of 2 and the other has a denominator of 7).

Both examples (one with like denominators and one with unlike denominators) are illustrated in Figure 02 below.


Figure 02: How do you subtract fractions? The first step is being able to identify whether the fractions in question have like denominators or unlike denominators.


This concept may seem uncomplicated, but it is essential to refresh your understanding since you must be able to recognize if a problem involving subtracting fractions has like or unlike denominators in order to find a correct solution.

Now that you have the important foundation skills, you are ready to work through a few fraction subtraction problems.


How to Subtract Fractions with Like Denominators

How to Subtract Fractions with Like Denominators: Example #1

Example #1: 3/5 - 2/5

The first fraction subtraction example is pretty easy and straightforward, which is why it is a good place to start using our simple 3-step process for subtracting fractions. If you can learn to apply these three steps to easy examples, then you will be able to use the same process to solve more complex problems in the future (since the process works for any fraction subtraction problem).

How Do You Subtract Fractions in 3 Easy Steps?

  • Step One: Identify whether the denominators are the same (like) or different (unlike).

  • Step Two: If the example involves like denominators, move onto Step Three. If they are unlike denominators, find a common denominator.

  • Step Three: Subtract the numerators and find the difference.

Now that you know the steps, let’s apply them to solving this first example:

  • 3/5 - 1/5 = ?

Step One: Identify whether the denominators are the same (like) or different (unlike).

The fractions in this example have like denominators. They are both 5.

Step Two: If the example involves like denominators, move onto Step Three. If they are unlike denominators, find a common denominator.

Since the denominators are the same, you can skip ahead to the next step.

Step Three: Subtract the numerators and find the difference.

To complete this fraction subtraction problem, simply subtract the numerators and express the result as follows:

  • 3/5 - 1/5 = (3-1)/5 = 2/5

Since 1/5 can not be reduced, you can conclude…

Final Answer: 2/5

Figure 03 below illustrates how you came to this conclusion.


Figure 03: How to Subtract Fractions with Like Denominators: Subtract the numerators and keep the denominator.


The first example shows you that subtracting fractions with like denominators is pretty easy.

To subtract fractions with the same denominator, subtract the numerators and keep the same denominator.

Now, let’s move onto one more example of subtracting fractions with like denominators before moving onto examples of how to subtract fractions with different denominators.


How to Subtract Fractions with Like Denominators: Example #2

Example #2: 8/9 - 5/9

For the next example, you will be applying the same 3-step method that you used in Example #1 as follows:

Step One: Identify whether the denominators are the same (like) or different (unlike).

In this example, the fractions have like denominators. They are both 9.

Step Two: If the example involves like denominators, move onto Step Three. If they are unlike denominators, find a common denominator.

Again, since the denominators are the same, you can skip ahead to Step Three.

Step Three: Subtract the numerators and find the difference.

To complete this fraction subtraction problem, subtract the numerators as follows:

  • 8/9 - 5/9 = (8-5)/9 = 3/9

In this case, 3/9 is the correct answer, but this fraction can be simplified. Since both 3 and 9 are divisible by 3, 3/9 can be simplified as 1/3.

Final Answer: 1/3

Figure 04 below illustrates how you just solved Example #2.


Figure 04: Subtracting Fractions: 3/9 can be simplified to 1/3


Now, let’s move onto learning how to subtract fractions with different denominators.


How to Subtract Fractions with Different Denominators

How to Subtract Fractions with Different Denominators: Example #1

Example #1: 1/2 - 3/7

Step One: Identify whether the denominators are the same (like) or different (unlike).

In this example, the fractions have unlike denominators (they are different). The first fraction’s denominator is 2 and the other’s is 7.

Step Two: If the example involves like denominators, move onto Step Three. If they are unlike denominators, find a common denominator.

Since the fractions have unlike denominators, you can not skip ahead.

Before you can move onto Step Three, you have to find a number that both denominators can divide into evenly. This is called a common denominator.

A very easy and effective way to find a common denominator between two fractions is by multiplying the denominators together (i.e. multiplying the denominator of the first fraction by the second fraction and multiplying the denominator of the second fraction by the first fraction.

  • 1/2 - 3/7 (1x7)/(2x7) - (3x2)/(7x2) = 7/14 - 6/14

This fraction subtraction process is illustrated in Figure 05 below.


Figure 05: How to Subtract Fractions with Different Denominators: Find a common denominator by multiplying the denominators together.


(Looking for some extra help with multiplying fractions, click here to access our free student guide).

Now that Step Two is complete, you can see that the original question has been transformed and you are now working with equivalent fractions that have common denominators, which means that the heavy lifting has been done and you can now solve the problem by subtracting the numerators and keep the same denominator:

  • 7/14 - 6/14 = (7-6)/14 = 1/14

Since 1/14 can not be reduced further, you have solved the problem…

Final Answer: 1/14


Figure 06: Once you have common denominators, simply subtract the numerators keep the same denominator.


Are you ready for one more practice problem for how to subtract fractions with unlike denominators?


How to Subtract Fractions with Different Denominators: Example #2

Example #1: 2/3 - 8/15

For this final example of subtracting fractions, you will again be using the 3-step method as follows:

Step One: Identify whether the denominators are the same (like) or different (unlike).

The fractions have unlike denominators (one is 3 and the other is 5).

Step Two: If the example involves like denominators, move onto Step Three. If they are unlike denominators, find a common denominator.

Just like last example, you will have to find a common denominator since the fractions have unlike denominators. You can find a common denominator by multiplying the denominators together as follows:

  • (2x15)/(3x15) - (8x3)/(15x3) = 30/45 - 24/45

This process is shown in Figure 07 below.


Figure 07: How to Subtract Fractions with Different Denominators


Now that the fractions share a common denominator, you can solve the fraction subtraction problem as follows:

  • 30/45 - 24/45 = (30-24)/45 = 6/45

Since both 6 and 45 are divisible by 3, you can simplify this fraction as…

Final Answer: 2/15


Figure 08: Subtracting Fractions with Unlike Denominators


Conclusion: How to Subtract Fractions

Subtracting fractions with like denominators involves simply finding the difference of the numerators (top values) and not changing the denominator (bottom value).

Subtracting fractions with unlike denominators requires you to find a common denominator, which is a value that both denominators divide evenly into.

How do you subtract fractions? You can solve any fraction subtraction problem by applying the following three step method:

  • Step One: Identify whether the denominators are the same (like) or different (unlike).

  • Step Two: If the example involves like denominators, move onto Step Three. If they are unlike denominators, find a common denominator.

  • Step Three: Subtract the numerators and find the difference.

Keep Learning:


Search Tags: how to subtract fractions, subtracting fractions, how to subtract fractions with different denominators, fraction subtraction, subtracting fractions with unlike denominators, how do you subtract fractions?

2 Comments