10 National Pi Day Fun Facts You Need to Know!

3 Comments

10 National Pi Day Fun Facts You Need to Know!

10 National Pi Day Fun Facts

March 14th is National Pi Day—a time to celebrate the mathematical π Symbol, which represents the value 3.1415926535897932384626433832…, but is often approximated to 3.14, which is why 3/14 is the date of National Pi Day every year.

You can celebrate at home and in the classroom by learning some awesome Pi Day fun facts that everyone should know!

1332.jpg

Source: Mashup Math FP

Pi (π) represents the ratio of the circumference of any circle to its diameter. This groundbreaking mathematical fact is learned by all math students and is a fundamental math fact related to circles and cyclic relationships.

(Note that Pi Day should not be confused with Pi Approximation Day, which is celebrated on July 22nd since the fraction 22/7 is commonly used to approximate π since 22/7 = 3.142857143…)

There are many ways to celebrate National Pi Day, including snacking on circular-shaped foods like pizza and cookies, solving fun pi-themed math puzzles like the Which is More Pizza? brain teaser, and by learning some new fun facts about Pi and Pi Day.

For example, did you know that Albert Einstein’s birthday is on National Pi Day?

And if you want to learn more fun facts about Pi Day, check out our list of the 10 Most Interesting National Pi Day Fun Facts.

(Note that the following Pi Day Fun Facts are also featured on our 10 Pi Day Fun Facts YouTube video.

The Best National Pi Day Fun Facts


 1.) The History of Pi Day

When was the first Pi Day?

 The first National Pi Day was observed in 1988 by the American artist and physicist Larry Shaw in San Francisco by marching in circles with colleagues and snacking on different kinds of pie.

In 2009, the United States House of Representatives officially designated March 14th as National Pi Day and identified Shaw as the founder of the famous mathematical holiday.

Pi Day was first celebrated in San Francisco in 1988. (Photo by Daniel J. Schwarz on Unsplash)


2) What is π?

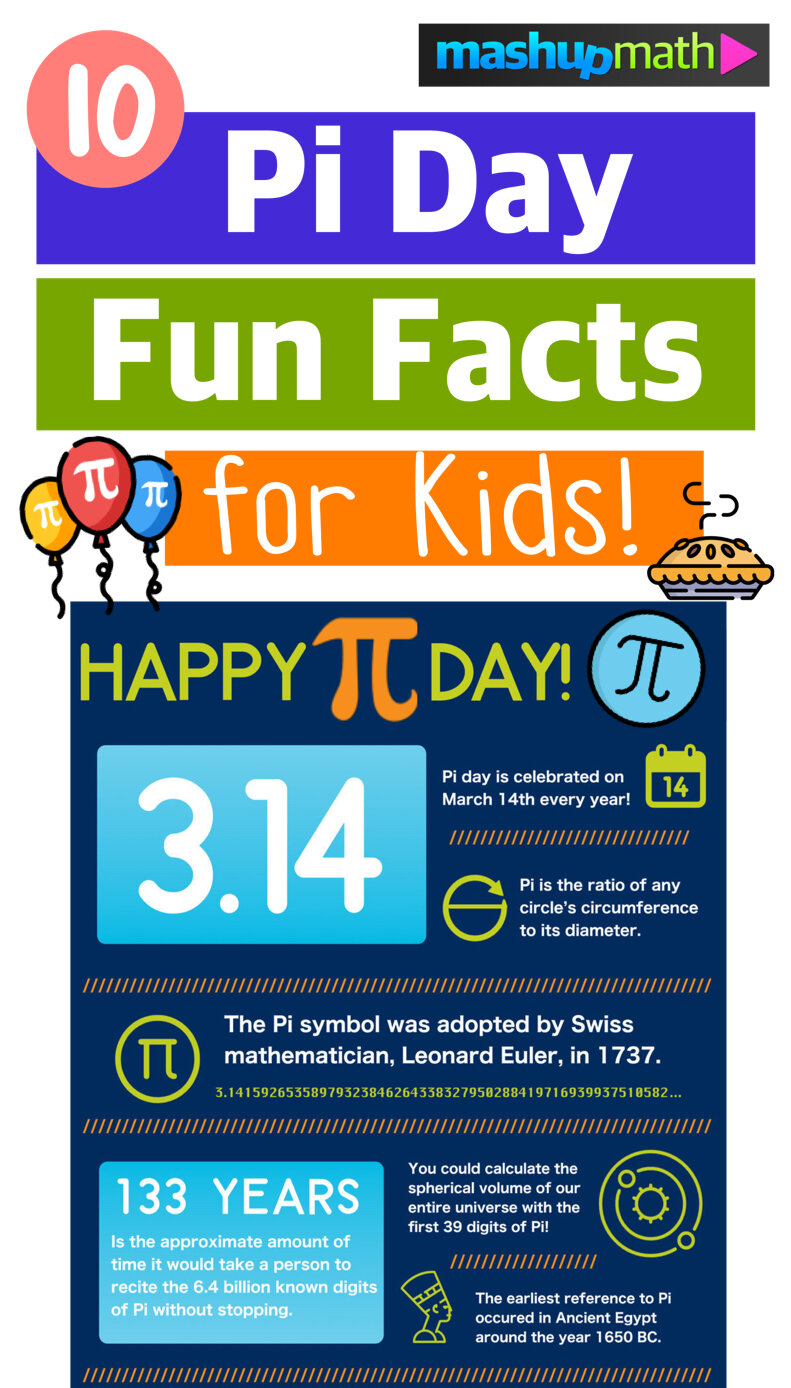
Pi (π) is the ratio of any circle’s circumference to its diameter.

The value of this ratio is approximately 3.14 and, yes, this relationship applies to any circle big or small.

 
Snip20210303_5.png
 

3.) Where did the Pi Symbol (π) come from?

 The π symbol that we use in math to represent pi was first used by the Swiss mathematician, physicist, and astronomer Leonard Euler in the year 1737.

Before Euler popularized using the Greek symbol π to represent the ratio of a circle’s circumference to its diameter, the value was known as Archimedes' constant.


Looking for more Pi Day activities?

Check out our super-popular Pi Day Fun Facts video on YouTube!


4.) How Long is Pi?

 The value 3.14 is used as an approximation for Pi since it is an irrational number that continues on and on forever, hence the “…”

π =3.1415926535897932384626433832795028841971693…

The current world record for memorizing the digits of pi is 67,890 consecutive digits set by Lu Chao in 2005.

Mathematicians estimate that it would take 133 years for a person to recite the 6.4 billion known digits of Pi without stopping!


5.) What is the earliest reference to Pi?

Even though the Greek symbol π wasn’t adopted until the 1700s, the earliest references to the constant ratio between any circle’s circumference and diameter occurred in Ancient Egypt around 1650 BCE.

Pretty cool, right?

Pi dates back to Ancient Egypt!

Pi dates back to Ancient Egypt! (Photo by Kévin et Laurianne Langlais on Unsplash)


6.) What is the most commonly occurring number in the first 100,000 decimal places of Pi?

The most common number in the first 100,000 decimal places of pi is the number 1, which occurs over 10,000 times!

 
Snip20210303_7.png
 

image-asset.jpg

Looking for more Pi Day activities?

Get your free Pi Day Fun Facts infographic!

(Perfect to share with students on March 14th!)


7.) Are there any famous Pi Day birthdays?

There are several famous people born on March 14th, Pi Day, including Albert Einstein, NBA All-Star Steph Curry, Actors Billy Crystal and Michael Caine, and Olympic Gold Medalist Simone Biles.


Source: Mashup Math MJ

8.)   Who discovered the greatest number of digits of Pi?

Mathematician and computer scientist Fabrice Bellard calculated 2.7 trillion decimal places of pi using just a typical desktop computer in 2010.

That’s a lot of digits!


9.)  How long is Pi?

As mentioned earlier, Pi is an irrational number and is thus infinite. In fact, it would take 12 billion digits of pi typed out using a normal-sized font to connect New York City and Kansas City.

And since pi goes on forever, it has enough digits to wrap around the entire world an infinite number of times!

Source: Mashup Math FP


10.) Is Pi present in nature?

You bet!

Pi can be used to measure circular natural events ranging from water ripples that emanate from a single point to finding the spherical volume of the entire universe (which can be done using only the first 39 digits of pi!)

Photo by Omar Gattis on Unsplash


11.) Bonus!  What about Pie Day?

 Even though Pi Day is a mathematical holiday, it’s hard to ignore the homophone that is PIE DAY.

 Many people celebrate Pi Day by eating pie and other circular-shaped foods.

 In fact, many pizzerias and bakeries offer special Pi Day deals and discounts on March 14th each year.

 And as for pies, Apple Pie is considered the most preferred flavor of pie amongst Americans, with Pumpkin Pie coming in second, and Pecan Pie in third.

hugo-aitken-PqYvDBwpXpU-unsplash.jpg

Photo by Hugo Aitken on Unsplash


(Never miss a Mashup Math blog--click here to get our weekly newsletter!)

By Anthony Persico

More Math-Related Posts and Resources You Will Love:

 
PiDayFunFacts.jpg

3 Comments

10 Free Kindergarten Math Worksheets (PDF Downloads)

3 Comments

10 Free Kindergarten Math Worksheets (PDF Downloads)

10 Free Kindergarten Math Worksheet PDFs

A Post By: Anthony Persico

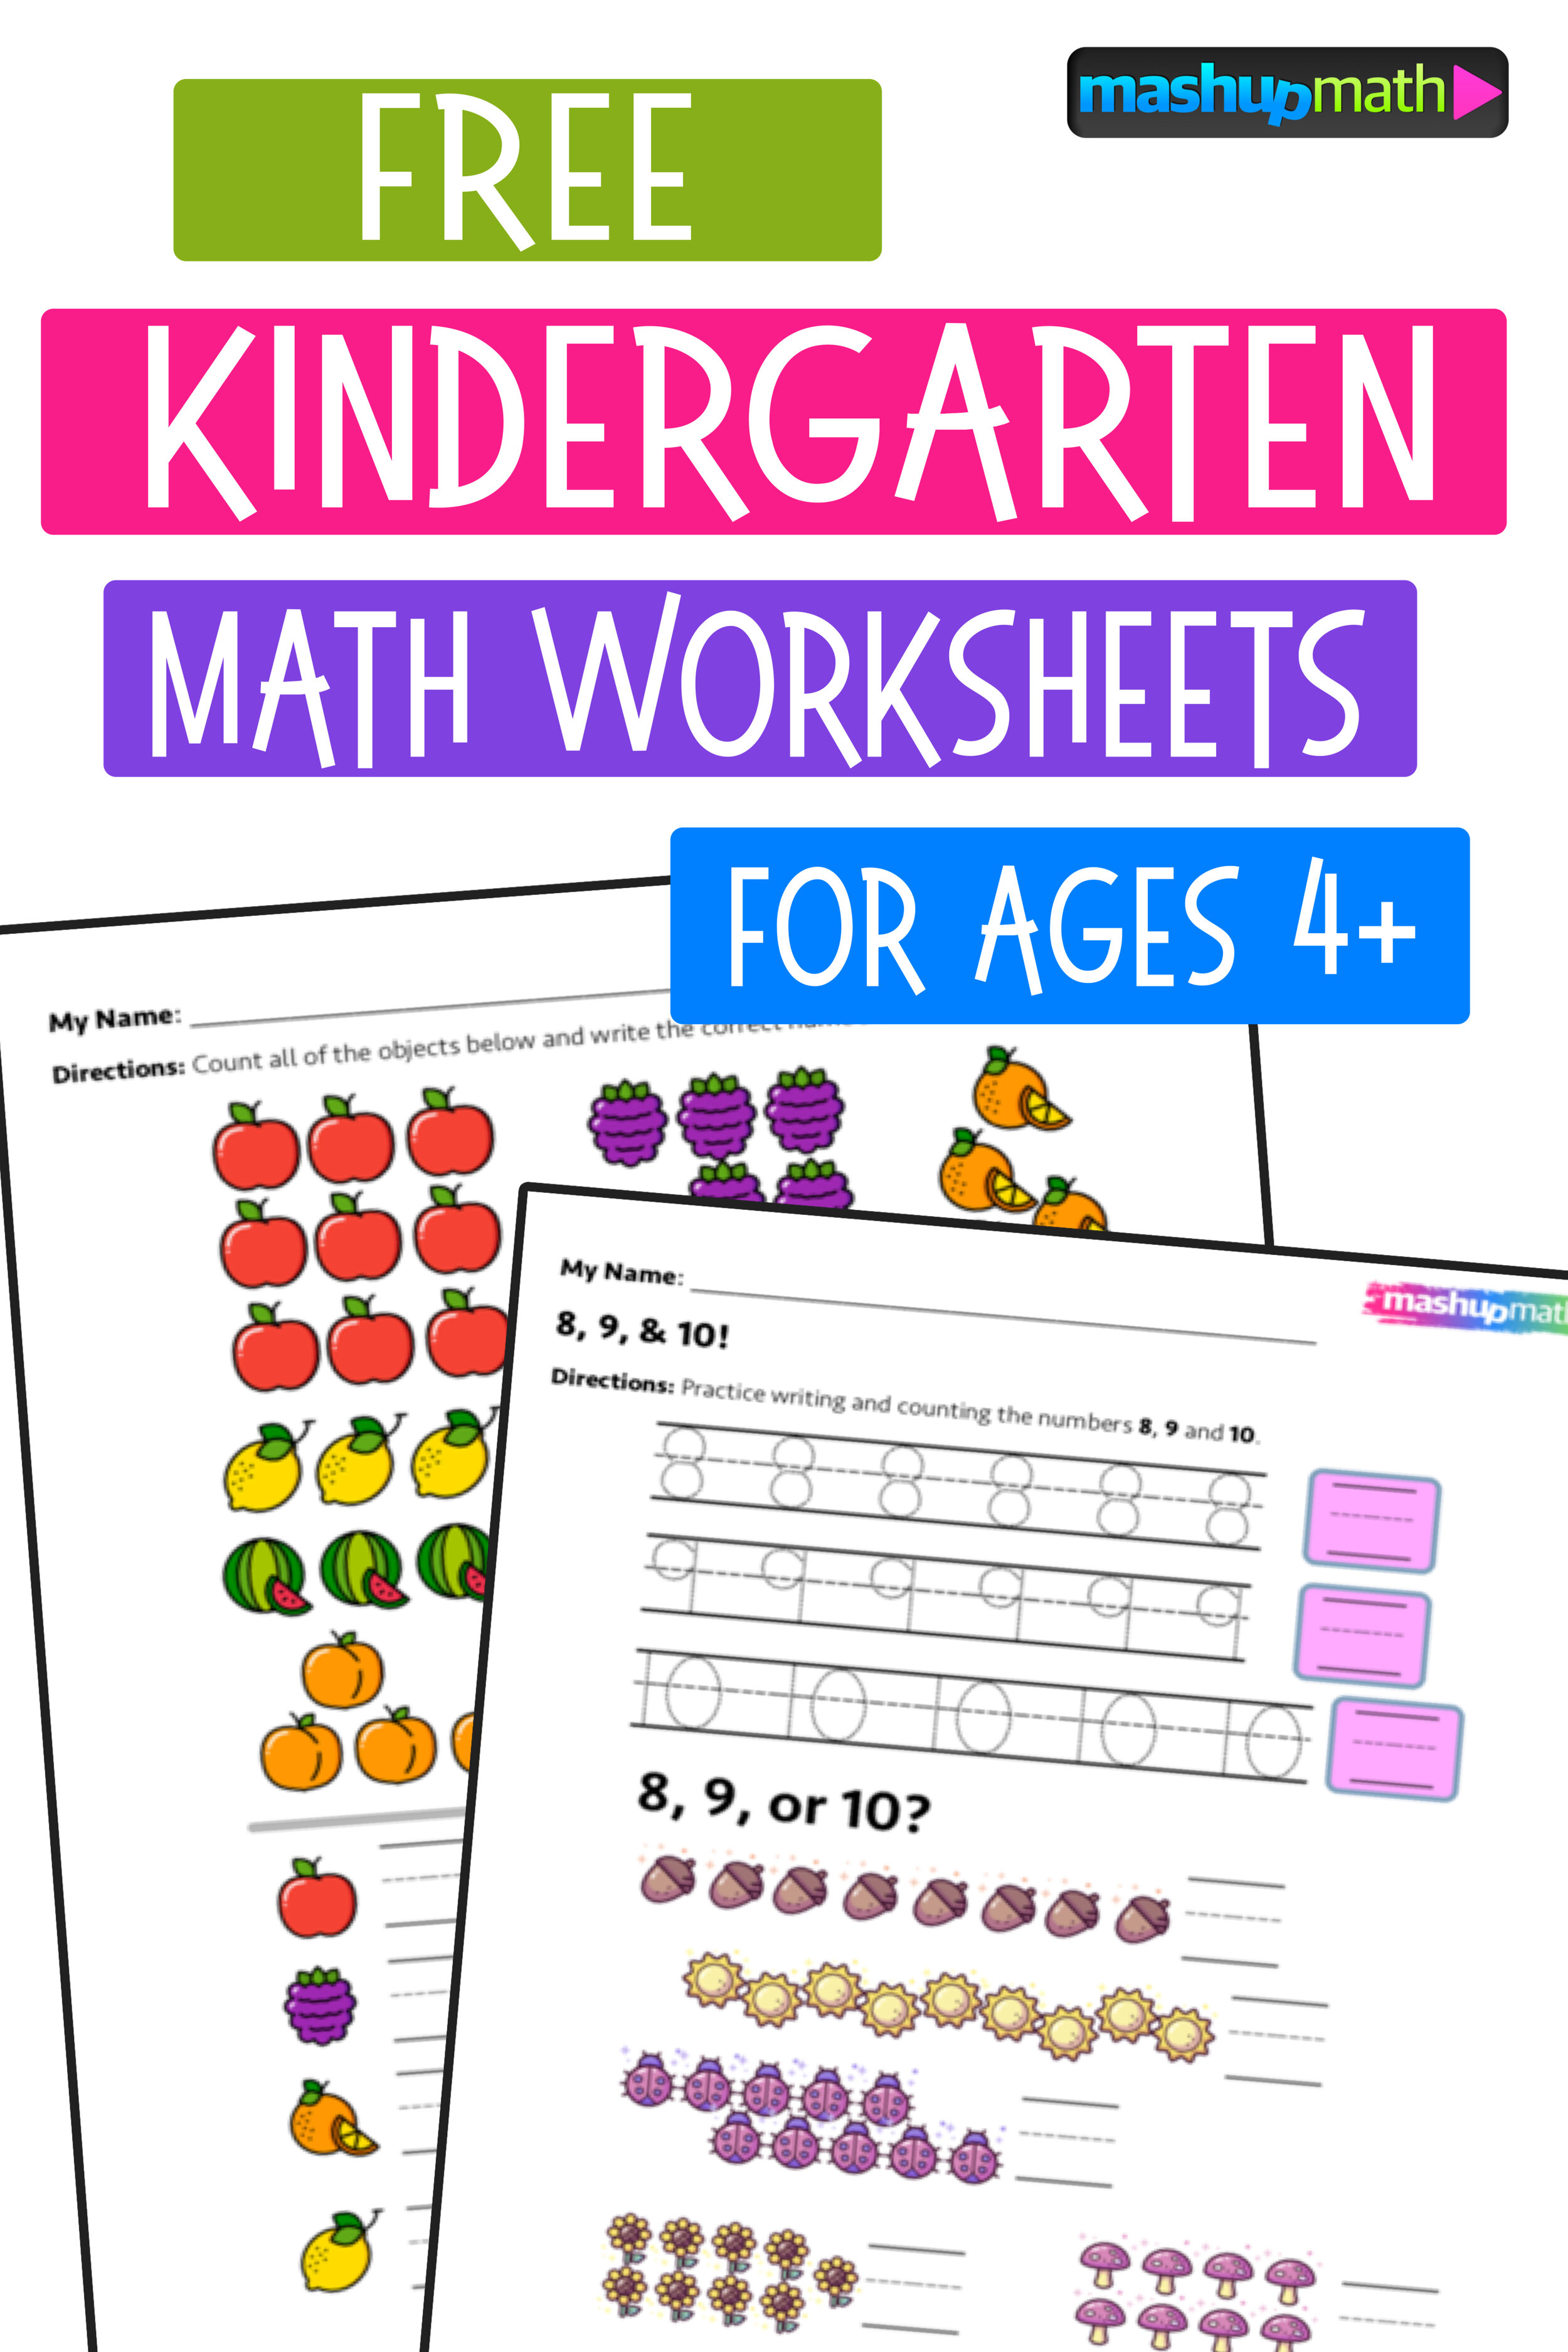
Are you looking for a handy of collection of 10 fun and engaging worksheets for kindergarten-level students? All of the following free kindergarten math worksheets come as PDF files that are easy to download, print, and share for use at home or in the classroom. Enjoy!

Banner.png

How to Use These Worksheets:

This collection of free kindergarten math worksheets can be shared with children ages 4 and up. The worksheets cover introductory math topics including identifying and writing numbers from 0 to 13, counting, and grouping. The activities are sequential and are designed to gradually include larger numbers and groupings (starting with single-digits and eventually moving towards double-digits including the low teens). It is recommended that children complete the activities in order from worksheet one to worksheet ten in order to experience and grasp the progression from smaller numbers to larger ones.

These worksheets can be used by kindergarten teachers in the classroom and/or by parents with their kids at home and in homeschooling settings. Based on your child’s ability levels and past exposure to numbers and counting, you can choose to either allow them to work on the worksheets independently or to work with them while they complete the activities.

How to Download and Print:

Below you will find preview images and links to download all ten kindergarten math worksheets. There will also be a link denoted by a download symbol ⤓. Once you click on one of these links, the corresponding worksheet will download in a new window as a PDF file. Once the file is downloaded, you can save it to your personal device and or print the worksheet.

If you need a more detailed explanation of how to save and/or print any of these free pdf worksheets, please view our video tutorial by clicking this link.

*Note that you can click on any of the worksheet images to see an enlarged preview before you download.


10 Free Kindergarten Math Worksheets PDFs


1.) Practice with Single Digit Numbers

This worksheet lets children practice writing the numbers zero through seven and includes tracing lines. This foundational skill is a key prerequisite to learning how to count and eventually add values together.

⤓ Click Here to Download PDF Worksheet #1


2.) Focus on 4

This worksheet focuses on writing the number four and identifying the symbol in comparison with other single-digit numbers (up to 6). Children must be able to identify and write all of the single-digit numbers, including zero, before moving onto double-digits.

⤓ Click Here to Download PDF Worksheet #2


3.) Sixes and Sevens!

This worksheet focuses on writing the numbers six and seven and identifying whether there are six or seven objects in a given set. This worksheet provides important practice with comparing and contrasting single-digit numbers.

⤓ Click Here to Download PDF Worksheet #3


4.) Practice with 8, 9, and 10

This worksheet focuses specifically on writing, identifying, and counting the values 8, 9, and 10. It also introduces the first double-digit number, ten, as a naturally coming after 8 and 9.

⤓ Click Here to Download PDF Worksheet #4

(Remember that it’s perfectly fine for children to rely on finger counting to help them with any of these worksheets)


5.) Practice Counting Objects

This worksheet focuses on counting and identifying numbers from zero to ten. In this activity, students have to identify and circle the correct value for each object shown in the diagram.

⤓ Click Here to Download PDF Worksheet #5


Do you want Free K-12 Math Resources, Lesson Plans, and Activities in your inbox every week?


6.) Practice Counting and Writing Numbers

This worksheet gives children more practice with identifying and counting the numbers from one to ten and gives them extra practice with writing these numbers by hand.

⤓ Click Here to Download PDF Worksheet #6


7.) Practice Counting Objects

This worksheet focuses on counting and identifying numbers from one to ten. In this activity, students have to identify and circle the correct value for each object shown in the diagram.

⤓ Click Here to Download PDF Worksheet #7


8.) Practice Comparing Numbers

This worksheet focuses on identifying and comparing values between three and ten. This foundational skill is a key prerequisite to understanding composite numbers and being able to add, subtract, multiply, and divide.

⤓ Click Here to Download PDF Worksheet #8


9.) Writing Numbers 10 through 13

This worksheet focuses on the double-digit numbers from ten to thirteen and gives children a guided practice opportunity to identify and write these numbers by hand.

⤓ Click Here to Download PDF Worksheet #9


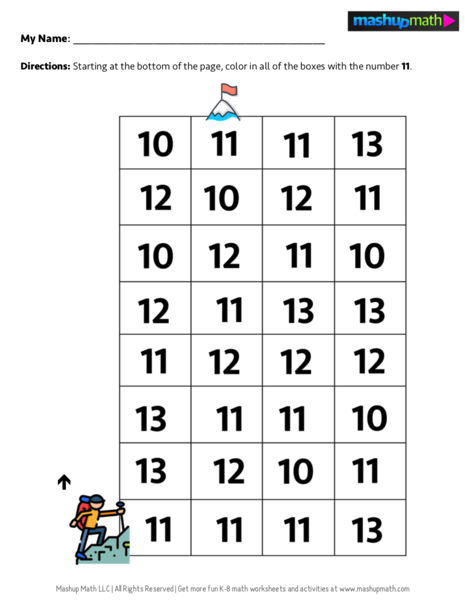
10.) Focus on 11

This worksheet focuses on identifying the number eleven when grouped with other double-digit numbers (10, 12, and 13). This activity helps children to become more comfortable working with and identifying double-digit numbers and prepares them to eventually learn the numbers 14 through 20.

⤓ Click Here to Download PDF Worksheet #10

Snip20210223_26.png

WAIT!

Do YOU Want On-Demand Access to All of Our Kindergarten Math Lesson Resources, Worksheets, and Activities?

Do you want on-demand access to ALL of our kindergarten math activities, worksheets, lesson plans, and puzzle libraries?

Mashup Math Members gain access to thousands of engaging grade-specific math puzzles, activities, and worksheets for grades K-8. Learn more and sign up for a free 7-day trial today!


Anthony is the content crafter and head educator for YouTube's MashUp Math and an advisor to Amazon Education's 'With Math I Can' Campaign. You can often find me happily developing animated math lessons to share on my YouTube channel . Or spending way too much time at the gym or playing on my phone.

You Might Also Like…

NewBlogImage.png
K_PIN.jpg
 
NewPin_01.jpg

3 Comments

How to Use a Protractor: Your Complete Guide

1 Comment

How to Use a Protractor: Your Complete Guide

Complete Guide: How to Use a Protractor

Key Question: How can I use a protractor to measure angles?

Learn how to solve these kinds of problems.

Learn how to solve these kinds of problems.

Welcome to this free lesson guide where you will learn how to read a protractor and how to use it to measure angles.

This complete guide on how to use a protractor includes several examples, an animated video mini-lesson, and a free worksheet and answer key.

Let’s get started!

How to Use a Protractor: Quick Review

Before we learn how to use the protractor tool to measure angles, let’s do a super quick review of angle notation (understanding this important skill will make learning how to use a protractor much easier).

Angle Notation: In geometry, an angle is denoted by the ∠ symbol and includes 3 consecutive letters which represent the three points that form the angle. Note that the middle letter denotes the vertex point of the angle.

For example, notice how in the diagram below that both angles ∠ABD and ∠CBD have point B as their vertex, but have different measures?

In this example, ∠ABD=120 and ∠CBD=60. But what happens when the angle measures are not included on the diagram? How can you find the measure of the angles in these kinds of situations?

This is where the protractor tool comes in!

AngleNotation.jpg
 

NamingANgles.jpg

Need some more help with naming angles?

If so, check out our short animated video lesson on how to name angles before moving forward with the protractor lesson.

Click here to watch the video on YouTube.


How to Use a Protractor

Now that you know understand angle notation, you are ready to learn how to use the protractor tool to find the measure of an angle.

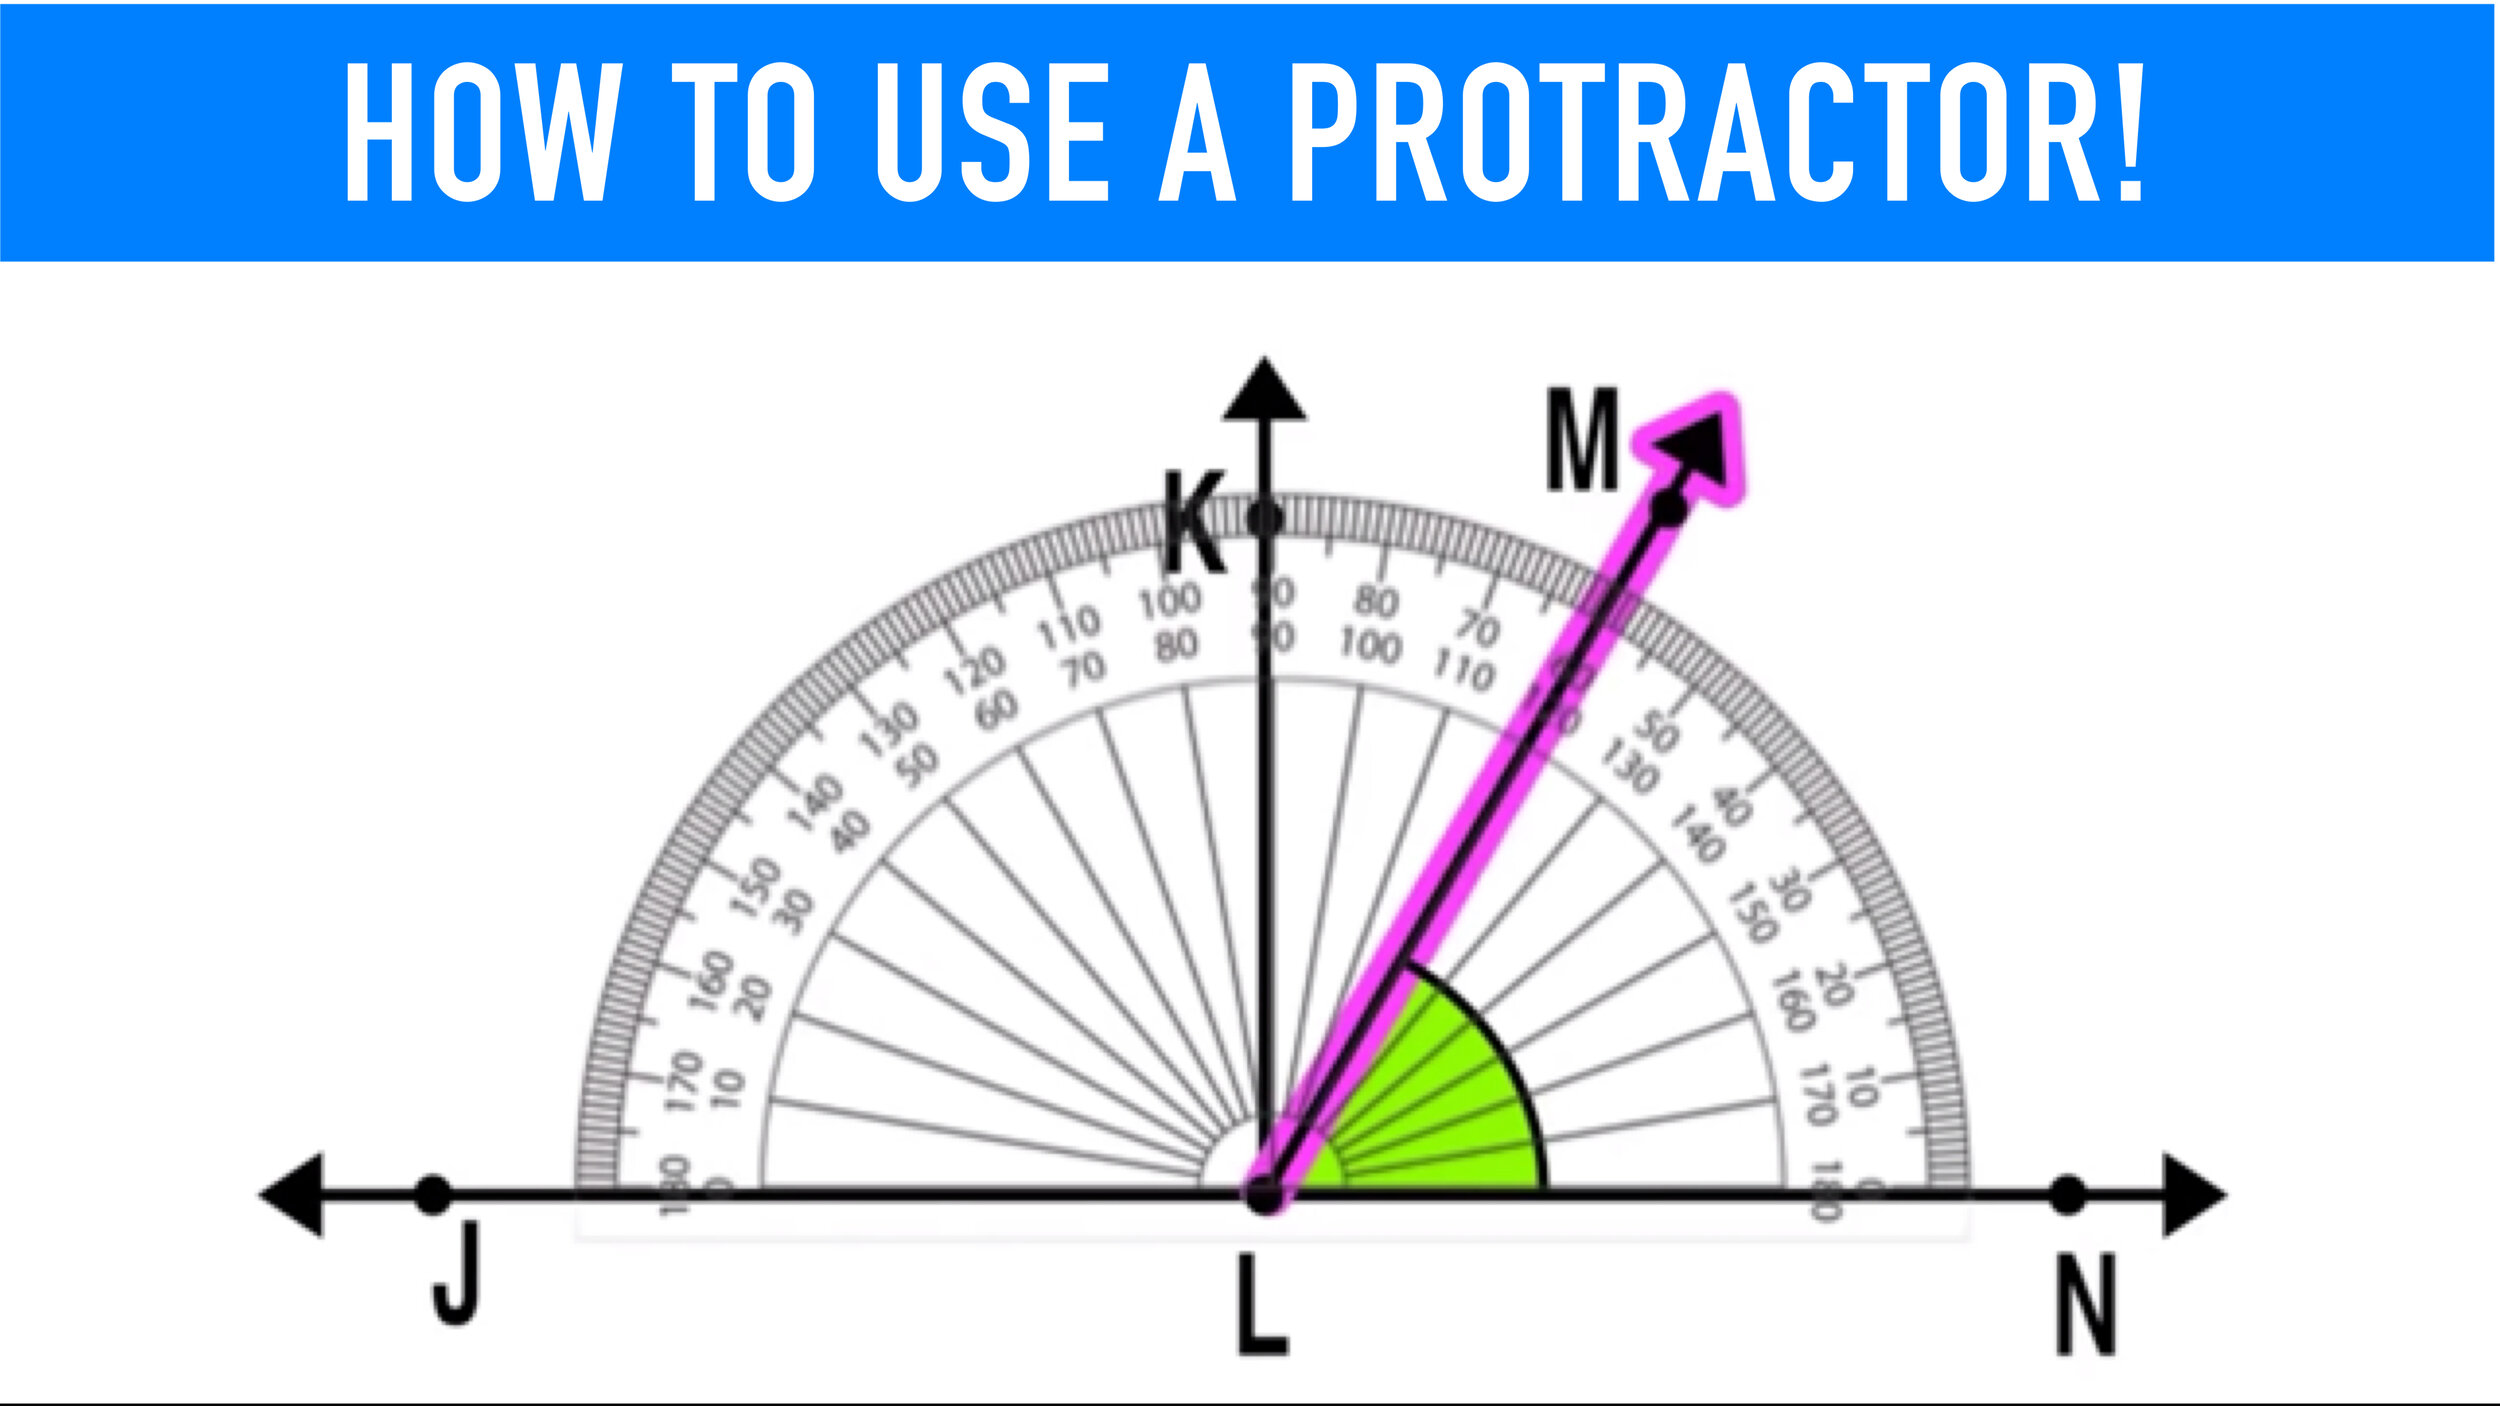
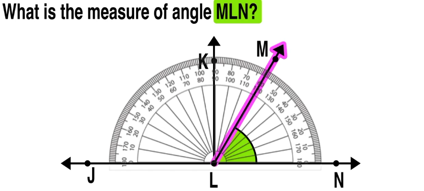
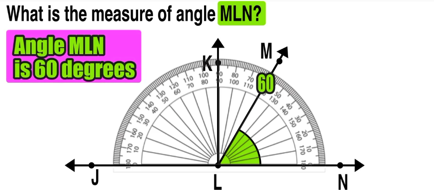
Example: Use a protractor to find the measure of ∠MLN in the diagram below.

Snip20210223_4.png
 

First, make sure that you correctly identify the angle in question. ∠MLN is the angle formed by points M, L, and N with a vertex at point L. Notice that the ∠MLN is now colored in the diagram below. If you find having the angle colored helpful, you can use markers or highlighters whenever you are using a protractor to measure angles on paper.

Snip20210223_5.png

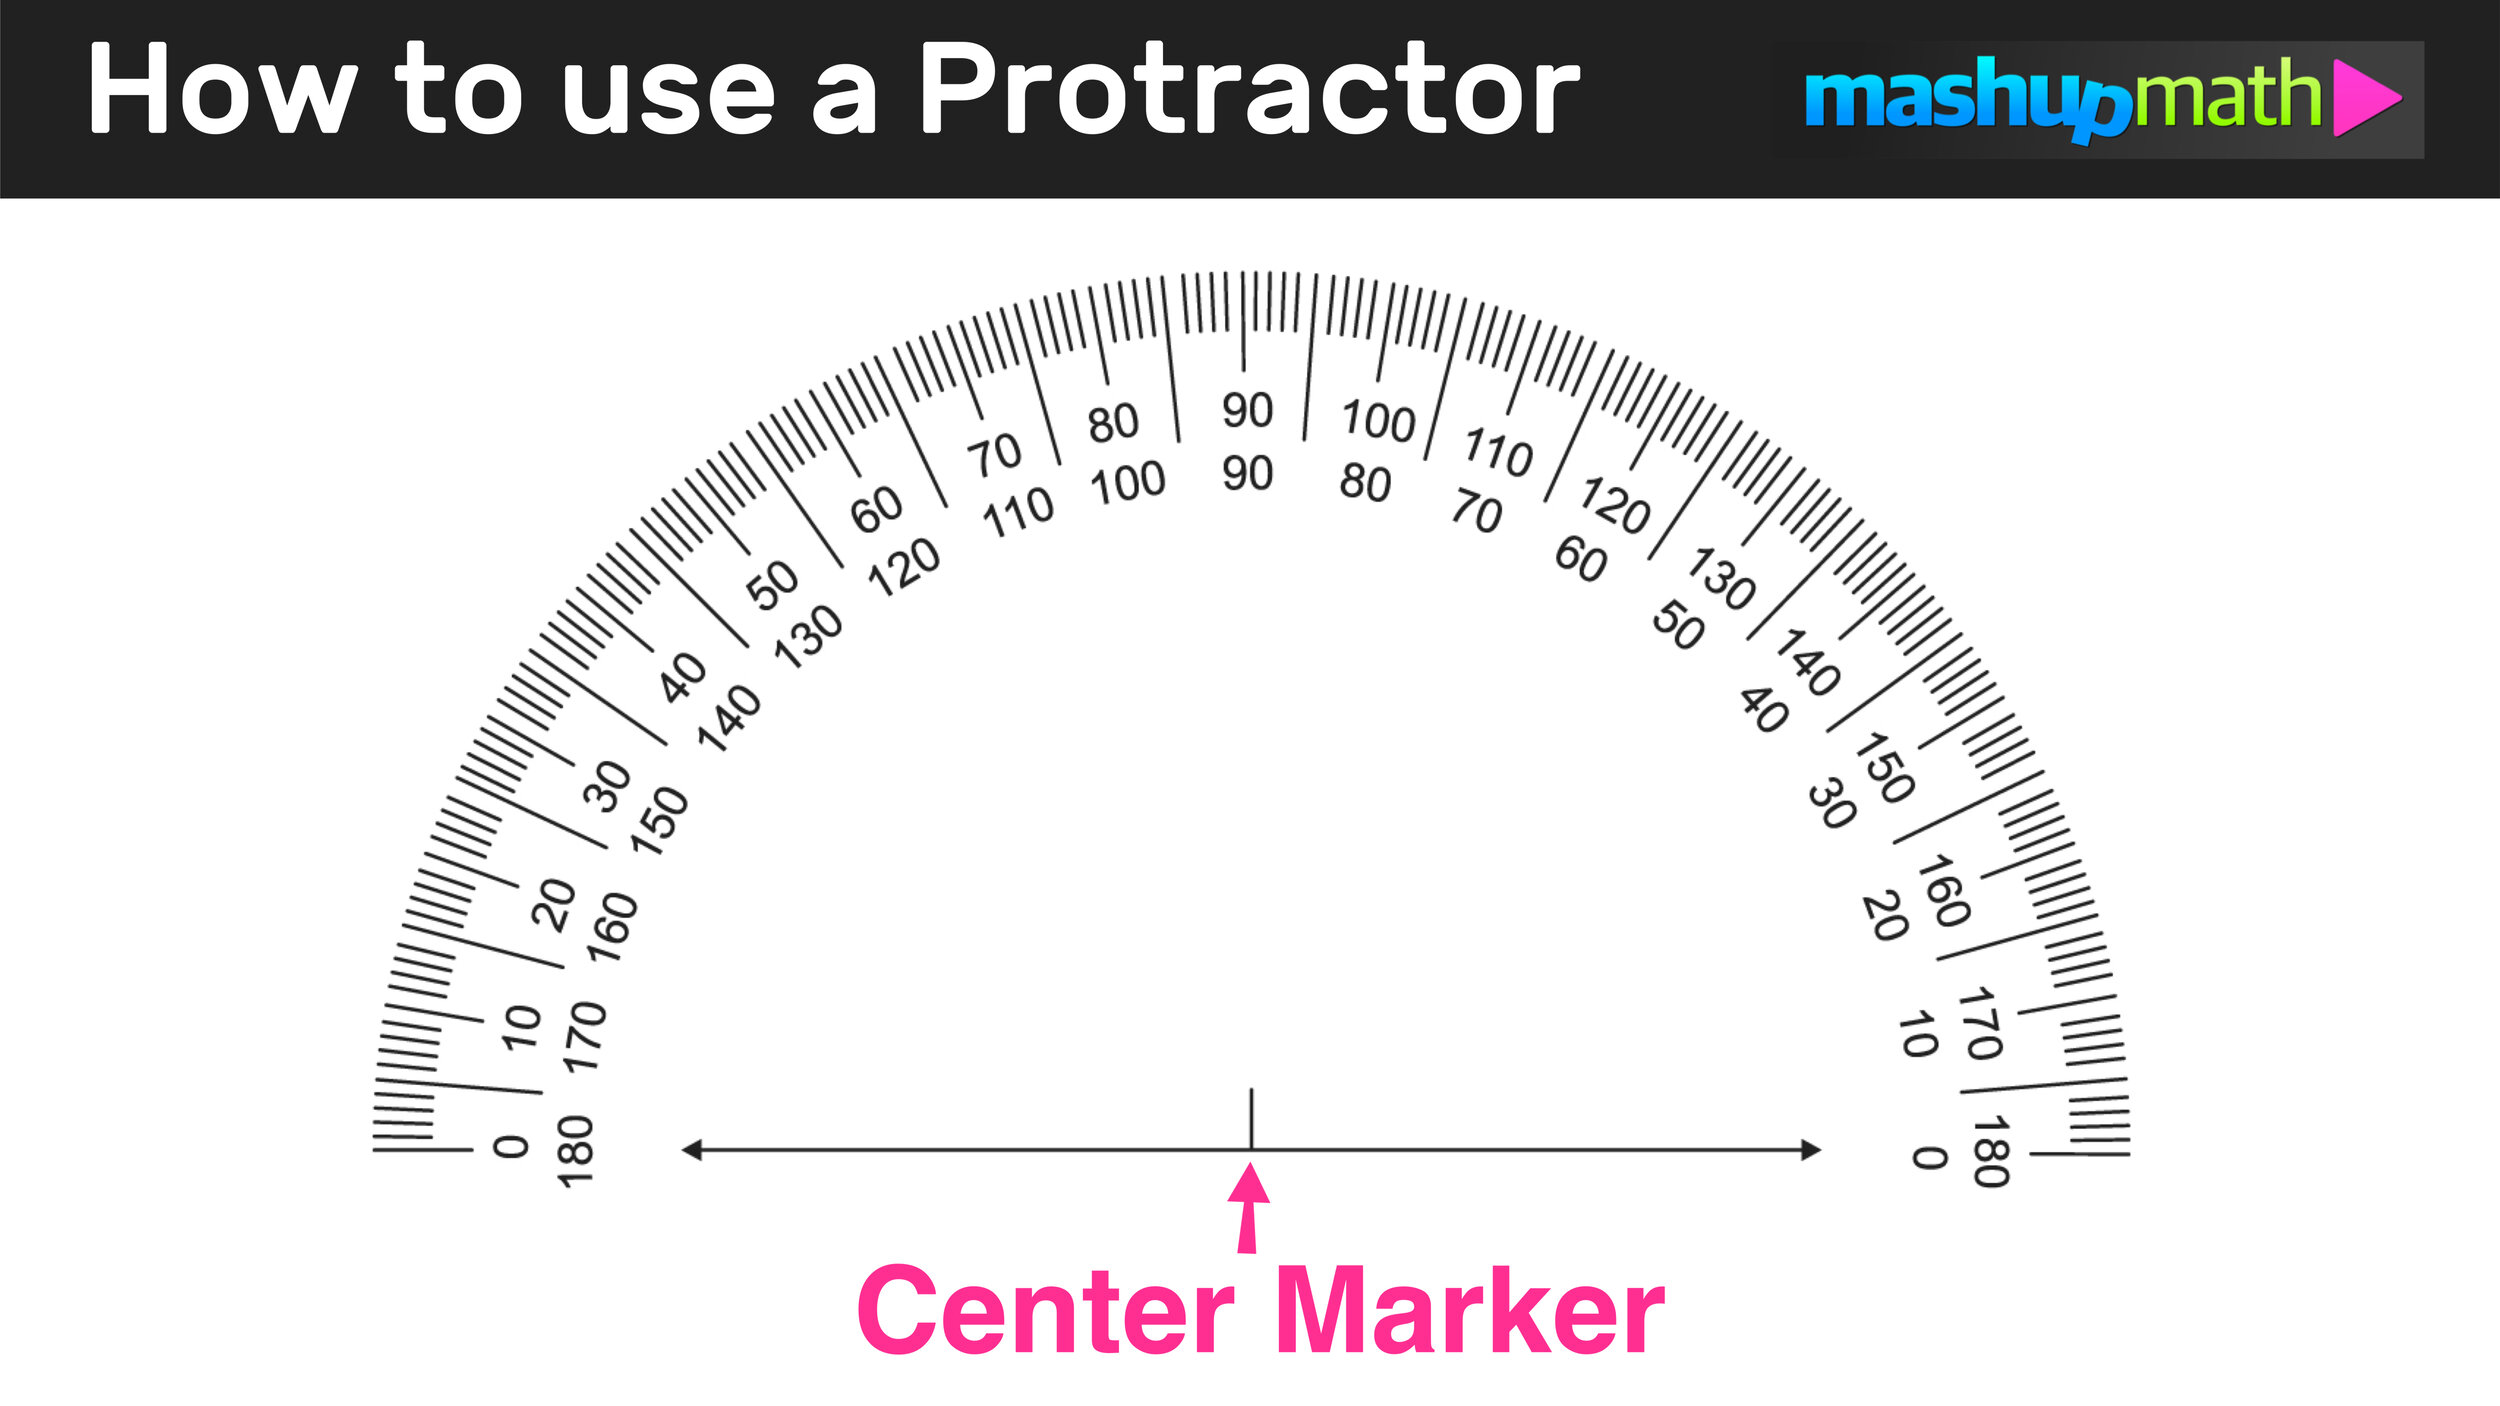
Quick Note: Before moving forward, identify the Center Marker on your protractor.

 
Center.jpg
 

The next step is to line up the center marker of the protractor with the vertex point of the angle (point L in this example) as follows:

Snip20210223_6.png

Make sure that the bottom ray of the angle (segment LN in this example) is aligned with the bottom of the protractor as shown in the diagram.

How to Read a Protractor

60 or 120?

60 or 120?

Now that you have your protractor in position, the last step is to use it to identify the angle measure.

Remember that we are trying to find the measure of ∠MLN. In order to do this, we must identify where the top ray of the angle (segment LM in this example) intersects with the protractor and then read the measurements.

Notice that where segment LM crosses the protractor, there are two values: 60 and 120.

Since ∠MLN is an acute angle (less than 90 degrees), you know that it can not equal 120 degrees.

Therefore, the measure of ∠MLN must be 60 degrees.

Snip20210223_8.png

How to Read a Protractor: More Examples

Below are a few more examples of how to read a protractor.

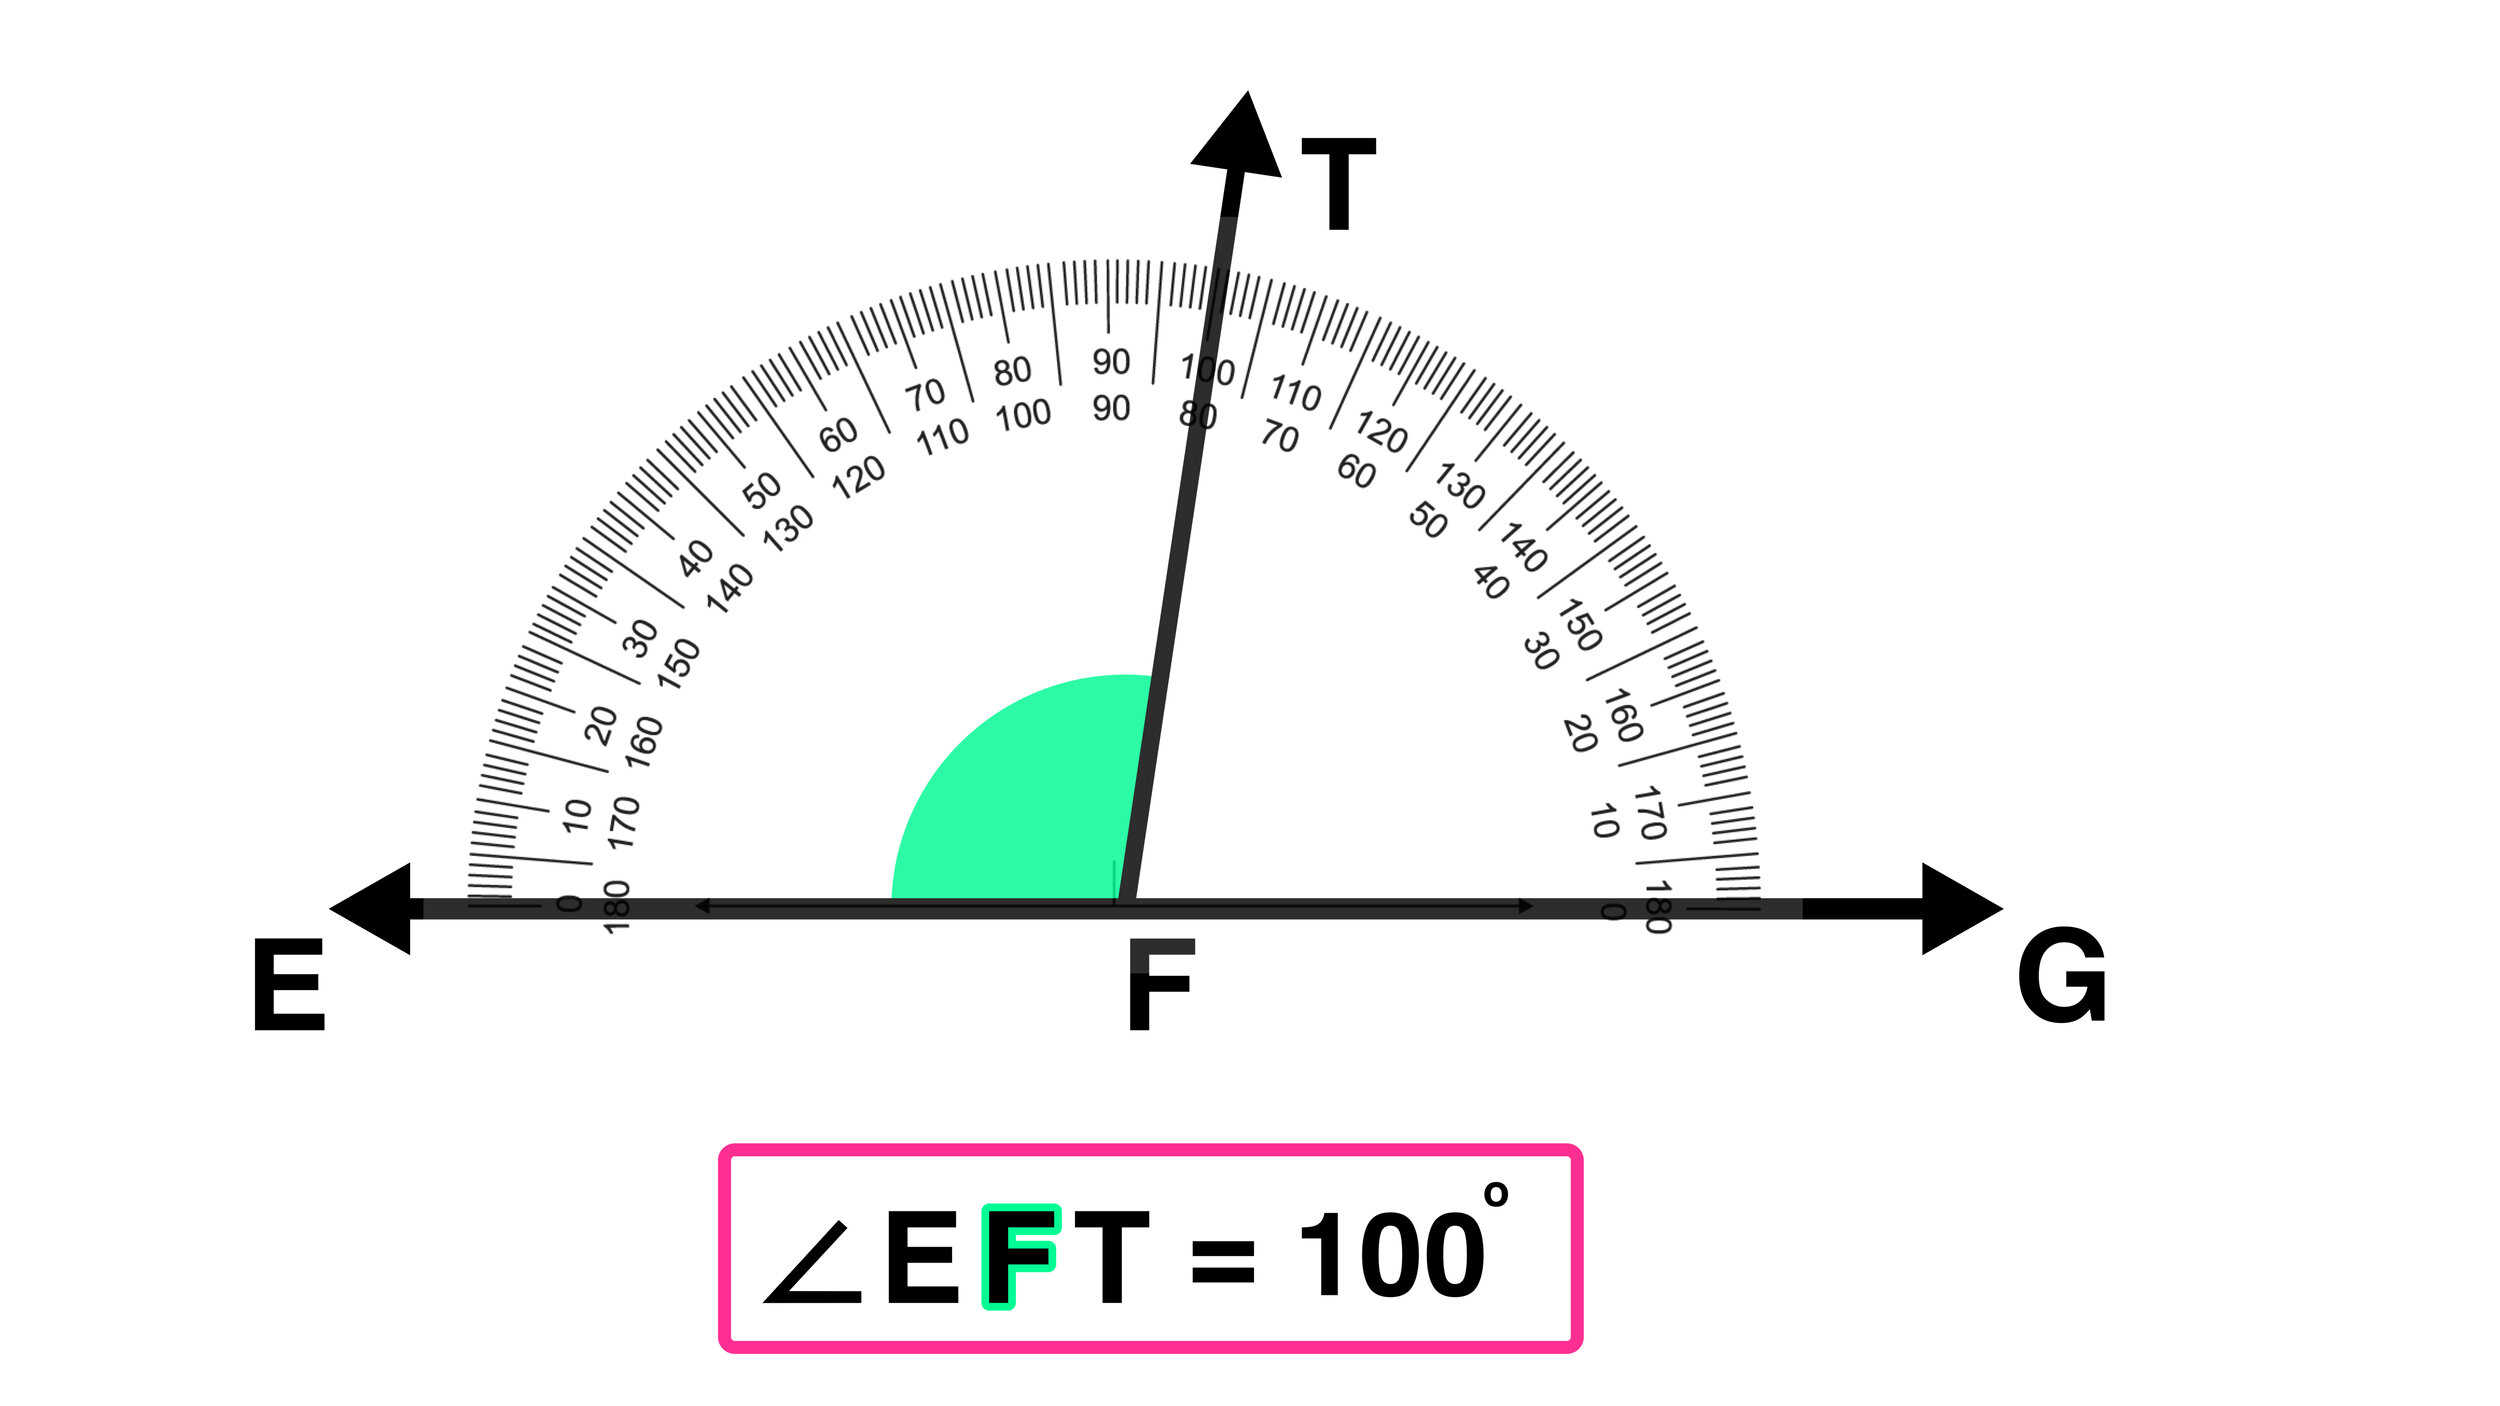
Example A: ∠EFT = 100

Notice that the angle in question is obtuse (>90 degrees)

Notice that the angle in question is obtuse (>90 degrees)

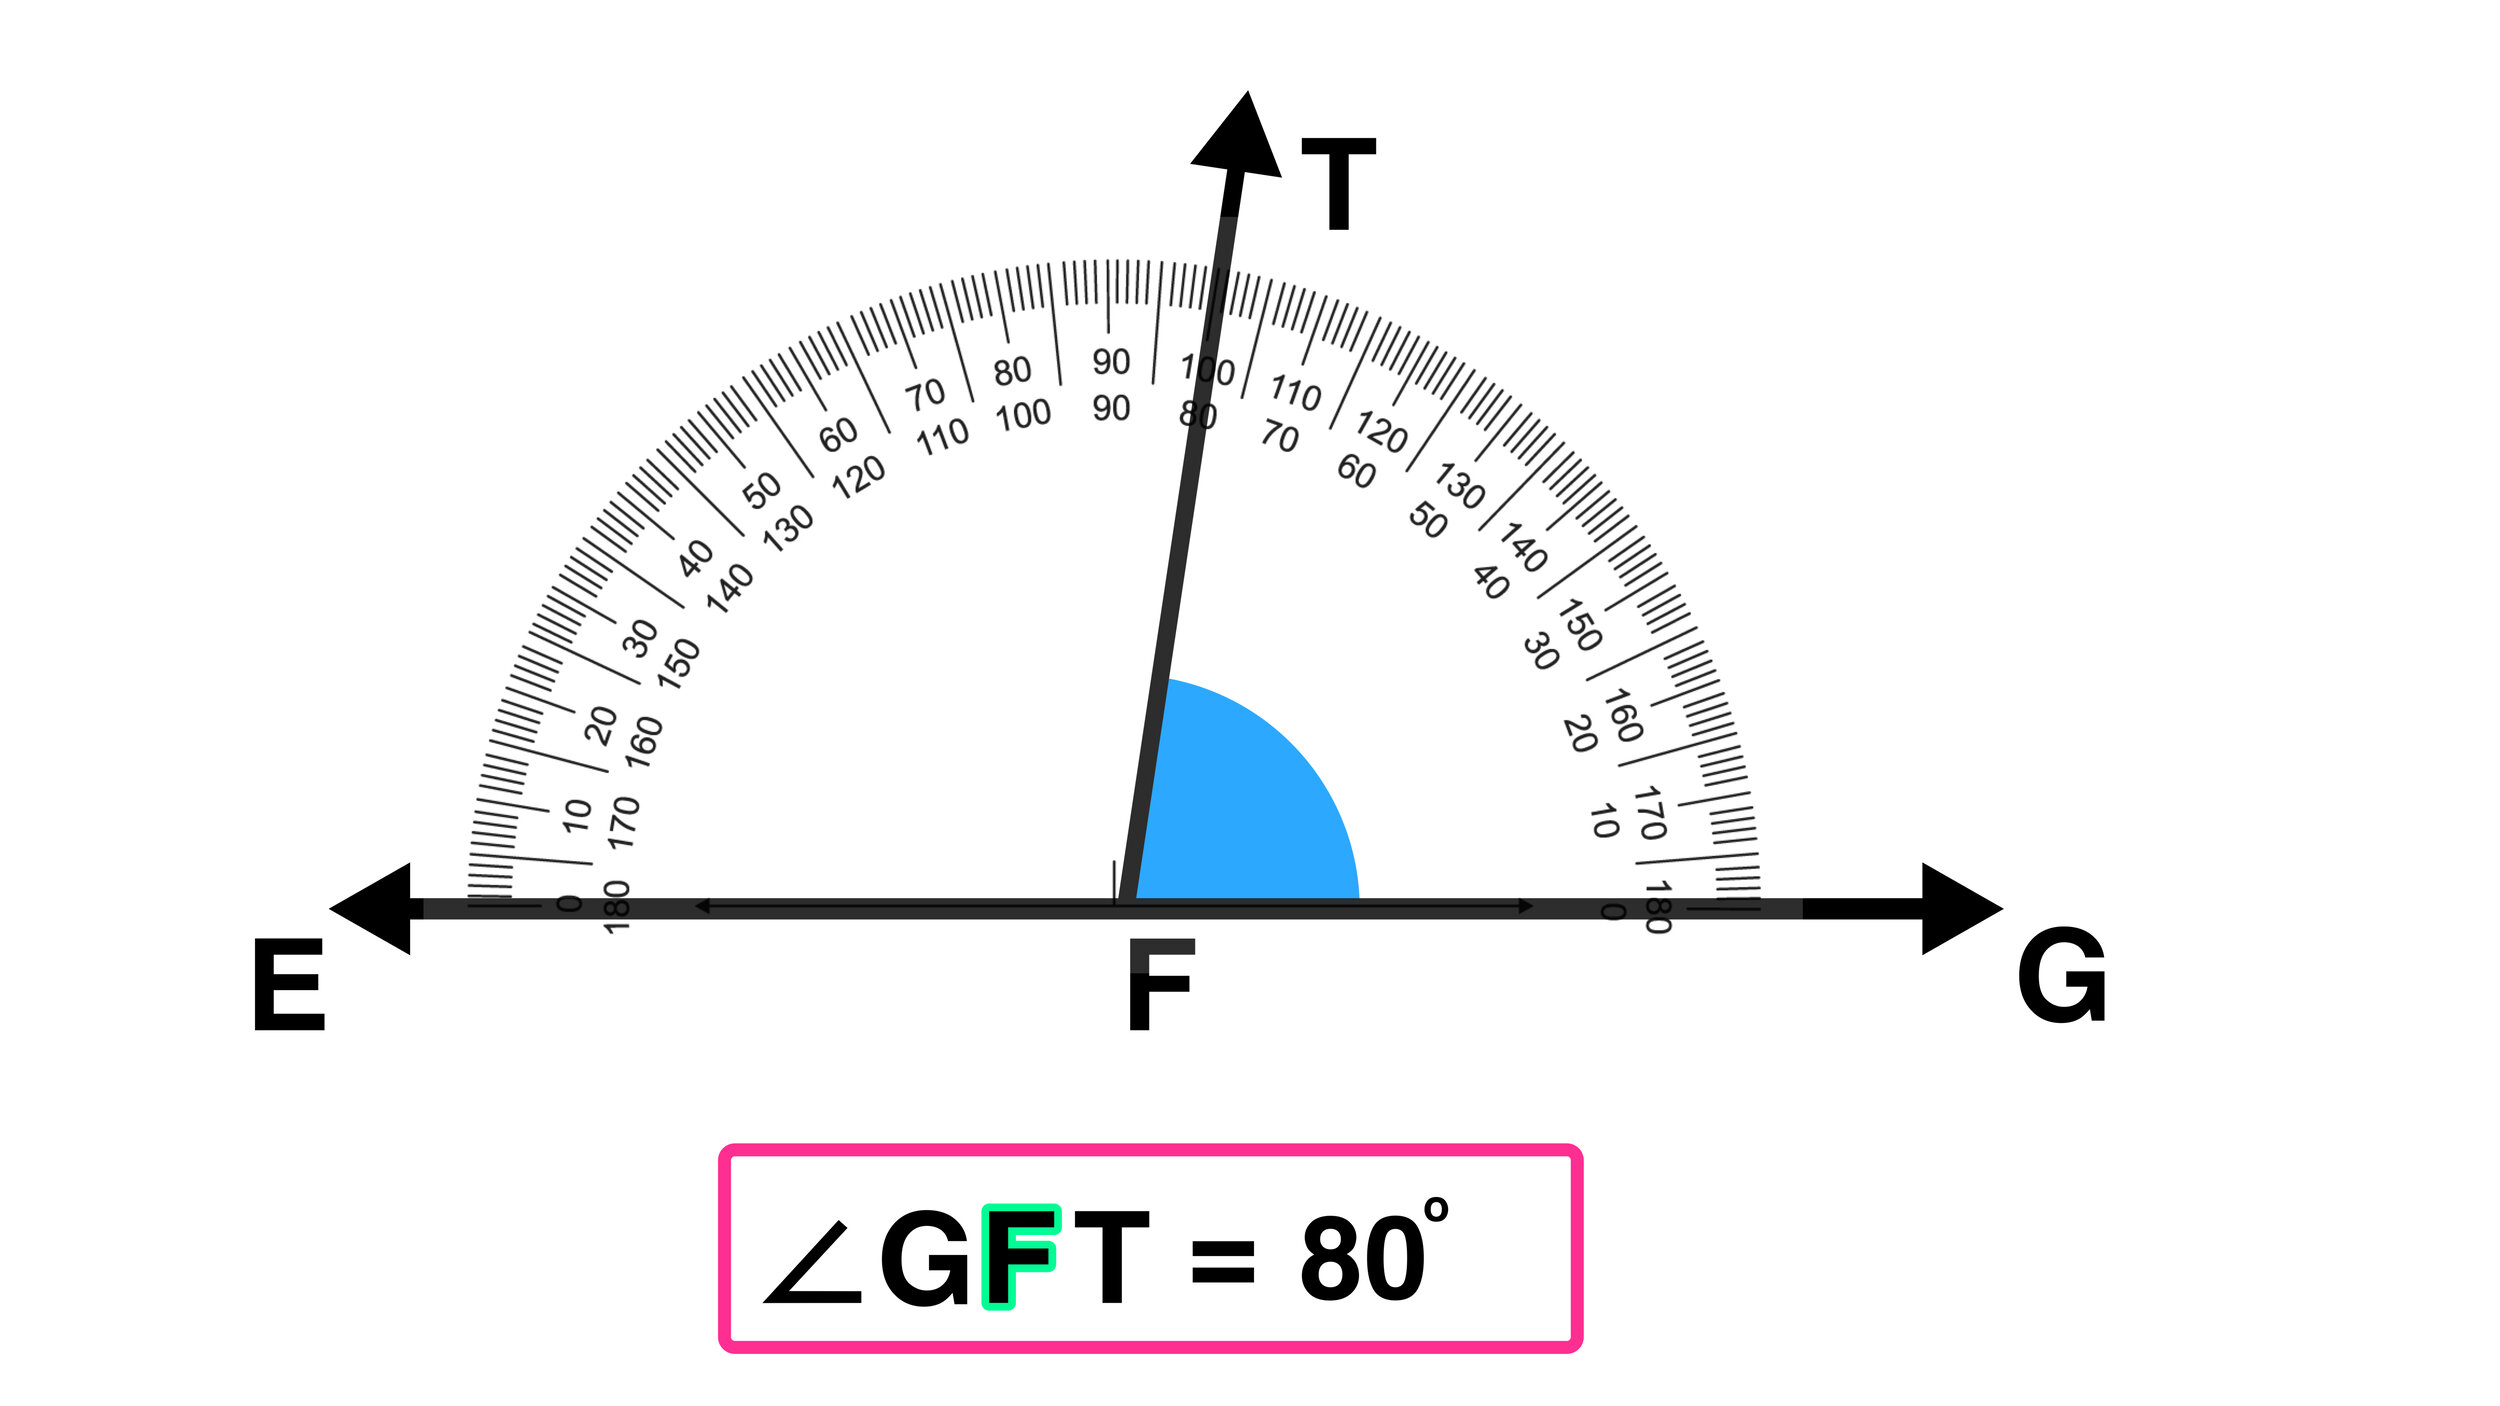
Example B: ∠GFT = 80

Notice that the angle in question is acute  (<90 degrees)

Notice that the angle in question is acute (<90 degrees)

Example C: ∠RQS = 35

Notice that the angle in question is acute  (&lt;90 degrees)

Notice that the angle in question is acute (<90 degrees)

Example D: ∠PQS = 151

Notice that the angle in question is obtuse  (&gt;90 degrees)

Notice that the angle in question is obtuse (>90 degrees)

Example E: Right Angles

Ex05.jpg
Example06.jpg
 

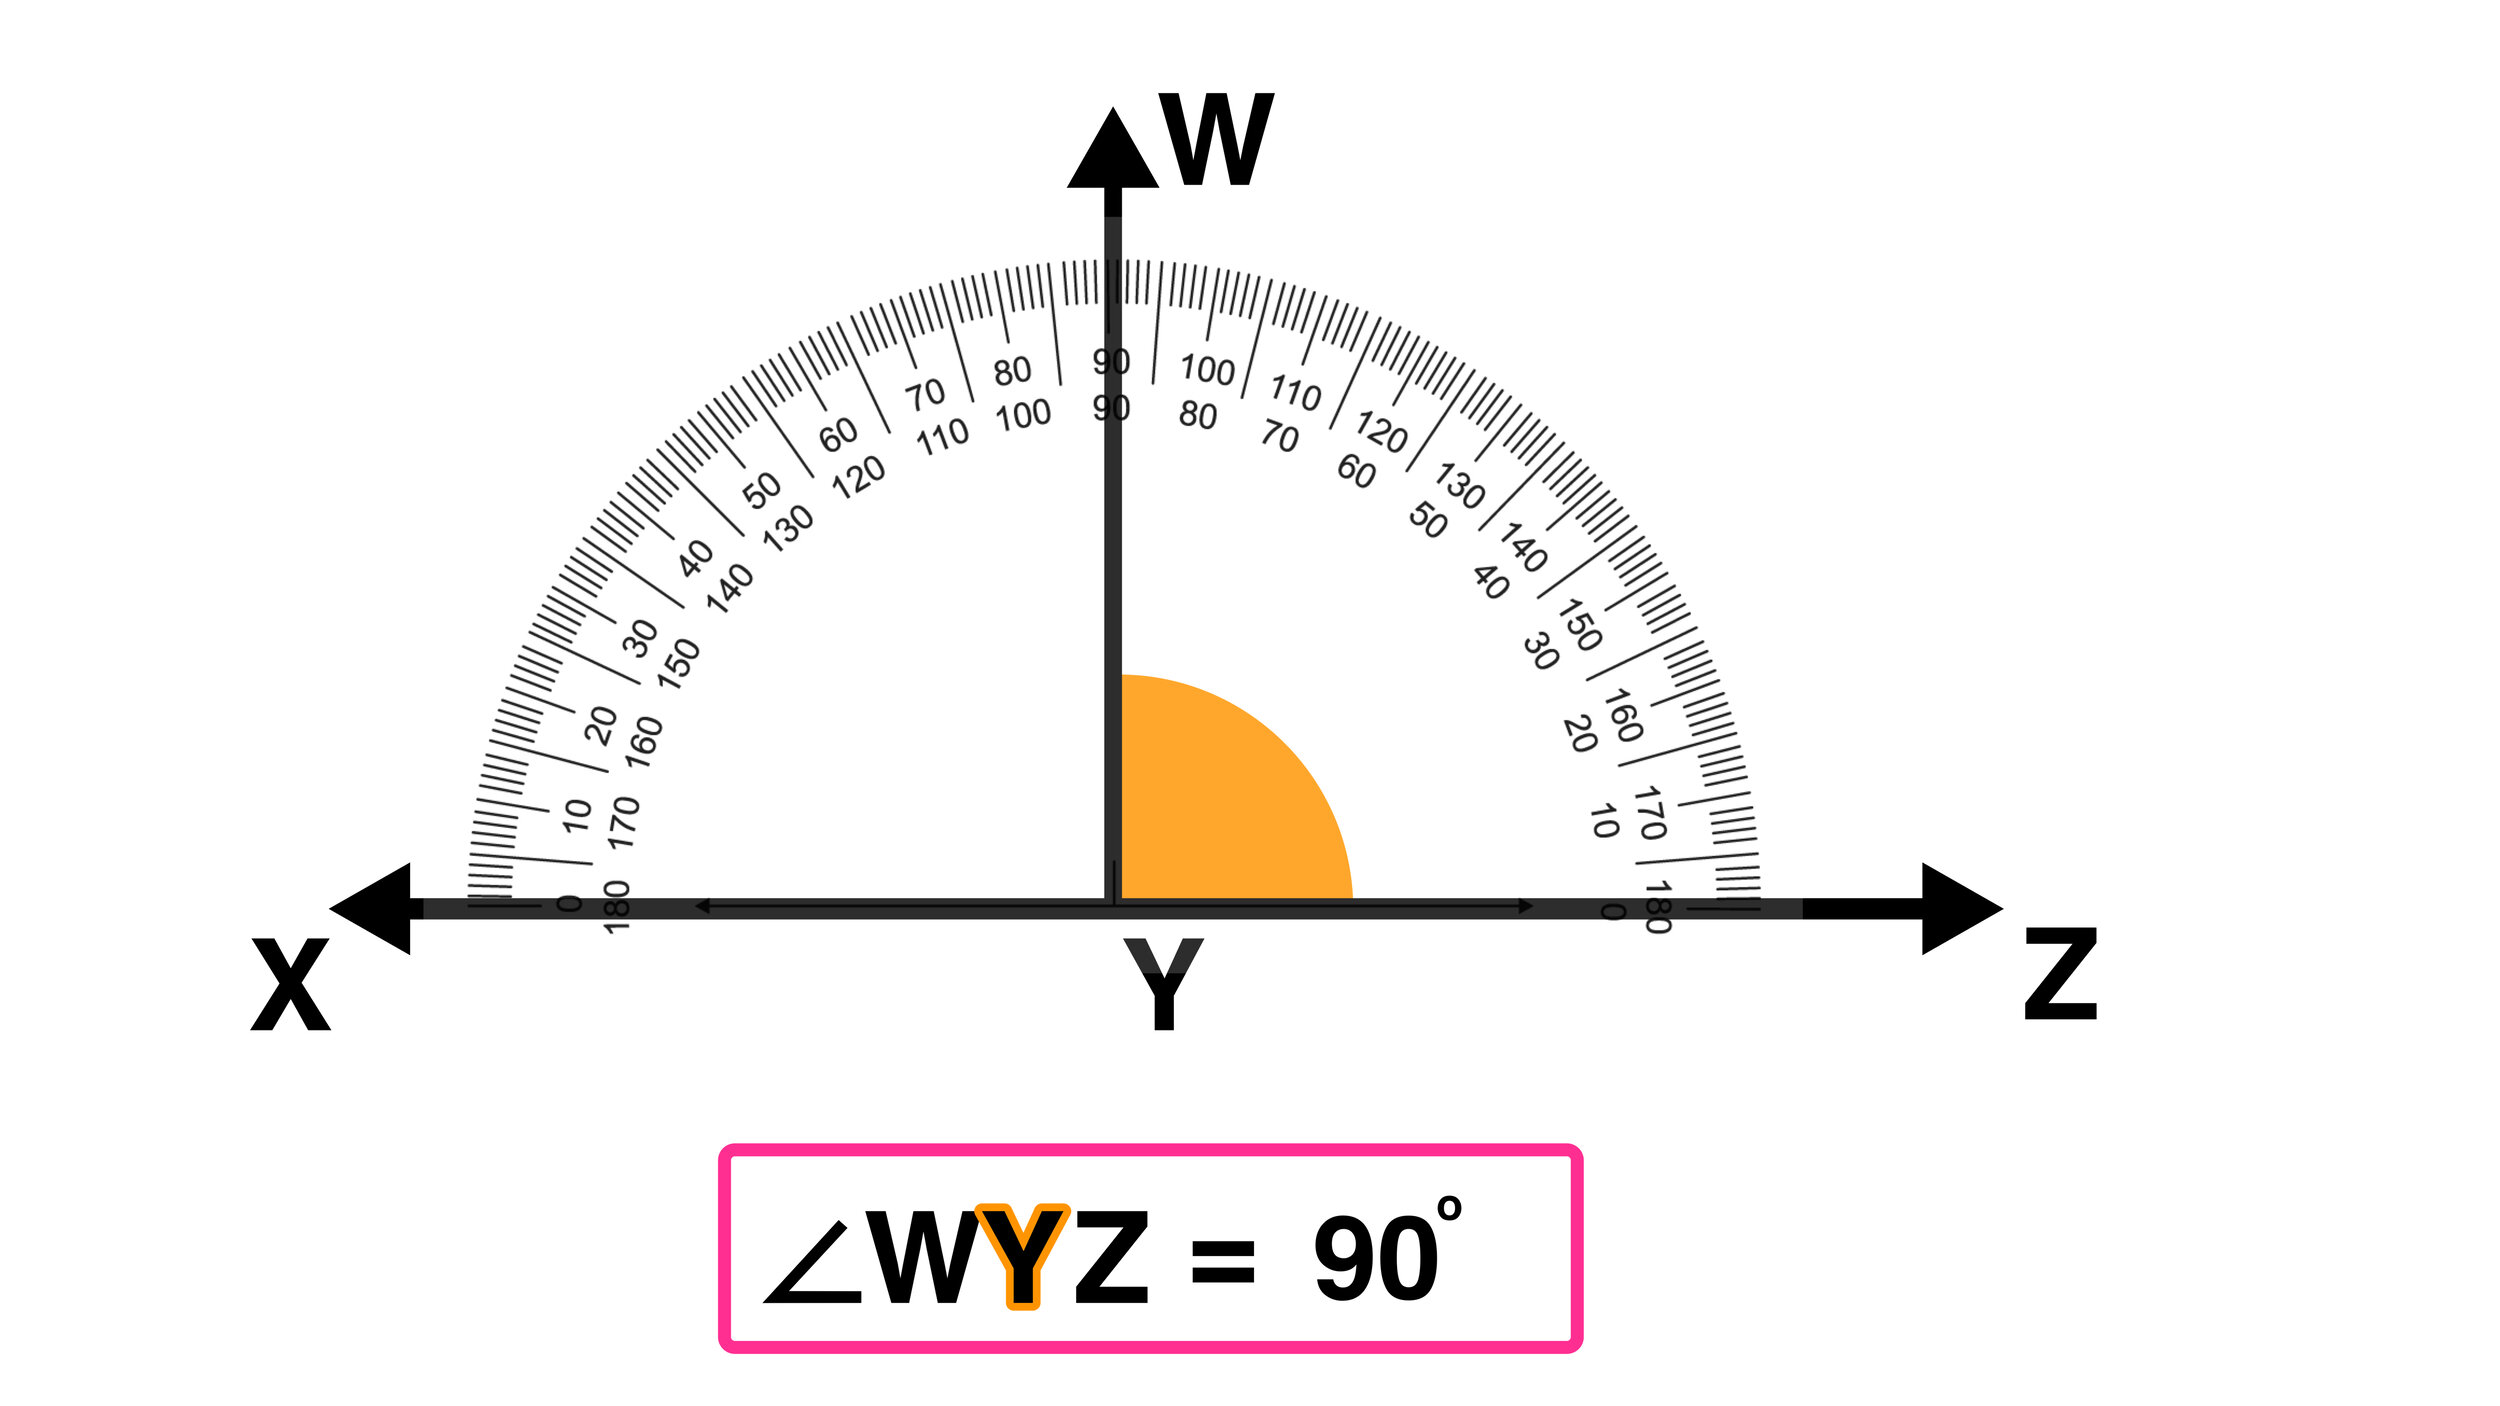
In Example D, notice that both angles in question ∠WYZ and ∠WYX are right angles, thus they are neither acute or obtuse and both have an angle measure of 90 degrees.

You probably didn’t need a protractor to identify that ∠WYZ and ∠WYX were right angles, but this example shows you how a protractor can always help you to find the measure of a give angle.

Pretty cool, right?


Still confused? Check out the animated video lesson below:

Video: How to Use a Protractor Explained!

Check out the video lesson below to learn more about how to measure angles using a protractor.


Protractor Practice Worksheet

Free Worksheet!

Free Worksheet!

Are you looking for some extra practice with using a protractor to measure angles? Click the links below to download your free worksheets and answer key:

CLICK HERE TO DOWNLOAD YOUR FREE WORKSHEET


Keep Learning:

Have thoughts? Share your thoughts in the comments section below!

Pin.jpg
NewPin11.jpg

(Never miss a Mashup Math blog--click here to get our weekly newsletter!)

By Anthony Persico

Anthony is the content crafter and head educator for YouTube's MashUp Math. You can often find me happily developing animated math lessons to share on my YouTube channel . Or spending way too much time at the gym or playing on my phone.

1 Comment

Geometry Translations Explained—Examples and Extra Practice!

1 Comment

Geometry Translations Explained—Examples and Extra Practice!

Performing Geometry Translations: Your Complete Guide

The following step-by-step guide will show you how to perform geometry translations on points and figures! (Free PDF Lesson Guide Included!)

 
Geometry Translations Explained-high (2).gif
 

Welcome to this free lesson guide that accompanies this Geometry Translations Video Tutorial where you will learn the answers to the following key questions and information:

  • What is the translation math definition in transformation math?

  • How can you perform a horizontal translation and a vertical translation?

  • Several translation math examples

This Complete Guide to Geometry Translations includes several examples, a step-by-step tutorial, a PDF lesson guide, and an animated video tutorial.


*This lesson guide accompanies our animated Geometry Translations Explained math video.

Want more free math lesson guides and videos? Subscribe to our channel for free!


Translation Geometry Definition

Before you learn how to perform horizontal translations and vertical translations, let’s quickly review the definition of translations in math terms.

Snip20210212_2.png

Translation Math Definition:

A translation is a slide from one location to another, without any change in size or orientation.

Note that a translation is not the same as other geometry transformations including rotations, reflections, and dilations.

To learn more about the other types of geometry transformations, click the links below:

Horizontal Translations vs. Vertical Translations

A horizontal translation refers to a slide from left to right or vice versa along the x-axis (the horizontal access).

  • Positive values equal horizontal translations from left to right. Negative values equal horizontal translations from right to left.

A vertical translation refers to a slide up or down along the y-axis (the vertical access).

  • Positive values equal vertical translations upward. Negative values equal vertical translations downward.

In many cases, a translation will be both horizontal and vertical, resulting in a diagonal slide across the coordinate plane. Let’s take a look at how this works in the next few examples:

Geometry Translations Notation

Note that the following notation is used to show what kind of translation is being performed.

T a,b

Where T stands for translation, a represents the value of the horizontal translation and b represents the value of vertical translation.

Figure 1

Figure 1

Now you are ready to try a few geometry dilation examples!


Geometry Translation Examples

>>> Example 01: Translate a Line Segment

Perform the following transformation on line segment PQ: T-8,4

Since 90 is positive, this will be a counterclockwise rotation.

In this example, you have to translate line segment PQ -8 units horizontally and +4 units vertically.

The first step is to write down the coordinates of the endpoints of line segment PQ. From the graph, we can see that the coordinates are P(3,0) and Q(6,-6).

*Note that PQ is called the pre-image and the new figure after the translation is complete P’Q’ (pronounced P prime, Q prime) will be the image).

Snip20210212_5.png

In this example, we are translating line segment by the following values:

T -8,4

This means that shifting the figure -8 units horizontally and +4 units vertically.

Let’s start with the horizontal translation:

Since the value is -8, you have to add -8 (or just subtract 8) from the x-coordinates of points P and Q as follows:

 
Point C after a 180-degree rotation.

From a visual standpoint, this is the same thing as sliding line segment PQ 8 units to the left from its current location.

Now for the vertical translation:

Since the value is 4, you have to add 4 to the y-coordinates of points P and Q as follows:

Snip20210212_7.png

From a visual standpoint, this is the same thing as sliding line segment PQ 4 units upward from its current location.

Now that we have our path, we can translate PQ to P’Q’ as follows:

 
Geometry Translations Explained-high (1).gif

Furthermore, we can confirm the coordinates of P’ and Q’ as follows:

Snip20210212_10.png
Snip20210212_11.png
Snip20210212_8.png
 
Snip20210212_12.png

This example should help you to visually understand the concept of geometry translations Next, you will learn how to translate an entire figure.

<><><>


>>> Example 02: Translate a Figure

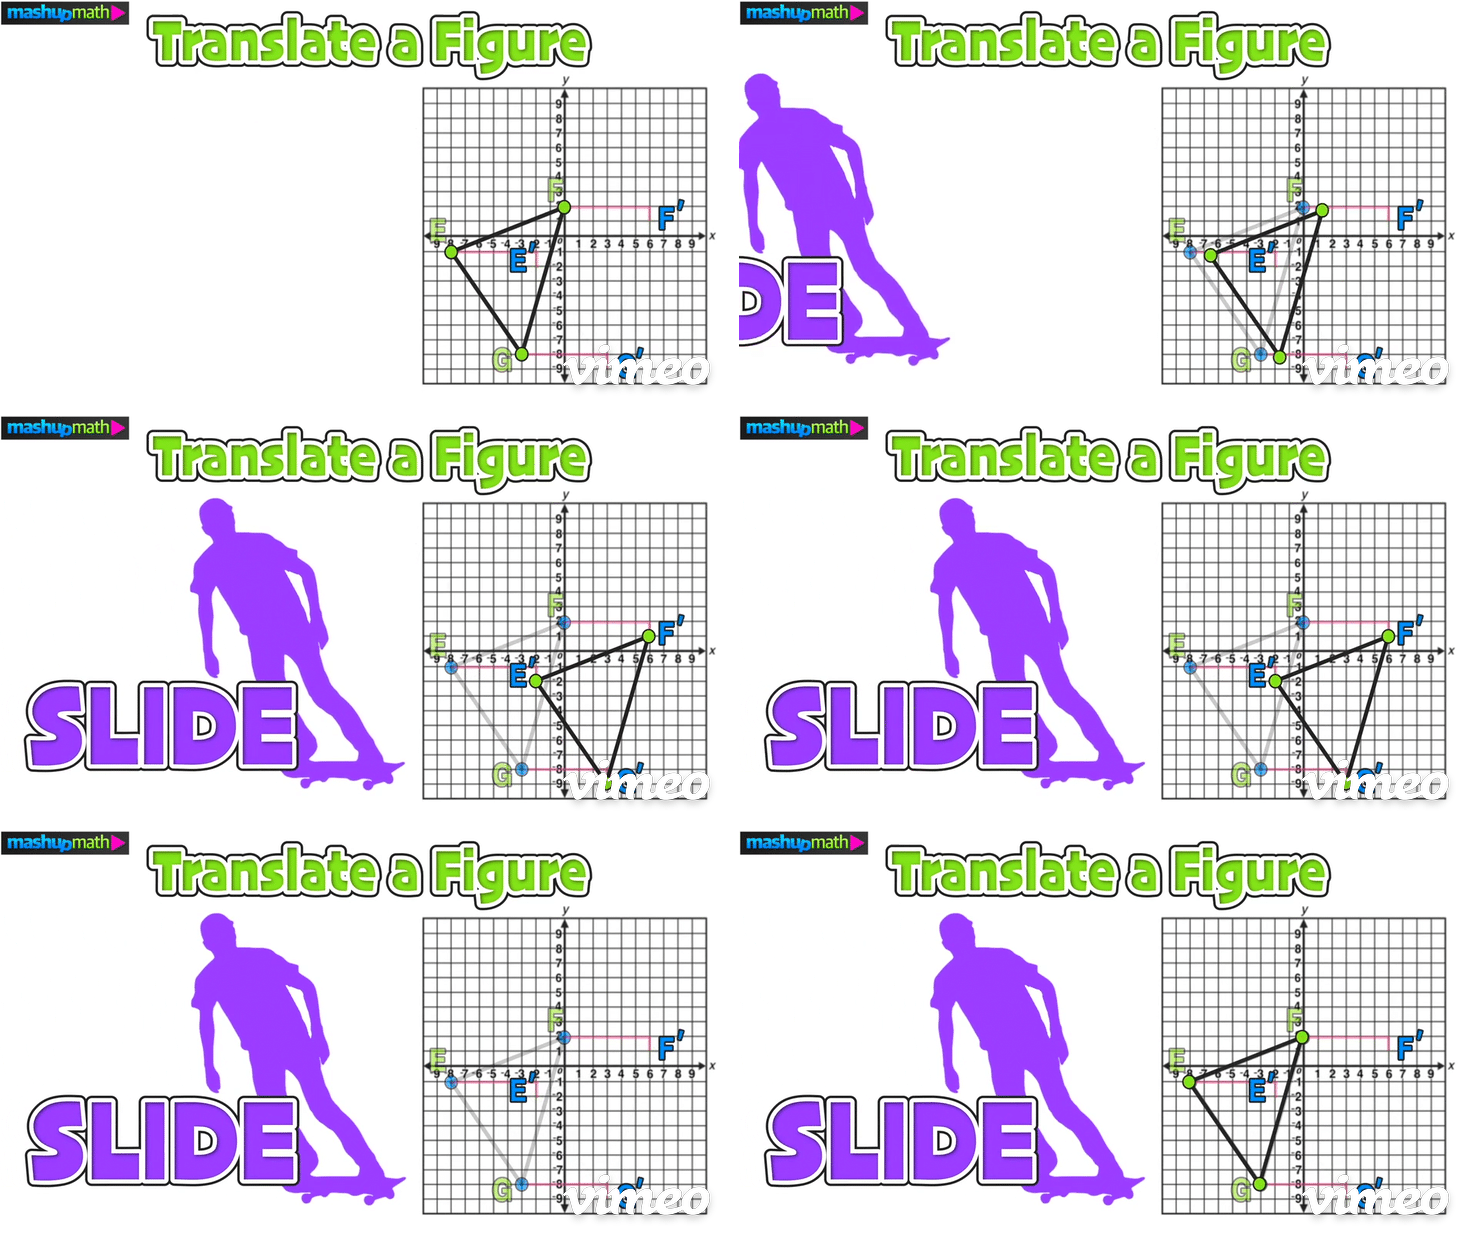
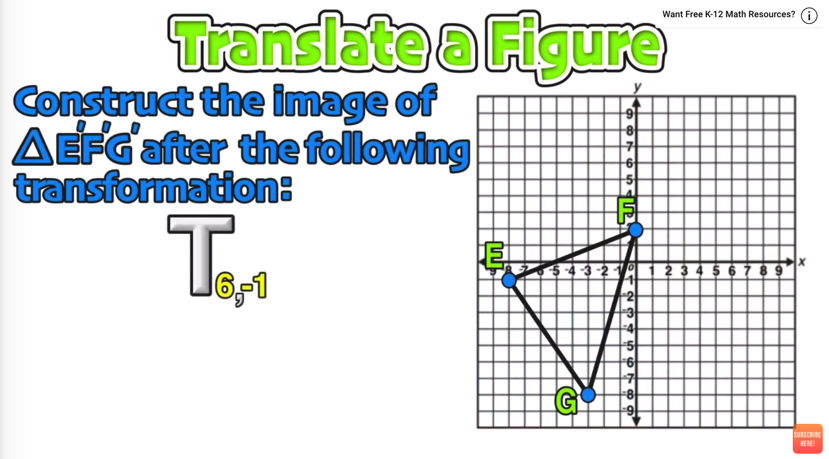
Construct the image of △E’F’G’ after the following transformation: T 6,-1

Left: replace x with 3. Right: replace x with -9

Just like in the last example, start by writing down the coordinates of the vertices of the pre-image △EFG: E(-8,-1), F(0,2), G(-3,-8)

Next, plan to add 6 to each x-value and to subtract 1 from each y-value:

Figure 2

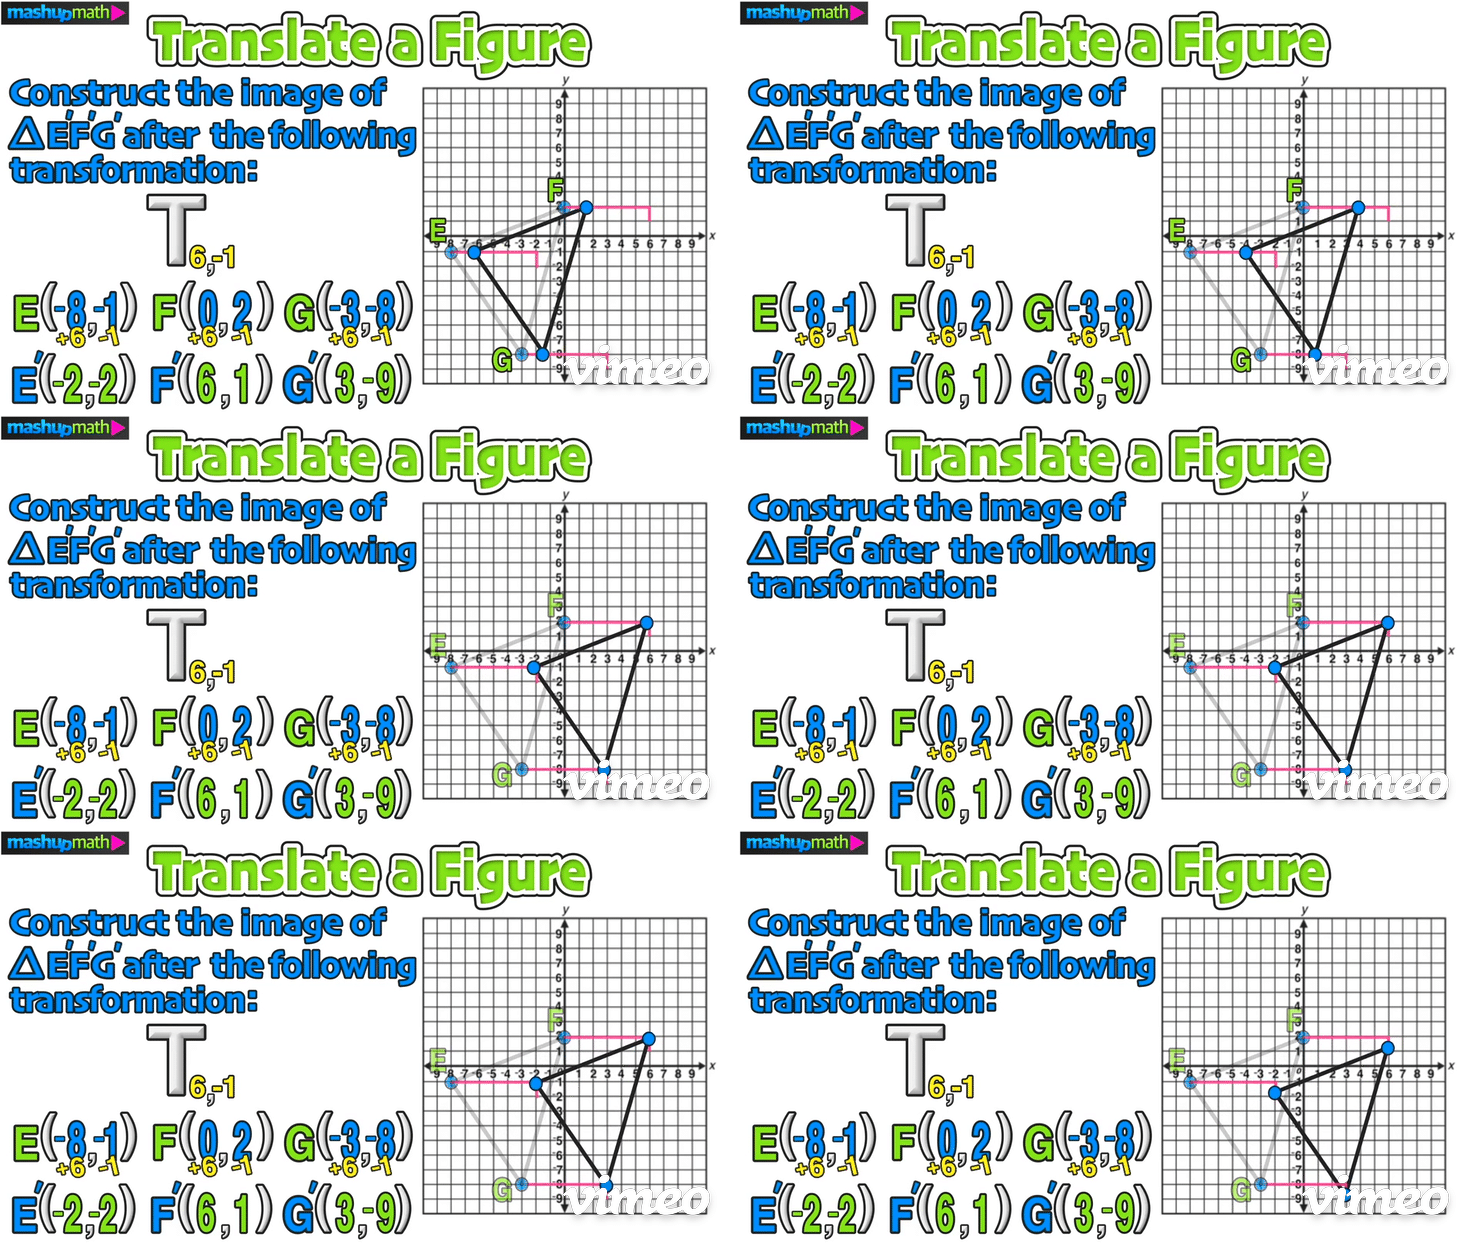
Doing this will give you the coordinates of the translated image △E’F’G’: E(-2,-2), F(6,1), G(-3,-9)

Snip20210212_16.png

On the graph, this transformation is a horizontal translation 6 units to the right and a vertical translation 1 unit down:

Snip20210212_17.png

The last step is to perform the translation and construct △E’F’G’

 
Geometry Translations Explained-high (3).gif

Furthermore, we can confirm the coordinates of △E’F’G’ as follows:

Snip20210212_18.png
 

<><><>


Free PDF Lesson Guide

Free PDF Lesson Guide

Free Geometry Translations Lesson Guide

Looking for more help with math translations?

Click the link below to download your free PDF lesson guide that corresponds with the video lesson below!

Click here to download the Your Free PDF Lesson Guide

Still Confused?

Check out this animated video tutorial on geometry translations:


Looking for more practice with Geometry Transformations?

Check out the following free resources:

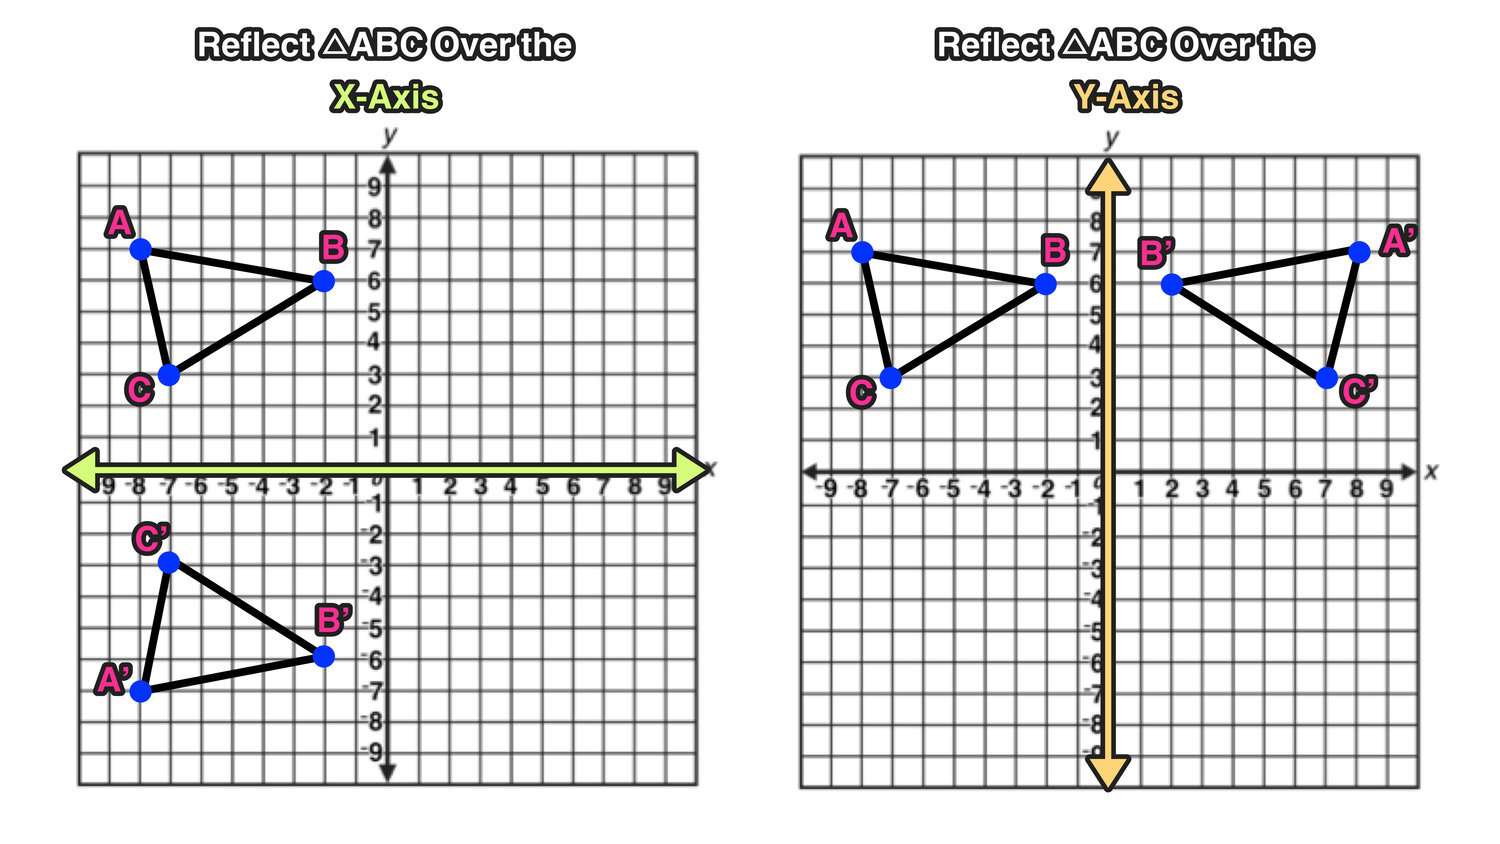
Free Tutorial on Reflections!

Free Tutorial on Reflections!

Have thoughts? Share your thoughts in the comments section below!

(Never miss a Mashup Math blog--click here to get our weekly newsletter!)

By Anthony Persico
Anthony is the content crafter and head educator for YouTube's MashUp Math. You can often find me happily developing animated math lessons to share on my YouTube channel . Or spending way too much time at the gym or playing on my phone.

1 Comment

Hexagons Explained! The Complete Guide to Hexagons

2 Comments

Hexagons Explained! The Complete Guide to Hexagons

Image Source: Mashup Math FP

What is a Hexagon? - Definition, Facts, Examples, and More!

Welcome to this complete guide to hexagons, where you will learn everything you need to know about this beautiful six-sided polygon!

Hexagon Definition:

2669017.jpg

Source: Mashup Math FP

In mathematics and geometry, a Hexagon is defined as a polygon (a closed two-dimensional shape with straight sides) with 6 sides.

Note that Hexagons have 6 sides and 6 angles.

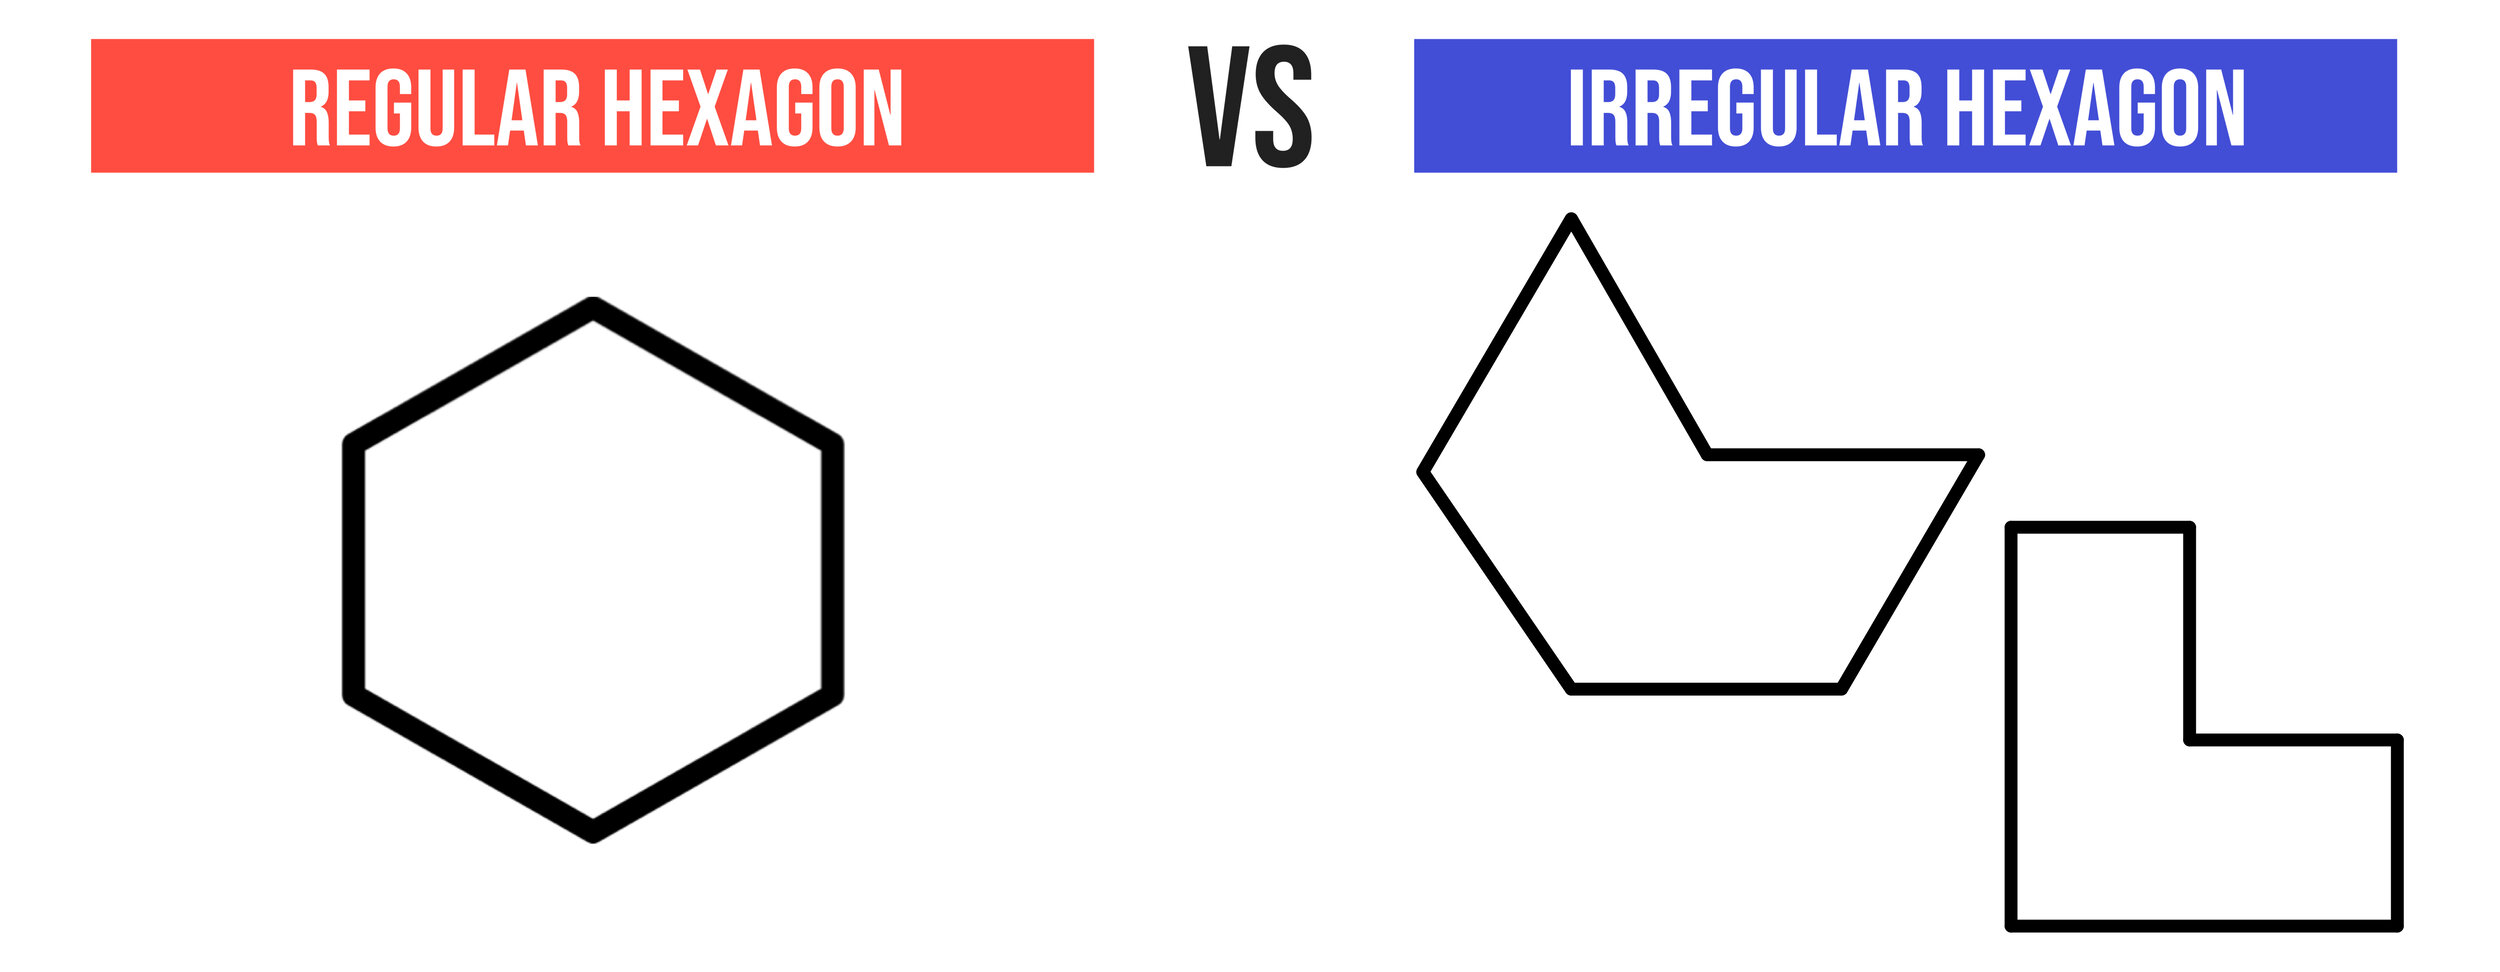
There are two types of Hexagons: Regular Hexagons and Irregular Hexagons.

What is a Regular Hexagon?

A regular hexagon is defined as a 6-sided polygon that is both equilateral and equiangular—meaning that all of the sides have the same length and all of the angles have the same measure.

What is an Irregular Hexagon?

An irregular hexagon is defined as a 6-sided polygon that is not regular—meaning that all of the sides and angles do not have the same measure.

Reg.jpg

What are the Properties of a Regular Hexagon?

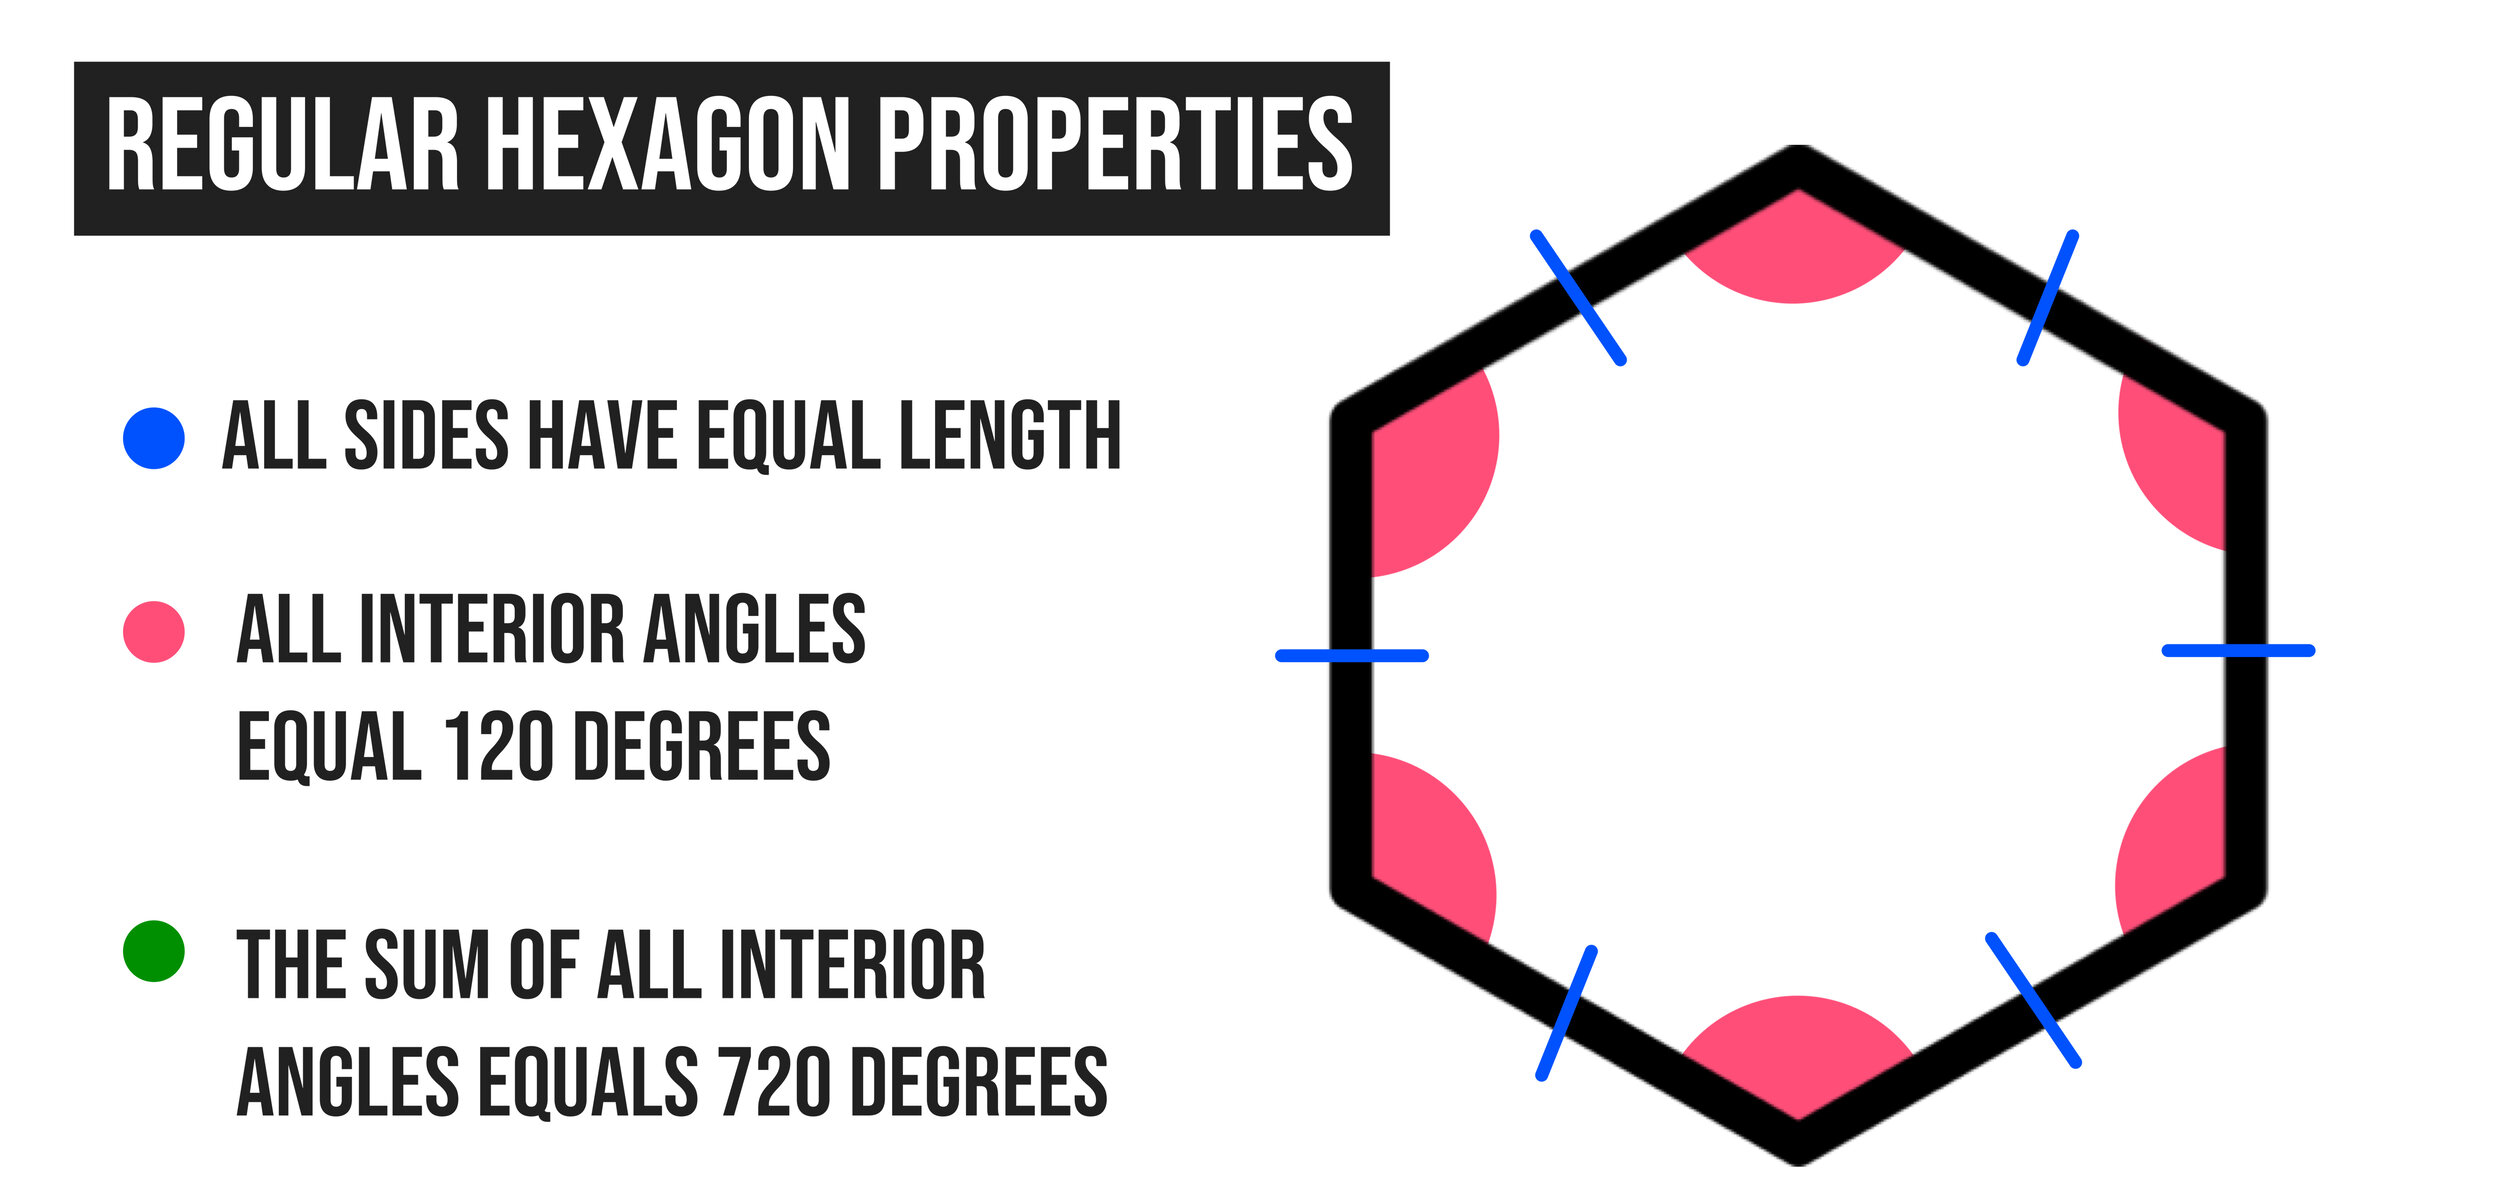
In Geometry, you will most often be dealing with regular hexagons. It is important to know their three main properties:

  • All sides of a regular hexagon have equal lengths.

  • All of the interior angles of a regular hexagon are 120° each.

  • The total sum of the interior angles is 720°.

RegularHex.jpg

What Is a 3D Hexagon?

Image via www.wikipedia.org

In Geometry, a 3D Hexagon is called a Hexagonal Prism—which is a prism with hexagonal base.

In the case of 3D hexagons, the hexagonal base is usually a regular hexagon.

For example, a truncated octahedron can be considered a 3D Hexagon because it has a hexagonal base.

Here are a few more examples of 3D Hexagons:

PRISM.jpg

Image Source: Mashup Math FP

Convex Hexagons vs. Concave Hexagons

In Geometry, a polygon is can be convex or concave.

  • For a hexagon to be convex, all of its interior angles must be less than 180°.

  • For a hexagon to be concave, at least one of its interior angles must be greater than 180°.

For example, a regular hexagon is also a convex polygon because all of the interior angles equal 120°, which is less than 180°.

CONVEX.jpg

Hexagons Degrees: Why 720°?

As previously stated, the measure of each interior angle in a hexagon is 120° and the total sum of all of the interior angles is 720°.

But why? Since there are 6 angles in a regular hexagon and each angle equals 120°, the total sum would be:

120 + 120 + 120 + 120 + 120 + 120 = 720

or

120 x 6 = 720

Furthermore, you can use the polygon interior sum formula to find the sum of the interior angles for any regular polygon.

Forumula.jpg

By applying the polygon interior sum formula to a hexagon, you replace n with 6 (since a hexagon has 6 sides) as follows:

(n - 2) x 180° ➞ (6 - 2) x 180° = 4 x 180° = 720°

Hexagons in Real Life

The hexagon is a simple yet remarkable shape that can be found everywhere and anywhere—ranging from art to architecture to nature. Here a few remarkable examples of hexagons in real life:


Hexagons in Real Life: Snowflakes

Did you know that all snowflakes are hexagons? When ice crystals form, the molecules join together in a hexagonal structure. Mother Nature has determined that this type of formation is the most efficient way for snowflakes to form.

57813.jpg

Source: Mashup Math FP


Hexagons in Real Life: Honeycombs

Regular hexagons are one of only three polygons that will tesselate a plane—meaning that they can be duplicated infinitely to fill a space without any gaps. And when bees build honeycombs, they choose to use hexagons. Always!

bees-honeycombs-background.jpg

Mashup Math FP


Hexagons in Real Life: Architecture

Bees are not the only ones who understand the power and efficiency of hexagons. Ancient and modern architecture constantly utilizes this shape from floor tiles to windows to ornate ceiling designs. Hexagons are everywhere!


Hexagons in Real Life: Art

Due to their beautiful form and ability to tessellate, hexagons are constantly used in art and graphic design to create patterns, mosaics, logos, and more!

In fact, many companies choose a hexagon shape for a logo because it represents strength and security.

47100.jpg

Source: Mashup Math FP


Hexagons in Real Life: Religion

Since regular hexagons often show up in nature (like snowflakes and honeycombs) they are often included in Sacred Geometry, which assigns higher meaning and spirituality to certain shapes and proportions. In fact, some view the hexagon as the most fascinating shape in relation to the universe.

157.jpg

Source: Mashup Math FP


Keep Learning:

2 Comments