How to Use 'Which One Doesn't Belong?' Math Activities to Boost Engagement

Comment

How to Use 'Which One Doesn't Belong?' Math Activities to Boost Engagement

How to Use ‘Which One Doesn’t Belong?’ Activities to Boost Student Engagement in K-8 Mathematics

This simple activity gives students to engage with mathematics without the fear of being incorrect.

Which One Doesn’t Belong? math activities encourage deep mathematical thinking. (Image: Mashup Math via Getty)

When students see mathematics as a black and white subject where every problem has only one correct solution, they can easily become frustrated and fearful of making mistakes.

But what would happen if students could engage with mathematics without the fear of being wrong? For example, consider the question, “What is ten minus seven?”. While it’s important that students know that the answer to this question is “Three,” it’s arguable more important (and more beneficial to their learning) that they also be able to answer a question like “Why does ten minus seven equal three?.”

These type of open-ended questions encourage deep mathematical thinking and reflection, and, since there are multiple different ways to answer them correctly, students can interact with math without the fear of making mistakes. Rather, they can think about mathematics creatively and in ways that make sense to them on a personal level.

“Open-ended math questions shift the focus from finding final answers to actually understanding whatever concept students are currently learning,” says Mashup Math founder Anthony Persico, who believes that “giving students opportunities to think about mathematics without the fear of making mistakes boosts overall engagement and participation, which encourages deep understanding and growth.”

When teachers incorporate open-ended follow-up questions in their daily lesson plans, they place a greater emphasis on thinking and learning and rather than only being concerned with whether or not students can get correct final answers to problems.

So, how can you add more open-ended math questions into your daily lessons?

 
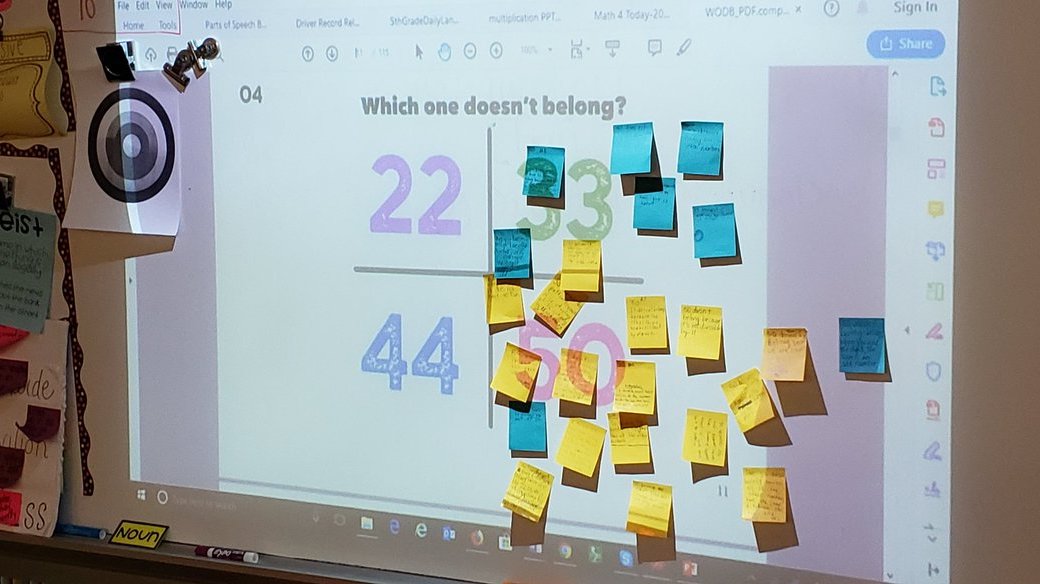
Using post-it notes is a great strategy for assessing student thinking, especially when using WODB as an exit ticket.

Using post-it notes is a great strategy for assessing student thinking, especially when using WODB as an exit ticket. (Image: Mashup Math ST)


Which One Doesn’t Belong? Math Activities

We are all familiar with the concept of “Which One Doesn’t Belong?” (which we will abbreviate as WODB going forward). You are given a set of objects or images and you are tasked with figuring out which one of them is not like the others.

In the case of WODB math activities, students are given a set of our different numbers or images and they must determine which one of the four does not belong and then justify why their response makes sense.

How Do WODB Activities Work?

Whenever you are aiming to boost student engagement, whole-class participation, or just to mix up your instruction, simply share a four-quadrant WODB graphic that requires students to observe and reflect upon four different numbers or graphics. They will then apply their mathematical and reasoning skills to decide which of the four items does not belong and also justify why (either verbally or in writing) their choice is valid.


Since WODB activities do not have a single correct answer, students will have to organize their thoughts and provide a justified response.


Unlike typical multiple choice questions, WODB activities do not have a single correct answer. These graphics are designed to be interpreted in a variety of different ways in order to spark deep mathematical thinking and discussion (in small groups, whole class, or both).

Here's an Example:

Consider the graphic above where students have to select which of the following numbers does not belong with the other three: 11, 22, 44, and 110.

Student A says: Since 22, 44, and 110 are all divisible by two, they are all even numbers. This means that 11 does not belong because it is not divisible by two. 11 is an odd number and does not belong.

Student B says: 11 does not belong because it is a prime number. The other three numbers are not prime numbers.

Student C says: 44 does not belong because it is the only number that is divisible by 4. You can technically divide the other three numbers by 4, but the result would have a remainder, so 44 does not belong.

Student D says: The number 110 does not belong because, although it is divisible by 11 like the other numbers, it is the only three-digit number.

Notice that every student’s answer makes sense and is backed up by deep mathematical thinking. Student A and Student B both determined that 11 does not belong, but for very different reasons, while Student C chose 44 and Student D chose 110.

As teacher, you can steer this discussion in a variety of directions by asking follow-up questions like:

What justification could you use to say that 22 doesn’t belong?

What other justifications could student A have used to decide that 110 does not belong besides the fact that it is the only three-digit number?

How can students A and B both be correct?

How can students B, C, and D all be correct even though they each chose different values?

 
An example of how you can record student responses.

Another example of how teachers can record student responses to WODB activities. ((Image: Mashup Math ST)


What topics and grade levels are WODB activities best suited for?

WODB activities can be used for all grade levels and topics. The graphics can be topic/lesson specific or broader and more open-ended. Remember, the idea is to spark enough student thinking, interest, and curiosity at the beginning of your lesson to last for the entire class!

Are You Ready to Try WODB Activities with Your Students?

Below you will find links to download free ‘Which One Doesn’t Belong Sample Activities” that you can share in your upcoming lesson plans. All of the activities are samples from the WODB activity libraries available on our membership website.

Which One Doesn’t Belong? Numbers

Click the image to preview each sample activity and click the text link below to download your free sample worksheet.

Sample A (Grades K-2)

Sample B (Grades 3-5)

Sample C (Grades 6-8)

Which One Doesn’t Belong? Pictures

While numbers are a great way to introduce your students to WODB, you can also include pictures, charts, graphs, and all kinds of math-related graphics.

Click the image to preview each sample activity and click the text link below to download your free sample worksheet.

Sample A (Grades K-6)

Sample B (Grades 3-8)

Sample C (Grades 5-8)


WAIT! Do you want over 100 topic-specific WODB activities for grades 1-8? 🙋🏻‍♀️

Click the link below to download our best-selling PDF workbook 101 Daily 'Which One Doesn't Belong?' Activities for Grades 1-8.


More Math Education Resources You Will Love:

Comment

How to Find the Circumference of a Circle in 3 Easy Steps

How to Find the Circumference of a Circle in 3 Easy Steps

How to Find the Circumference of a Circle

Step-by-Step Guide: What is the circumference of a circle? How to find the circumference of a circle using the formula for circumference of a circle?


Free Step-by-Step Guide: How to find the circumference of a circle explained.


Understanding how to find the circumference of a circle is an important math skill that every student must learn.

In order to learn how to find the circumference of a circle, you need to be familiar with the concept of circumference and how to use the formula for circumference of a circle to solve problems where you are tasked with finding the length of a circle’s circumference.

This free Step-by-Step Guide on How to Find the Circumference of a Circle will teach you how to use the circle formula, C=πd, to find circumference of a circle. The guide is organized by the following sections/subtopics:

While we recommend that you work through in section in order, you can use the links above to jump to any section of interest.

Are you ready to get started? Let’s begin with a review of some important properties of circles that you will need to be familiar with in order to learn how to find the circumference of a circle.


Figure 01: Do you know the key properties of circles?


What is the Circumference of a Circle?

Before we get into what the circumference of a circle actually means, there are some key circle-related vocabulary terms that you should be familiar with:

  • A circle’s diameter is any line that passes through the center point of the circle and touches two points on the edge of the circle.

  • A circle’s radius is any line segment that runs from the center point and touches the edge of the circle.

  • A radius of a circle, r, will always be equal to half the length of its diameter, d. In other words, r=2d.

  • Conversely, the diameter of a circle, d, will always be equal to twice the length of its radius, r. In other words, d=2r.

These key properties of circles are illustrated in Figure 01 above for your reference. Make sure that you understand them well before moving on.

What is the circumference of a circle?

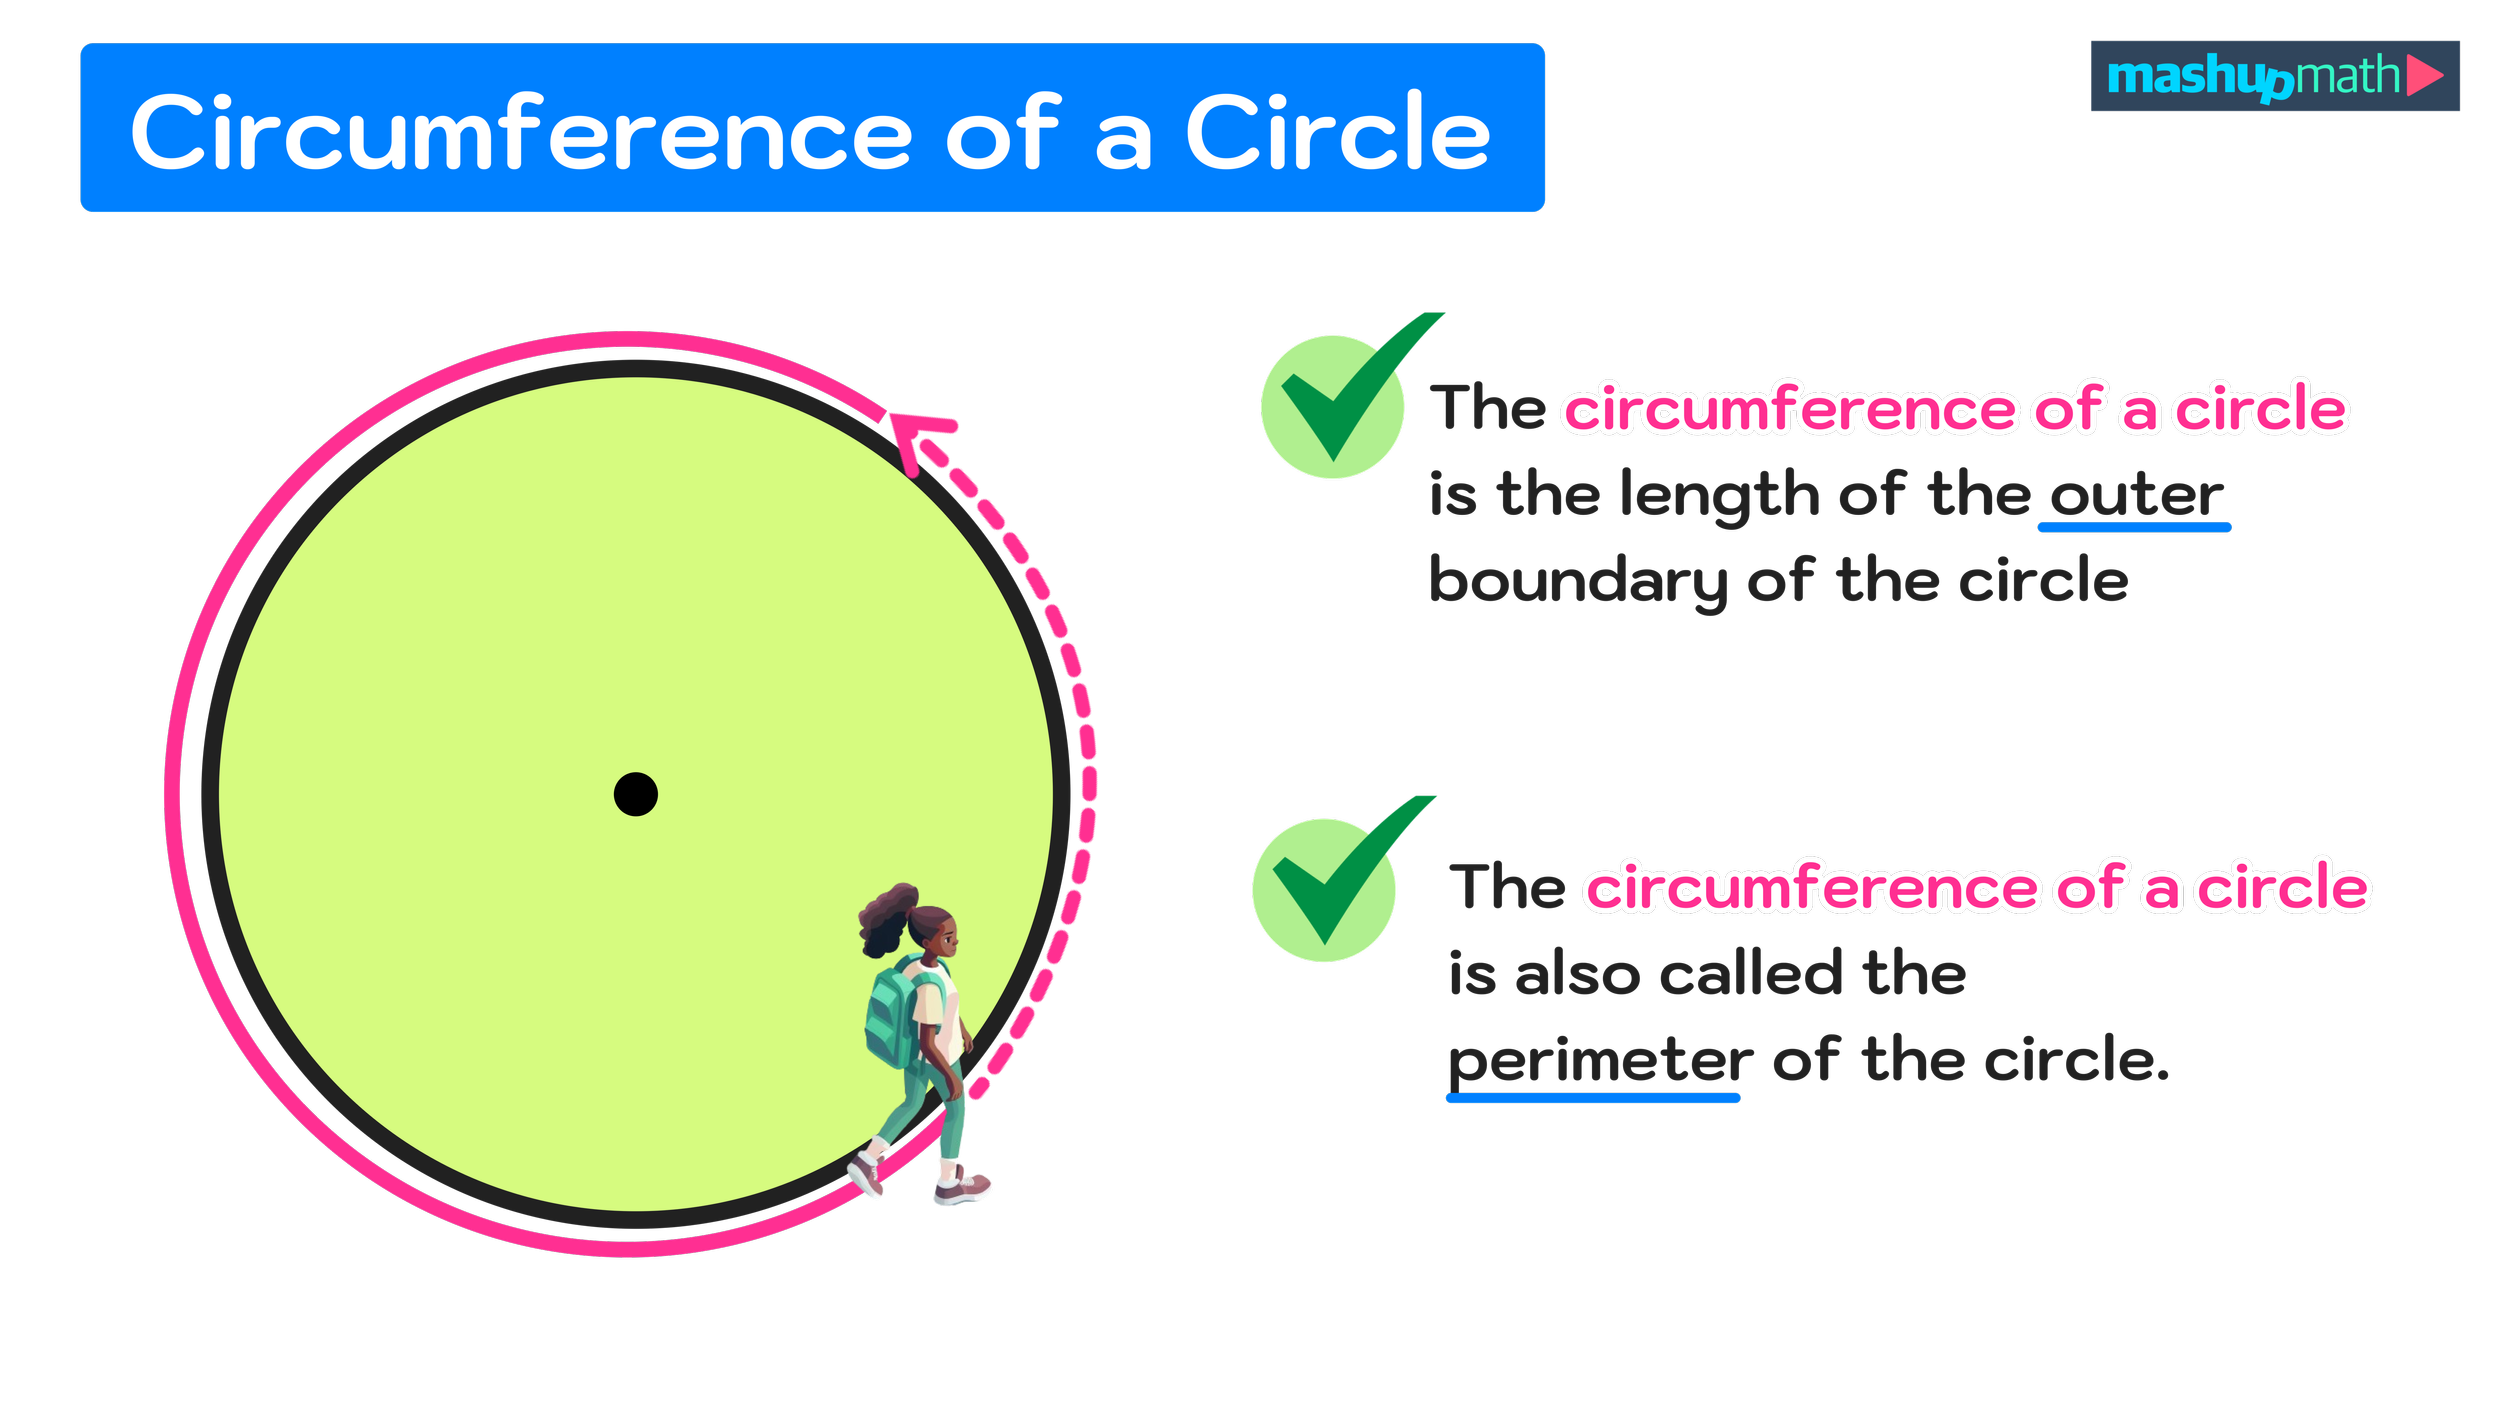
The circumference of a circle is the length of its outer boundary. The circumference of a circle is sometimes referred to as a perimeter of a circle and it is always measured in units such as inches, centimeters, yards, etc.

In real-world terms, you could find the circumference of a circle by taking the outer boundary of a circle and flattening it out into a straight line and then measuring the length of that straight line. Whatever the length is would be the circumference of the circle.

For example, if you have a section of rope that was 4 feet long and you curled it into a perfect circle, the circle will also have a circumference of 4 feet, as shown in Figure 02 below.


Figure 02: What is the circumference of a circle?


The biggest takeaway here is that the circumference of a circle is the total length of the outer region of the circle. You could imagine taking a circle, cutting it somewhere, and then bending it so it forms a straight line. You could then find the circumference by measuring that straight line.

The diagram in Figure 03 below further illustrates the concept of circumference in mathematical terms.

Now that you understand what the circumference of a circle represents, let’s move onto the next section, where will we learn the circumference of a circle formula.


Figure 03: What is the circumference of a circle?


Circumference of a Circle Formula: C=πd

You can find the circumference of any circle simply by using the circumference of a circle formula: C=πd (where d is the length of the diameter of the circle).

In other words, circumference equals pi times diameter.

Whenever you are using the circumference of a circle formula, you have the option of using pi (π) or an approximation of pi (π≈3.14). If you have a calculator that has a π button, we highly recommend using it instead of approximating pi as 3.14, since it will give you more accurate answers. However, both options are acceptable in most cases.

Before continuing onto the next section, be sure to remember that the d in the circumference formula represents the length of the circle’s diameter. You can use the diagram in Figure 04 below as a reference for remembering that the circumference of a circle formula is C=πd.


Figure 04: The circumference of a circle formula is C=πd (circumference equals pi times diameter).


For example, let’s say that we wanted to find the circumference of a circle with a diameter of 10 cm. Knowing that d=10 in this example, we could solve this problem by using the circumference of a circle formula as follows:

  • C=πd and d=10

  • C=π(10) or C=10π

  • C=31.41592654…

  • C=31.4 cm

So, we can conclude that the circle has an approximate circumference of 31.4 centimeters. We figured this out by substituting d with 10 in the formula to get C=π(10) or C=10π (this both mean the same thing—the product of 10 and π) and using our calculator to get C=31.41592654…, which we rounded to the nearest tenth decimal place to get C=31.4 cm.

Note that we will be expressing circumference to the nearest tenth of decimal place for all of the examples in this guide.

The step-by-step process for finding the circumference of a circle with a diameter of 10cm is shown in Figure 05 below.


Figure 05: How to use circumference of a circle formula.


Now that you know how to use the circumference formula, you are ready to learn how to find the circumference of a circle by working through a several examples.


How to Find Circumference of a Circle with Diameter

In the previous section, we learned how to find the circumference of a circle with diameter of 10cm. The step-by-step process for solving thing problem is illustrated in Figure 05 above.

As long as you know that the circle circumference formula is C=πd, you can solve any problem where you have to find the circumference of a circle with diameter given. To do this, simply substitute d with the numerical value of the length of the diameter and then multiply it by π to determine the length of the circle’s circumference.

This method is exactly how we will solve our first practice problem. Let’s go ahead and get started.

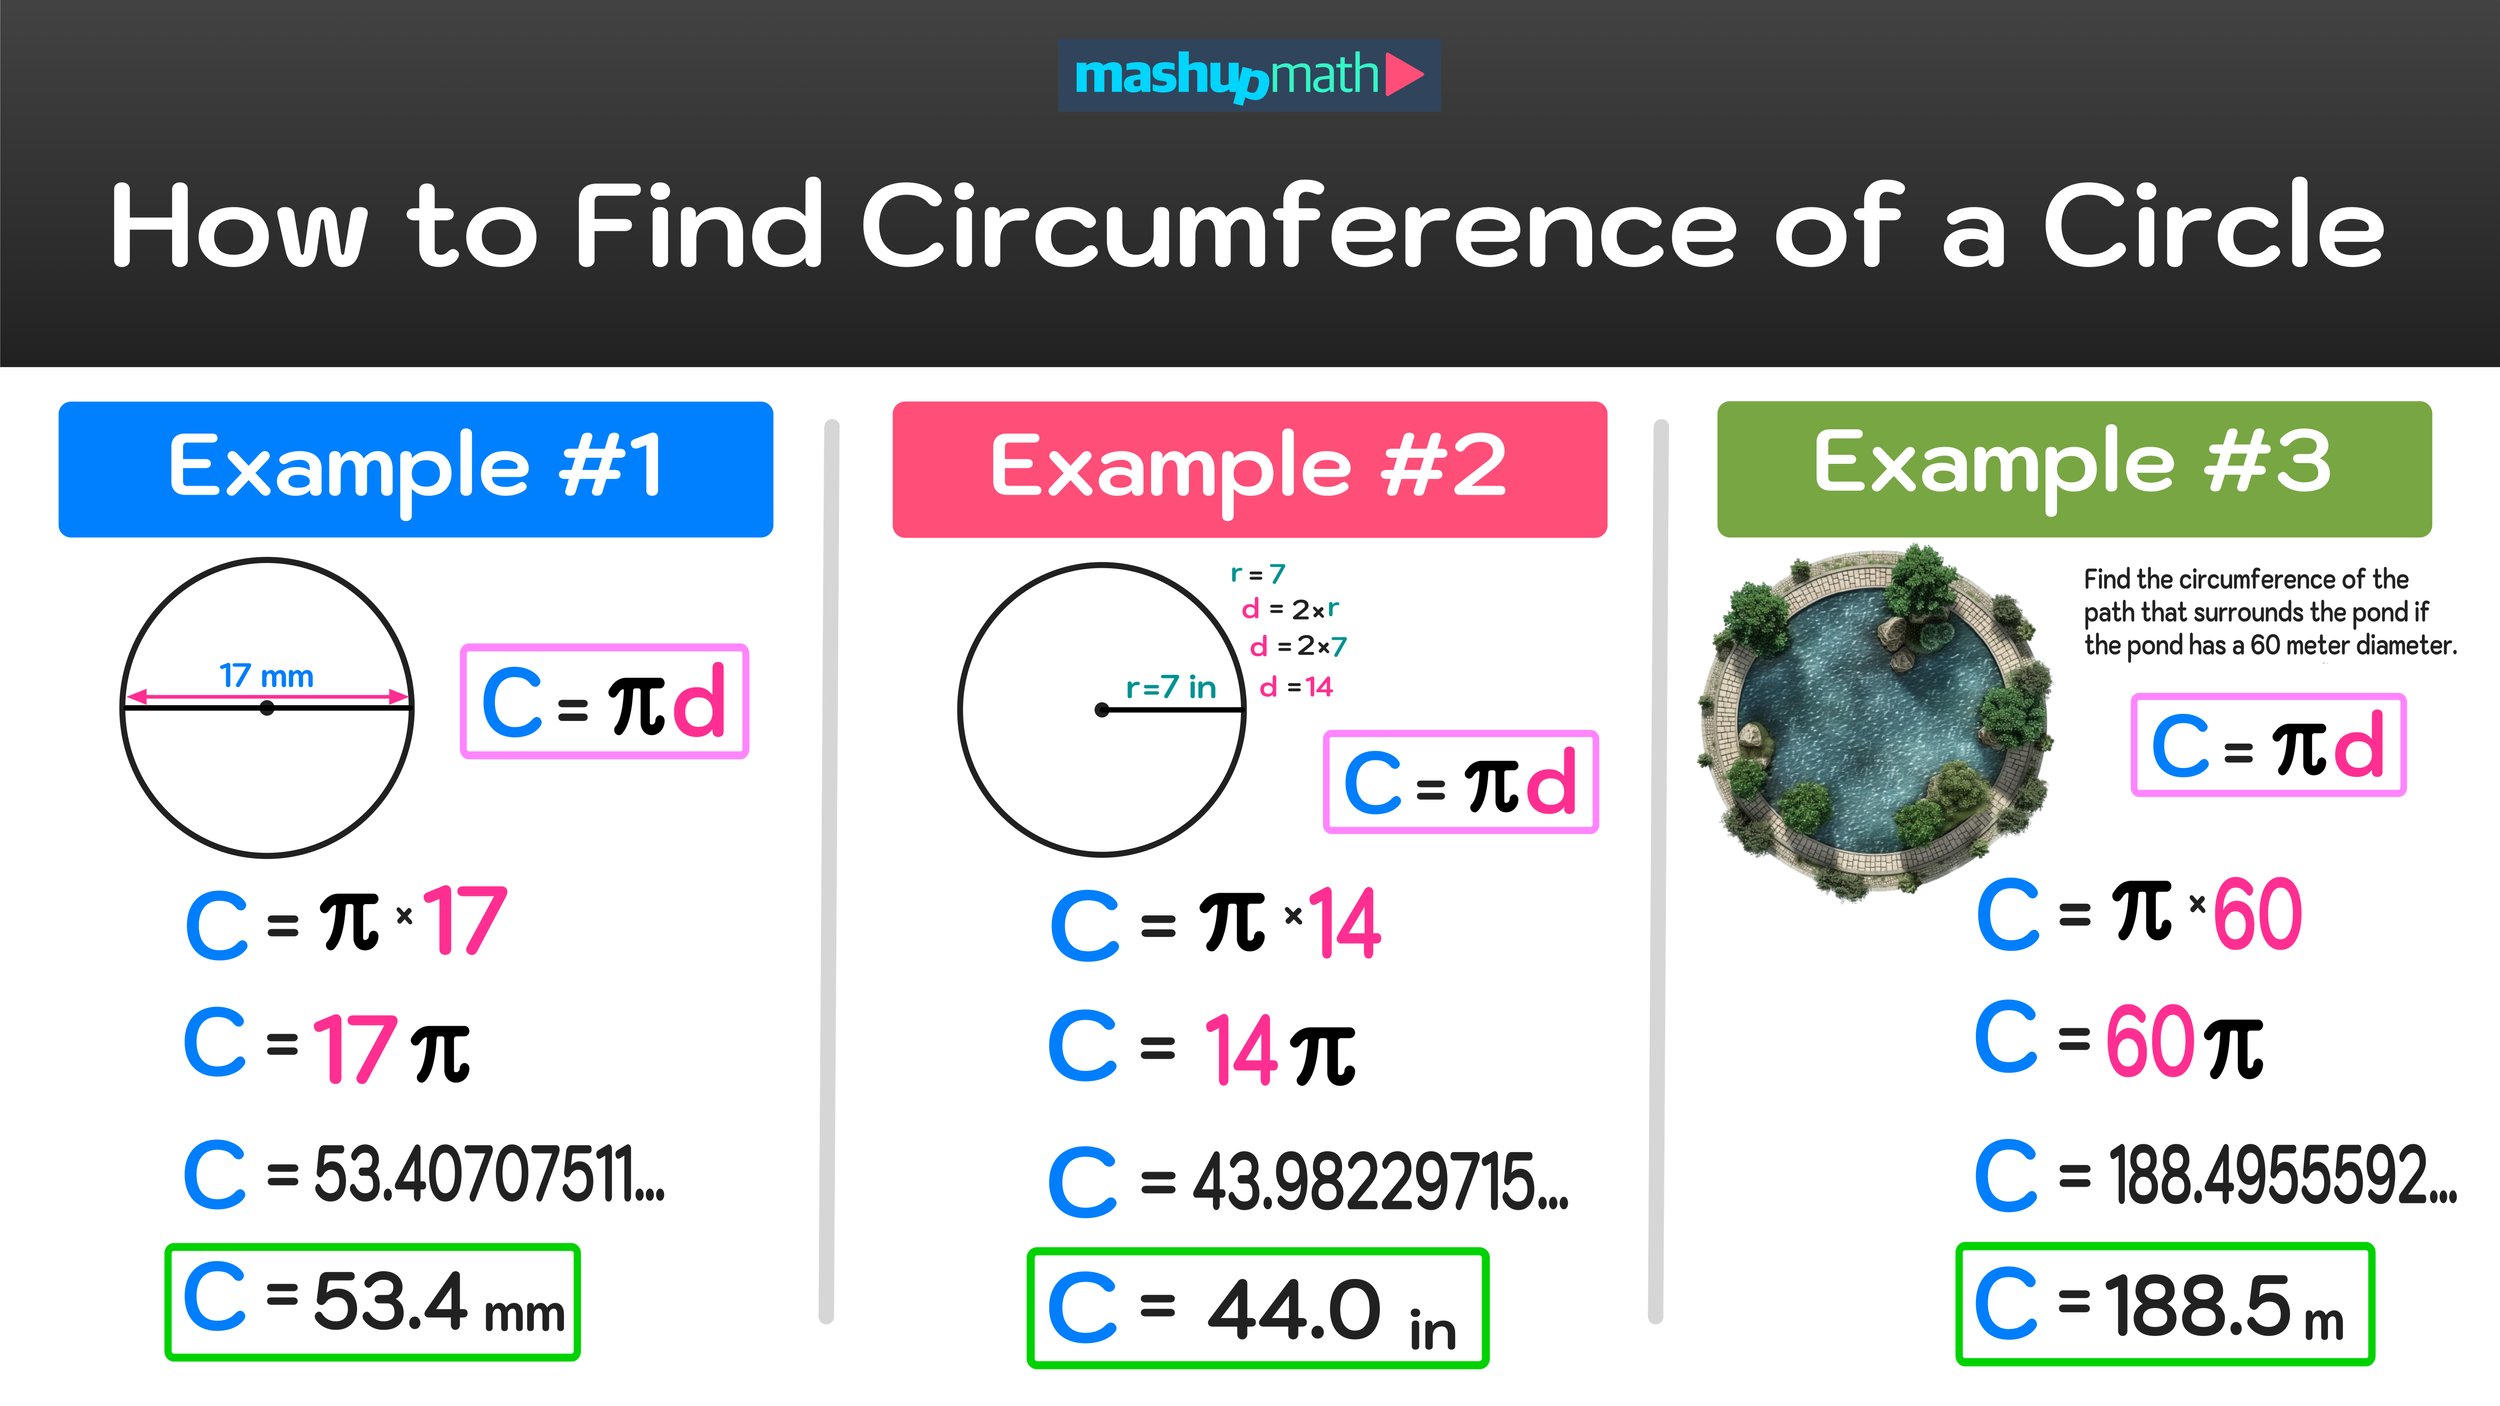
Example #1: Find the Circumference of a Circle with Diameter 17 mm

For this first example, we have to find the circumference of a circle with diameter of 17 mm.

We can solve this problem by using the circumference of a circle formula, C=πd, by inputting d=17 into the formula and solving as follows:

  • C=πd

  • C=π(17) pr C=17π

  • C=53.40707511…

  • C=54.4 mm

Final Answer: The circle has a circumference of 54.4 mm.

Finished! As long as you know the length of a circle’s diameter, you can input it into the circle circumference formula to calculate its circumference.

The step-by-step process for solving Example #1 are shown in Figure 06 below. Be sure that you are comfortable with this process before moving onto the next example.


Figure 06: How to Find the Circumference of a Circle Step-by-Step.


Example #2: Find the Circumference of a Circle with Diameter 20.6 yd

For this next example, we want to calculate the circumference of a circle with diameter 20.6 yd.

Notice that the value of the diameter, d, in this example is a decimal. However, you can still use the formula, C=πd, to solve this problem and find the circumference of the circle as follows:

  • C=πd

  • C=π(20.6) or C=20.6π

  • C=64.71680866…

  • C=64.7 yd

Final Answer: The circle has a circumference of 64.7 yd.

This process for using the circumference of a circle formula to find the circumference of a circle with a diameter of 20.6 yd is illustrated in Figure 06 below.


Figure 06: How to find the circumference of a circle when the diameter is given.


Now, let’s work through one more example of how to find circumference of a circle with diameter in a real-world context.

Example #3: Find the Circumference of a Circle with Diameter 60 meters

For this third example, we want to find the circumference of a paved sidewalk that surrounds a circular pond with a diameter that is 60 meters long.

Even though this is a real-world scenario, we can still use the circumference formula to find the answer as follows:

  • C=πd

  • C=π(60) or C=60π

  • C=188.4955592…

  • C=188.5 m

Final Answer: The paved sidewalk has a circumference of 188.5 meters.

The diagram in Figure 07 illustrates this real-world scenario and how we used our formula to figure out the circumference of the path that surrounds the circular pond.


Figure 07: How to find the circumference of a circle in a real-world scenario.


How to Find Circumference of a Circle with Radius

You probably have learned that finding the circumference of a circle when you are given the length of its diameter is a pretty straightforward process, but what happens when only know the length of the circle’s radius and not the length of its diameter?

As long as you understand the relationship between a circle’s radius and its diameter, you can easily use a given radius to figure out the length of the diameter. And this skill is extremely useful because it will allow you to use the circumference of a circle formula, C=πd, to solve circle problems where only the radius is given.

Recall from our vocabulary review at the start of this guide that a radius of a circle is any line segment that starts at the center and ends on the edge of the circle and that the radius of a circle is equal to half the length of the circle’s diameter.

  • r = d/2

Conversely, we can say that the diameter of a circle is equal to twice the length of its radius:

  • d=2r

So, if you know the length of the radius of a circle, you can use it to find the length of the diameter, d, by multiplying it by 2.

For example, if you were given a circle with a radius of 5 feet (r=5). You could take the radius and double it to find the value of the diameter, which, in this case, would be 10 ft.

  • r=5

  • d=2r

  • d=2(5)

  • d=10

The diagram in Figure 08 below illustrates this relationship between the radius and the diameter of a circle.

The key takeaway is that the diameter of a circle is equal to twice the length of its radius.

Now, let’s go ahead and apply our understanding of this relationship to another practice problem.


Figure 08: The diameter of a circle is equal to twice the length of its radius (d=2r).


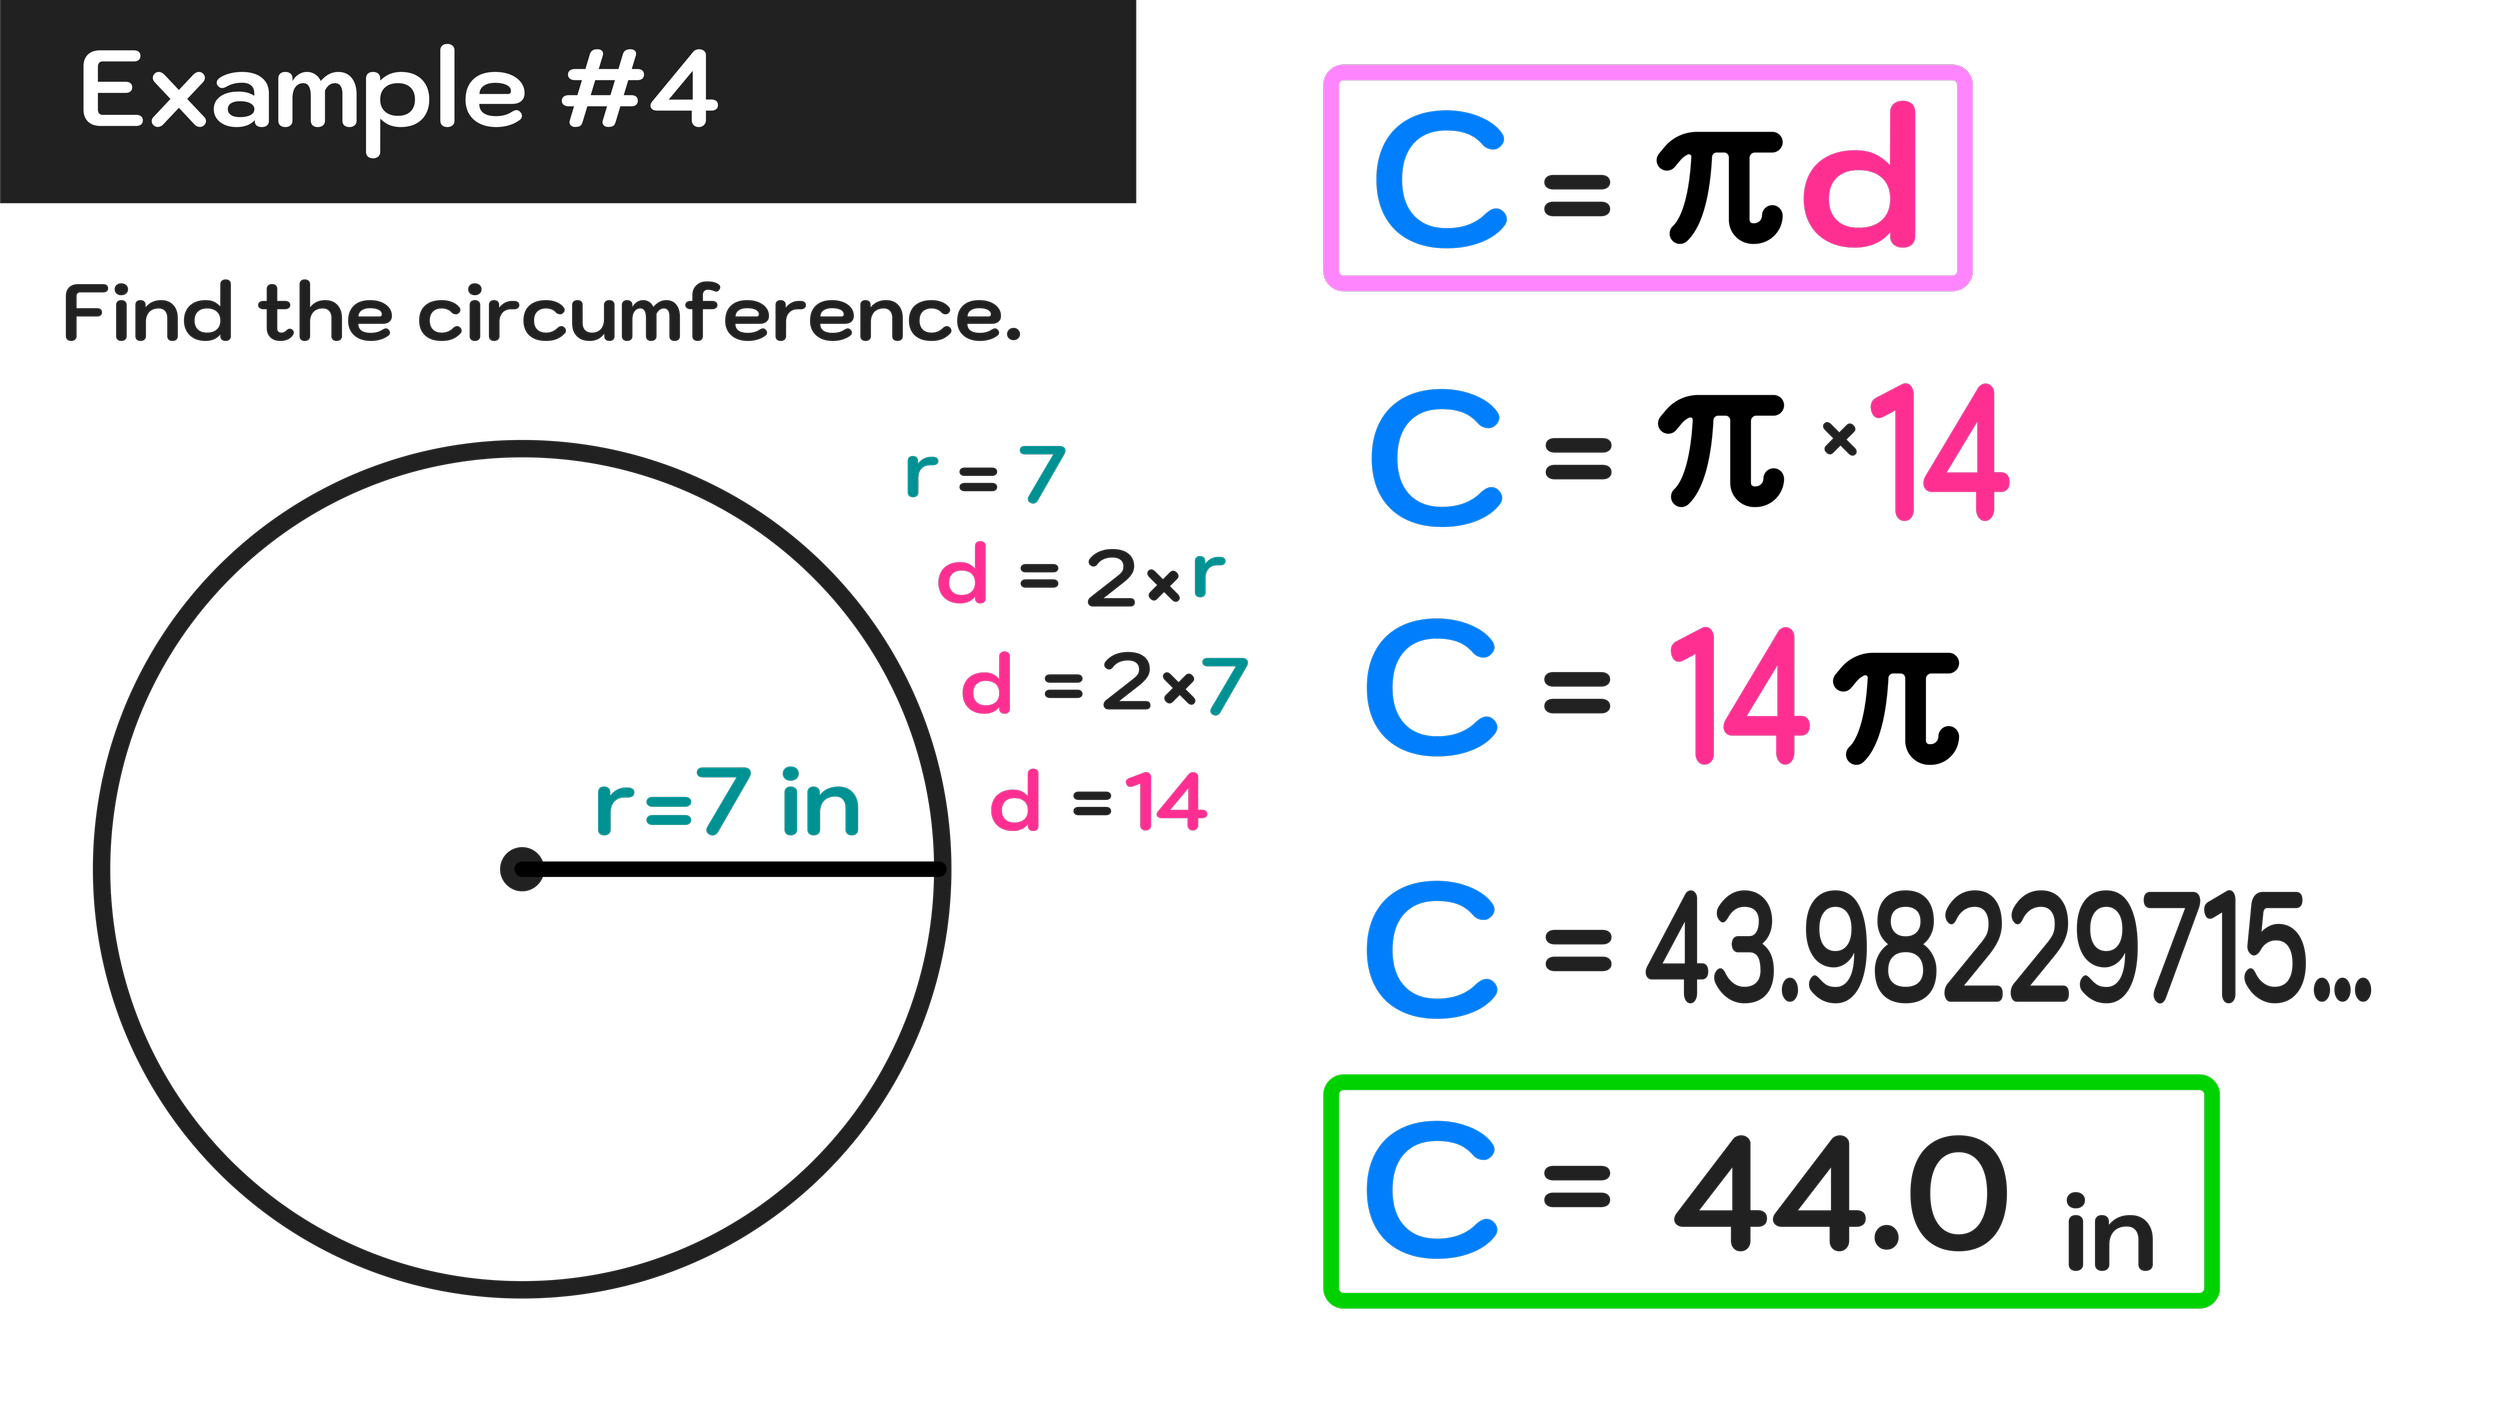
Example #4: Find the Circumference of a Circle with Radius of 7 inches

In this example, we have to find the circumference of a circle with a radius of 7 inches (r=7).

Our goal is to solve this problem the same way that we solved the three previous examples where we calculated circumference using the formula C=πd.

However, the difference between Example #4 and the previous three is that, in this case, we are given the radius of the circle, r, and not the diameter.

But we can use the given radius, r=7, to find the length of the diameter, d, because we know that the diameter of a circle is equal to twice the length of its radius:

  • d=2r

  • d=2(7)

  • d=14

Therefore, if the circle has a radius of 7 inches, then it also has a diameter of 14 inches (because 7x2=14).

Now that we know the value of d (d=14 in this case), we can substitute it into the circumference of a circle formula and solve as follows:

  • C=πd

  • C=π(14) or C=14π

  • C=43.98229715

  • C=44.0 in

Final Answer: The circle has a circumference of 44 inches.

The entire step-by-step process for solving this fourth and final example are illustrated in Figure 09 below. If you are still confused about how to find the circumference of a circle, we recommend that you go back and work through the practice problems again.


Figure 09: How to find the circumference of a circle with a given radius.


How to Find the Circumference of a Circle: Conclusion

The circumference of a circle, also known as its perimeter, is the length of its outer boundary.

Understanding how to find the circumference of a circle is a foundational math skill that has many practical applications both inside and outside of the math classroom.

Whenever you have to find the circumference of a circle, you can use the formula C=πd, where d represents the lengths of the circle’s diameter, to find an answer.

If you are given the length of the circle’s diameter, you can substitute it for d in the formula and solve. However, if you only know the circle’s radius, you will have to multiply it by two (d=2r) to find the length of its diameter, d, before you can use the formula.

However, as long as you know the circumference of a circle formula and the relationship between the radius and diameter of a circle, you can easily calculate the circumference of a circle in just a few simple steps.

Keep Learning:


How to Find the Area of a Circle in 3 Easy Steps

How to Find the Area of a Circle in 3 Easy Steps

How to Find the Area of a Circle

Step-by-Step Guide: How to Find Area of a Circle with Radius, How to Find Area of a Circle with Diameter


Free Step-by-Step Guide: How to find the area of a circle explained.


In math, it is important to be able to calculate the area of a shape (i.e. the total space that a shape takes up) by using a formula.

When it comes to finding the area of a circle, you can easily find the area as long as you know the area of a circle formula and the length of the circle’s radius or diameter.

This free Step-by-Step Guide on How to Find the Area of a Circle will teach you how to use the circle formula, A=πr², to find area of a circle and it will cover the following topics:

You have the option of either following this guide on how to find area of a circle in step-by-step order, or you can use the hyperlinks above to skip to any particular section of interest.

Now, before we get into any examples of how to find the area of a circle, let’s do a review of important vocabulary terms and characteristics of circles that we can later on apply to solving our sample problems.

Are you ready to get started?


Figure 01: What are the key properties of circles?


What is the Area of a Circle?

In order to understand what the area of a circle actually represents, it’s important that you are familiar with some key properties of circles:

  • Every circle has a center point.

  • The circumference of a circle (also known as the edge or perimeter of the circle) is the outer boundary of the circle. All points on the edge of a circle are equidistant from the center point.

  • The diameter of a circle is a line that passes through the center point and touches two points on the edge of the circle. Any diameter will cut the circle in half.

  • The radius of a circle is a line segment that starts at the center and ends on the edge of the circle. Any radius will always be equal to half the length of the circle’s diameter.

All of these key properties are highlighted for Circle P in Figure 01 above.

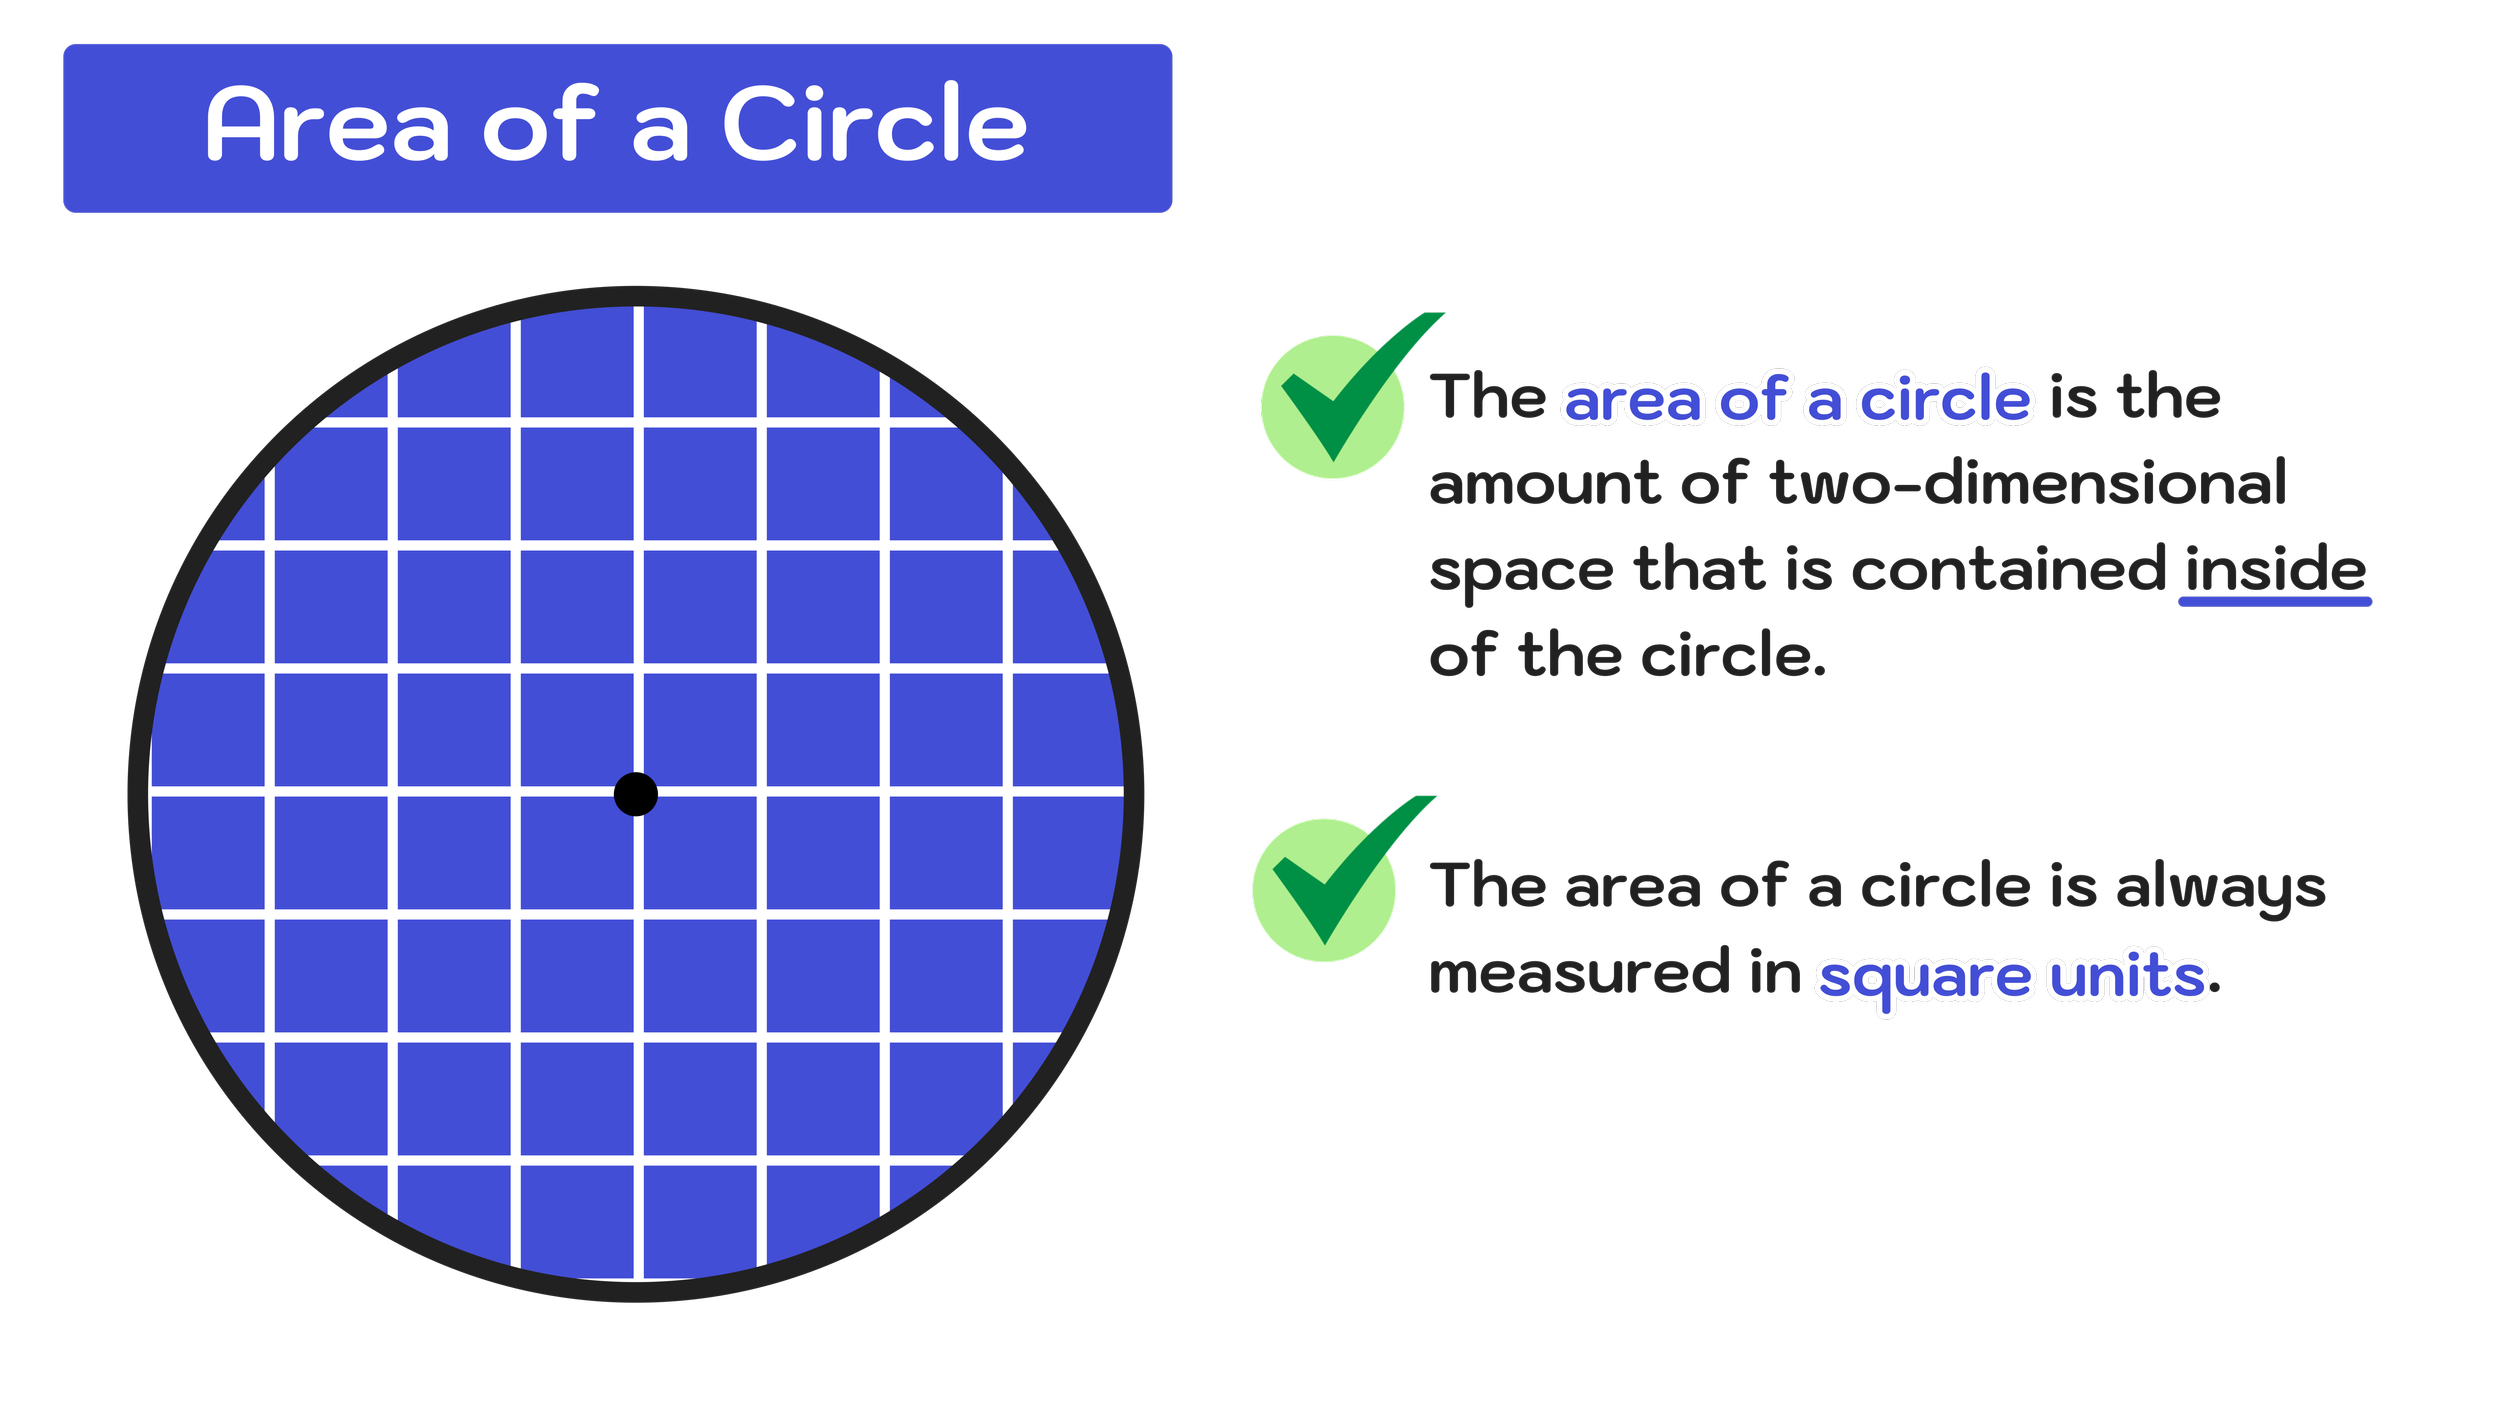
The area of a circle is the amount of two-dimensional space that is contained inside of the circle. Area is measured in square units.

What does this mean in real-world terms? If you wanted to figure out the size of the region contained within a particular circle, you would simply have to calculate its area. For example, if you wanted to tile the bottom of a circular swimming pool, knowing the size of the pool’s area would help you to determine how many square units of tile you would need to cover the entire region.

This real-world example is illustrated in Figure 02 below.


Figure 02: Real-world application of finding the area of a circle. (Image: Mashup Math MJ)


While many math problems involving circles with simply include two-dimensional diagrams of circles, the idea is still the same. The key takeaway here is that the area of a circle is the size of the region encompassed within the circle. The larger the circle, the larger its area will be. And, since circles are two-dimensional figures (i.e. they are flat), the area will be measured in square units.

Figure 03 illustrates this concept and what it means when we say that the area of a circle will always be expressed in square units.

Notice that many of the squares are “cut off” and incomplete, so we should expect to have answers that include decimals rather than whole numbers (we will see this more when we get to the practice problems later on).

For now, just make sure that you are comfortable with the key properties of circles (especially the difference between the radius of a circle and the diameter of a circle) and what the area of a circle represents before moving onto the next section where we will learn the area of a circle formula.


Figure 03: What is the area of a circle?


Area of a Circle Formula: A=πr²

You can find the area of a circle by using the area of a circle formula: A=πr² (where r is the length of the radius of the circle).

Whenever you are calculating a circle’s area using the area of a circle formula, you can use pi (π) or an approximation of pi (π≈3.14).

Before moving forward, make sure that you remember the area of a circle formula and that the r in the formula represents the length of the radius of whatever circle whose area you are trying to find. The diagram in Figure 04 below can serve as a reference for remembering the area of a circle formula. You may also wish to write the formula down before moving onto the practice problems later on in this guide.


Figure 04: The area of a circle formula.


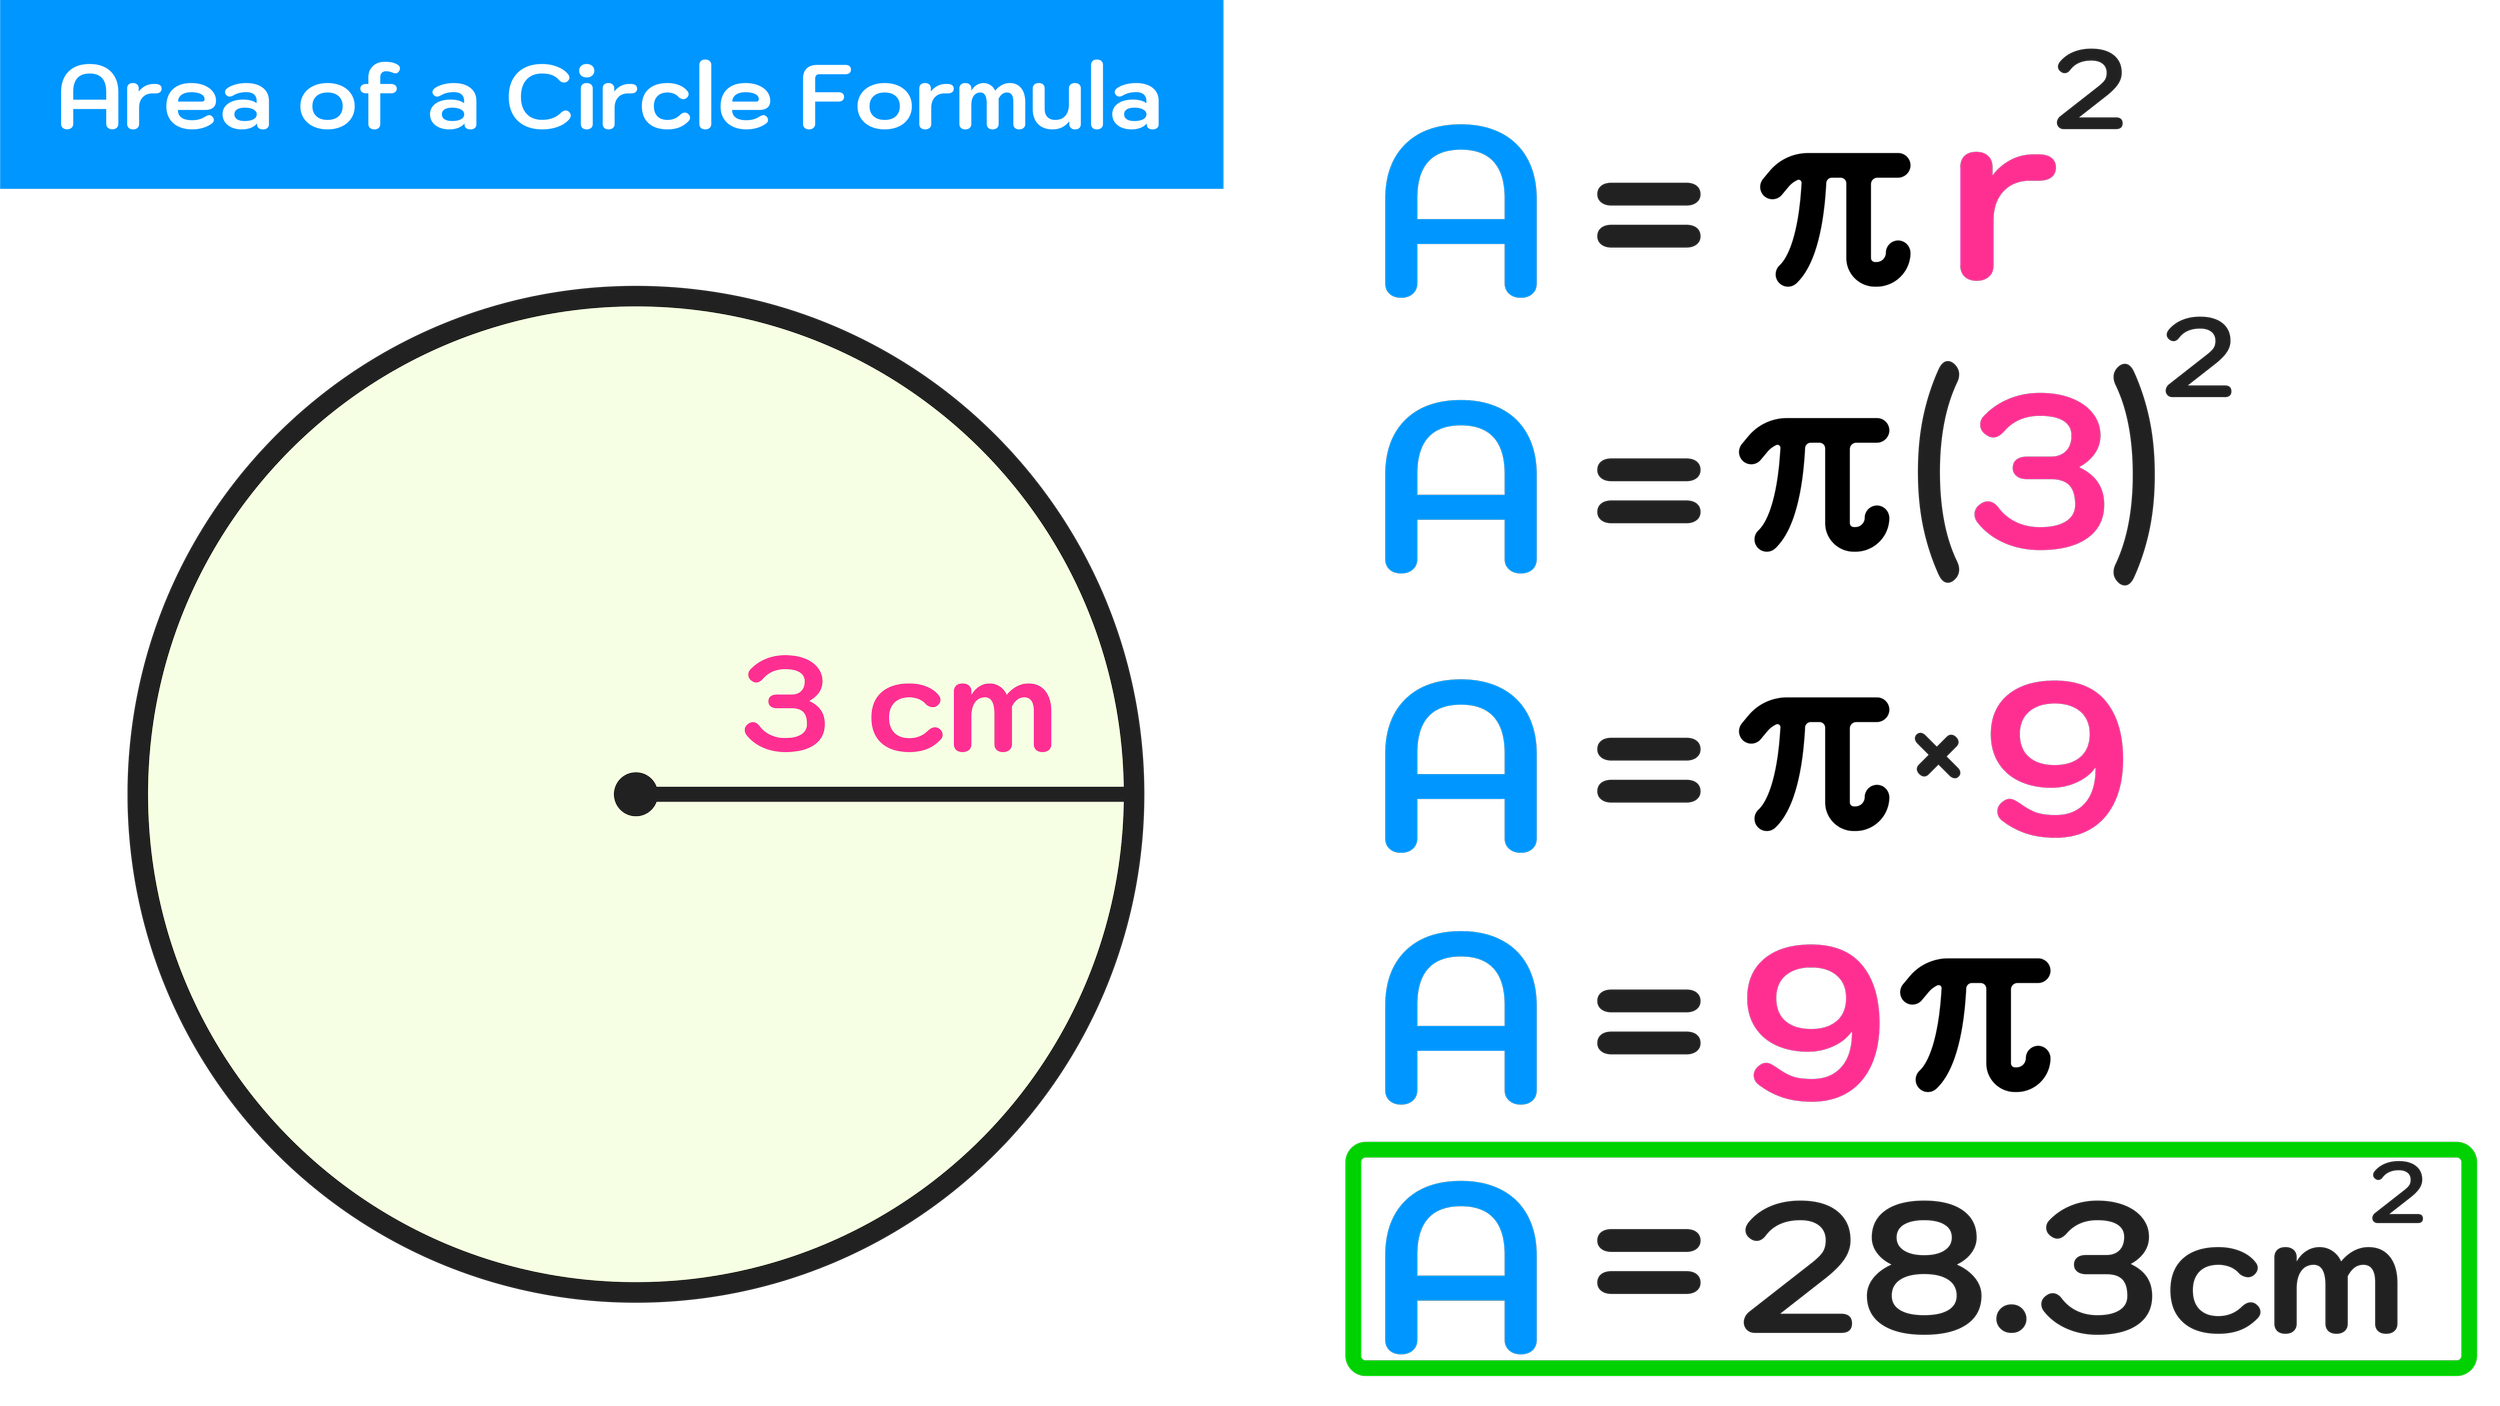
For example, if we wanted to find the area of a circle with a radius of 3 cm, we could use the area of a circle formula to determine the approximate amount of square inches that make up the region inside of the circle.

In this case,

  • A=πr²

  • r=3

So, to find the area of this circle, we would simply have to substitute r with 3 and then evaluate to find the area as follows:

  • A=πr²

  • A=π(3)²

  • A=π9 or A=9π

  • A=28.27433388…

  • A=28.3 cm²

As shown above, we know that area equals π times 3². Since we know that 3²=9, we can now say that area equals π times 9 (or 9π). Finally, we can put 9π into a calculator to get 28.27433388….

In this guide, we will find area to the nearest tenth of a square unit, so we can approximate our final answer as A=28.3 cm².

These steps are illustrated in Figure 05 below.


Figure 05: How to use the area of a circle formula to find the area of a circle.


Next, let’s move onto working on a few more examples of how to find the area of a circle with a given radius or a given diameter. Then, we will take a look at how to find the area of a half circle.


How to Find Area of a Circle with a Radius

In the example shown in Figure 05 above, we found the area of a circle with a radius of 3cm using the area of a circle formula A=πr².

Whenever you have to find the area of a circle where the radius is given, you can simply input the given value of r (the radius of the circle) into the area of a circle formula and evaluate to find the value of the area.

And we will go ahead and do exactly that in the example below.

Example #1: Find the Area of a Circle with Radius 7 mm

For this example, we have to find the area of a circle with a radius of 7 mm.

We can easily find the area of using the area of a circle formula, A=πr², by substituting r with 7 as follows:

  • A=πr²

  • A=π(7)²

  • A=π49 or A=49π

  • A=153.93804…

  • A=153.9 mm²

That’s all that there is to it! Whenever you know the length of the radius of a circle, r, you can input that value into the area of a circle formula to figure out its area.

The steps for solving this first example are illustrated in Figure 06 below. Make sure that you are comfortable with finding the area of a circle with a given radius using the area of a circle formula before moving onto the next section where we will learn how to find area of a circle with diameter.


Figure 06: How to Find the Area of a Circle Step-by-Step


How to Find Area of a Circle with Diameter

While students often have a relatively easy time with finding the area of a circle when they know the value of its radius (as shown in the previous section), they can sometimes get confused when they have to find the area of a circle with diameter given instead of radius.

However, you can still use the area of a circle formula, A=πr², to find the area of a circle with a diameter, but with one small extra step.

Remember that the radius of a circle is a line segment that starts at the center and ends on the edge of the circle and that any radius will always be equal to half the length of the circle’s diameter.

In other words, the diameter of a circle is equal to twice the length of the circle’s radius. Or, vice versa, the radius of a circle is equal to half the length of a circle’s diameter.

So, if you know the diameter of a circle, then you can simply divide it by two to find its radius.

For example, consider a circle with a diameter of 10 feet. This means that the circle has a radius of 5 feet. And, if you know the radius of a circle, then you can use the area of a circle formula to calculate its area.

Let’s go ahead and learn how to find the area of a circle with diameter with this in mind by working through the examples below.


Figure 07: The radius of any circle is equal to one half the length of its diameter.


Example #2: Find the Area of a Circle with Diameter 24 yd

For this example, we have to find the area of a circle with a diameter of 24 yards.

Just like the previous examples, we can use the area of a circle formula, A=πr², to find the area of the circle in question.

However, we can’t use the formula just yet because we only know the length of the diameter and not the radius. So, in order to find the value of the radius, r, we have to first have to divide the diameter by two to find the value of r as follows:

  • r=d/2

  • r=24/2

  • r=12

So, if the circle has a diameter of 24 yards, then it also has a radius of 12 yards (because 24÷2=12).

Now that we know the value of r (r=12 in this case), we can substitute it into the area of a circle formula and solve as follows:

  • A=πr²

  • A=π(12)²

  • A=π144 or A=144π

  • A=452.3893421…

  • A=452.4 yd²

And that is how to find area of a circle with diameter!

Just remember that you can always determine the length of a circle’s radius by dividing its diameter by two. And once you know a circle’s radius, you can use the formula A=πr² to find its area.


Figure 08: How to find the area of a circle with diameter by using the area of a circle formula.


Next, let’s look at another example of how to find area of a circle with diameter in a real world context.

Example #3: Find the Area of a Circle with Diameter 57 m.

For this next example, we want to find the area of a circular zen garden with a diameter of 57 meters.

Again, we can solve this problem by using the area of a circle formula A=πr².

Since we know that the circle has a diameter of d=57, we can use that given information to find the length of the radius as follows:

Figure 09: Find the area of a circular zen garden with 57 m diameter.

  • r=d/2

  • r=57/2

  • r=28.5

Remember that we can always find the length of a circle’s radius simply by dividing its diameter by two. In this case, 57/2=28.5 so we can say that r=28.5 (note that it’s totally fine to have a radius that is a decimal value).

So, if the circular zen garden has a diameter of 57 m, then it also has a radius of 28.5 m (because 57÷2=28.5).

Now that we know that r=28.5, we can substitute it into the area of a circle formula and solve as follows:

  • A=πr²

  • A=π(28.5)²

  • A=π812.25 or A=812.25π

  • A=2,551.758633…

  • A=2,551.8 m²

We can now conclude that the circular zen garden has an approximate area of 2,551.8 square meters and we have solved the problem!


Figure 10: Real world example of how to find the area of a circle with diameter given.


Now, let’s move onto the final section where we will learn how to find the area of a half circle.


How to Find Area of a Half Circle

Now that you know how to find the area of a circle with a given radius or diameter using the area of a formula circle, you are ready to learn how to find the area of a half circle (also known as a semicircle).

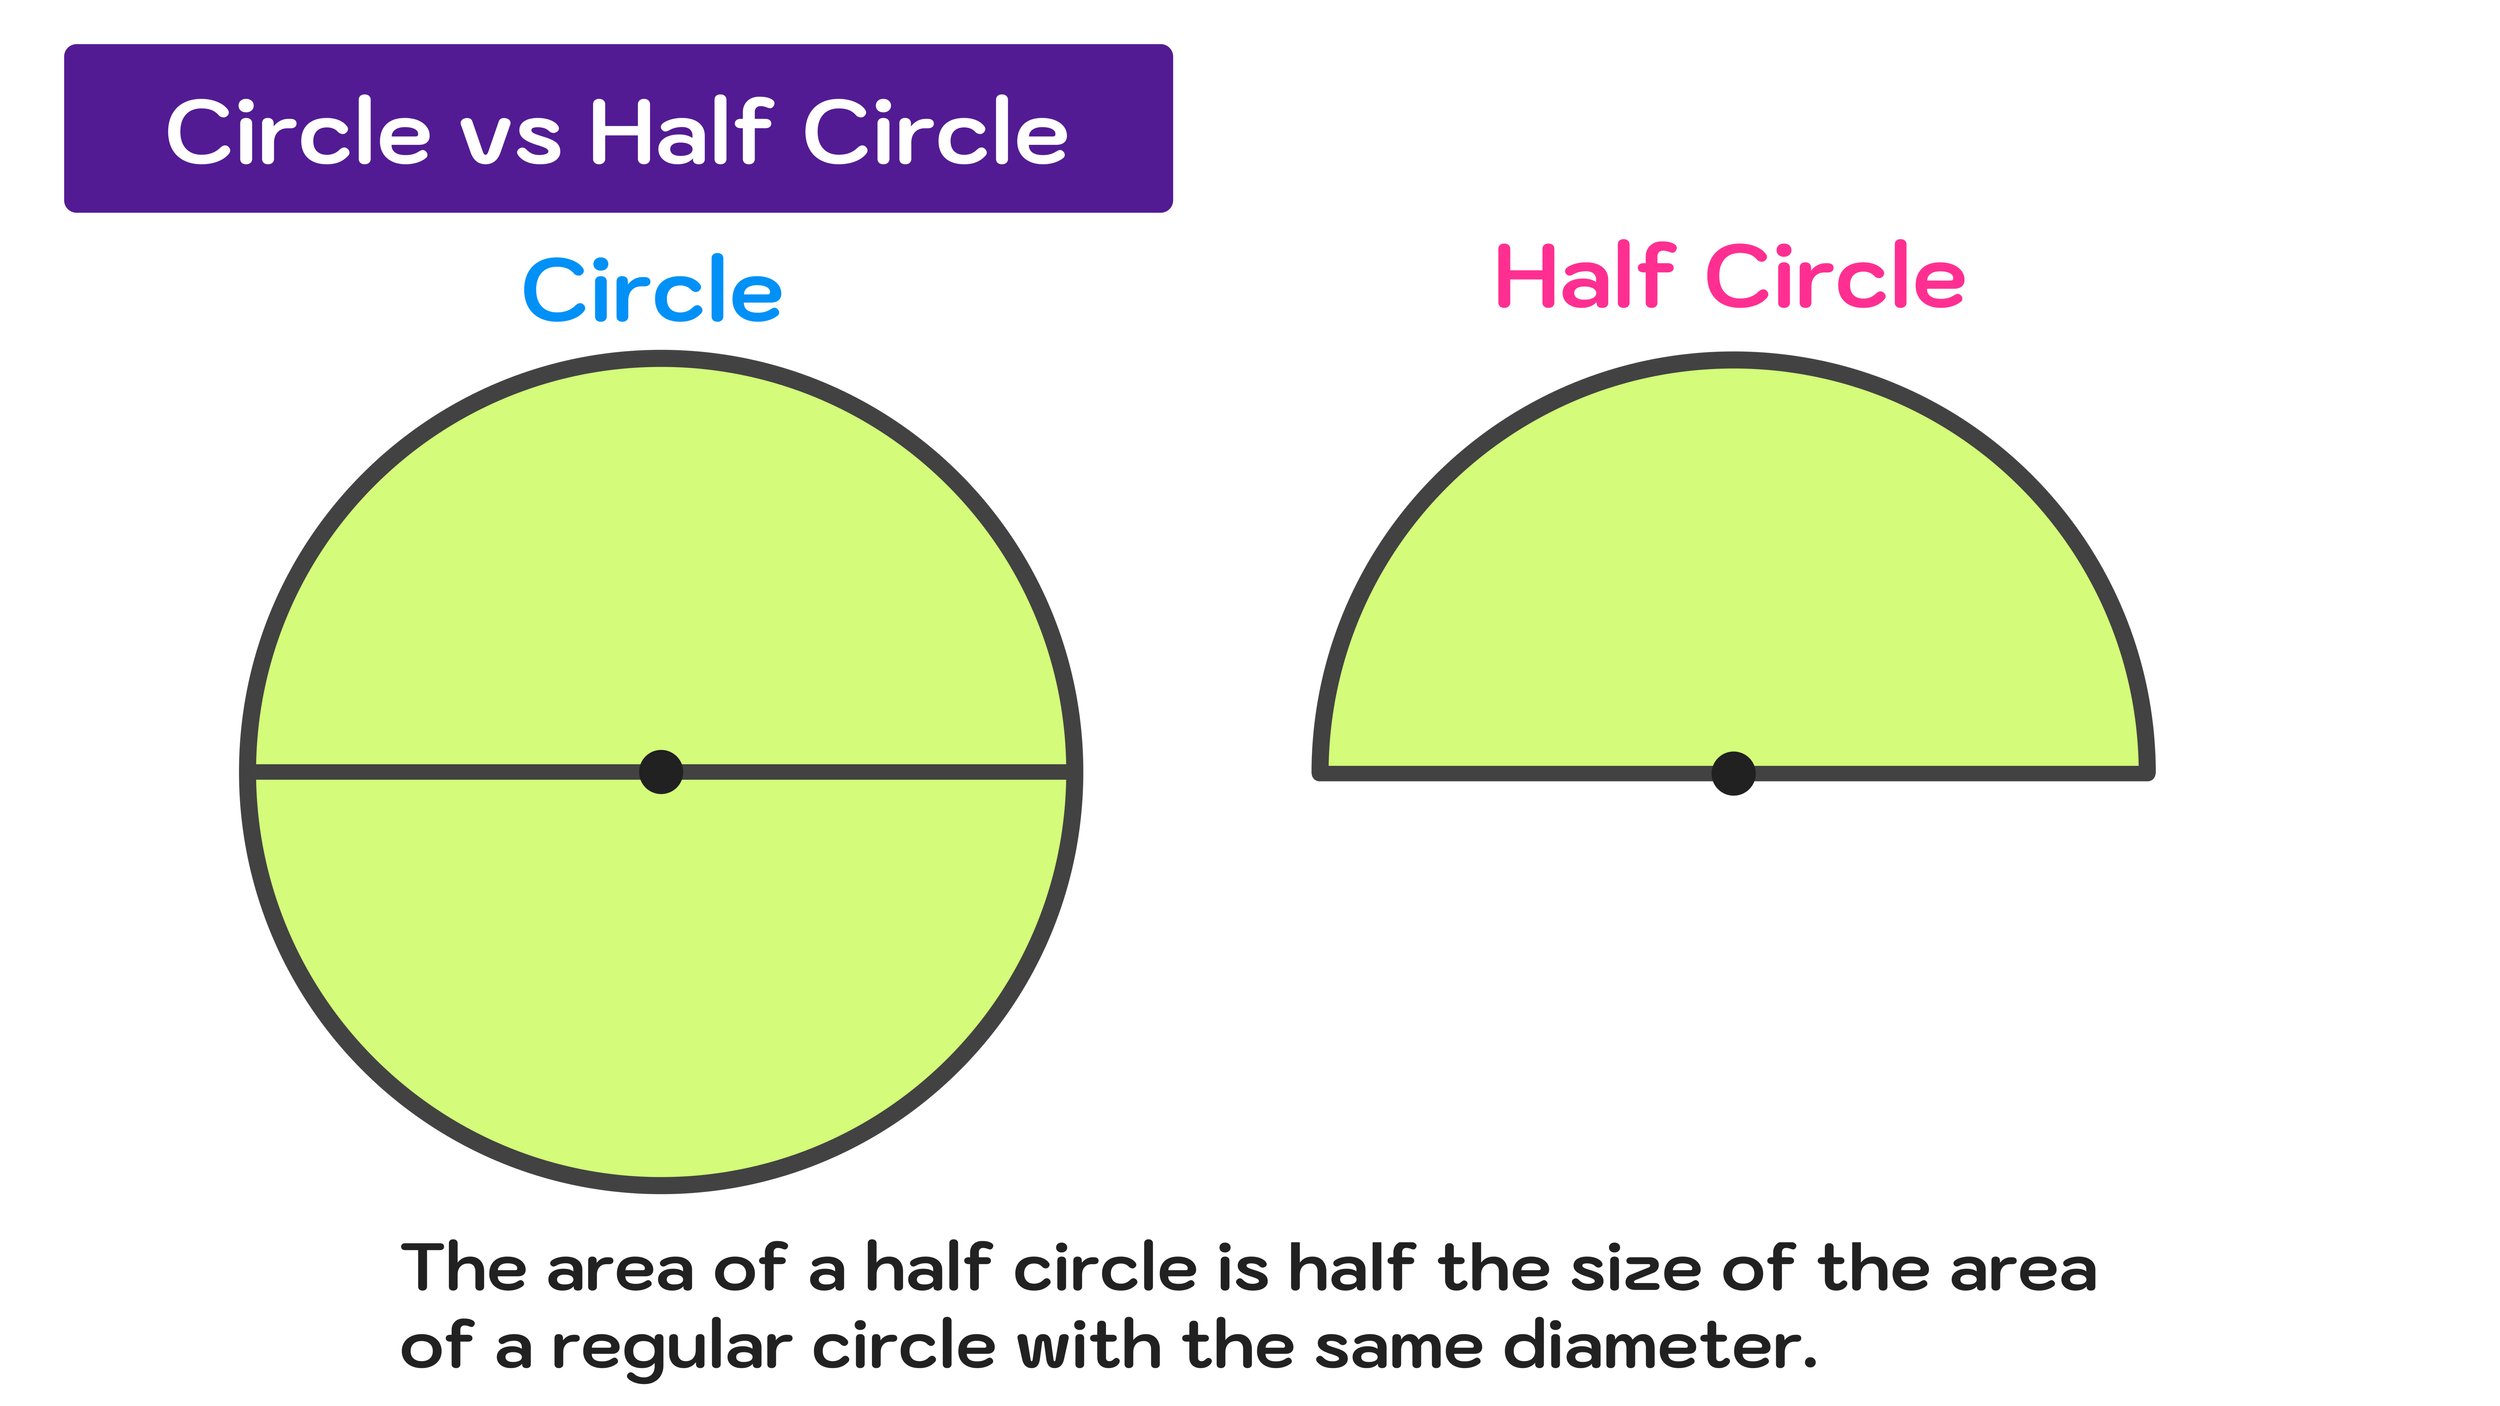
What is a half circle? Simply put, a half circle is a regular circle that has been cut in half along the diameter.

And, notably, the area of a half circle is exactly one half the area of a regular circle with the same diameter.

The differences between a circle and a half circle are illustrated in Figure 11 below.


Figure 11: What is the difference between the area of a circle and the area of a half circle?


With this difference in mind, we will have to use a modified version of the area of a circle formula to find the area of a half circle.

  • Area of a Circle Formula: A=πr²

  • Area of a Half Circle Formula: A=(πr²)/2

Notice that the area of a half circle formula is the same as the area of a circle formula except that the result is being dividing by 2. This should make sense because the area of a half circle is half the size of the area of a regular circle with the same diameter.


Figure 12: The area of a half circle formula is A=(πr²)/2


Now that you know the area of a half circle formula, let’s learn how to find the area of a half circle step-by-step.

Example #4: Find the Area of a Half Circle with Diameter 22 cm

For this example, we have to find the area of a half circle with a diameter of 22 cm.

To solve this problem, we can use the area of a half circle formula: A=(πr²)/2

Let’s start by figuring out the value of r (the radius of the half circle), which can determine by cutting the diameter in half as follows:

  • r=d/2

  • r=22/2

  • r=11

Now that we know the value of r (r=11 in this example), we can substitute it into the area of a half circle formula and solve as follows:

  • A=(πr²)/2

  • A=(π(11)²)/2

  • A=(121π)/2

  • A=190.0663555…

  • A=190.1 cm²

And that is how to find area of a half circle using the area of a half circle formula.

All of the steps for solving this example are illustrated in Figure 13 below.


Figure 13: How to Find Area of a Half Circle


Example #5: Find the Area of a Half Circle

For this final example, let’s learn how to find the area of a circle (namely a half circle) in a real-world scenario.

In this case, we have a circular shaped table with a surface that is half-covered with tile and half-covered with hardwood and we want to find the area of the portion that is covered in hardwood.

If we know that the table has a diameter of 13 feet, we can find the length of the radius use the area of a half circle formula to solve the problem as follows:

  • r=d/2

  • r=13/2

  • r=6.5

Now that we know that r=6.5, we can substitute it into the area of a half circle formula and solve as follows:

  • A=(πr²)/2

  • A=(π(6.5)²)/2

  • A=(42.25π)/2

  • A=66.36614481…

  • A=66.4 ft²

We can now conclude that the hardwood half of the table has an area of 66.4 square feet and we are finished!


Figure 14: How to find the area of a half circle with a diameter of 13 feet.


How to Find the Area of a Circle: Conclusion

Learning how to find the area of a circle or a half circle is an important and useful math skill.

You can find the area of a circle by using the formula A=πr² where r is the length of the circle’s radius.

If you only know the length of a circle’s diameter, you can simply divide it by two (since d=r/2) to find the value of its radius and then use the formula to find the circle’s area.

You can find the area of a half circle by using the formula A=(πr²)/2 where r is the length of the circle’s radius. This formula is derived from the regular area of a circle formula since the area of a half circle is equal to half the area of a regular circle with the same diameter.

Keep Learning:


How to Find Perimeter in 3 Easy Steps

Comment

How to Find Perimeter in 3 Easy Steps

How to Find Perimeter in 3 Easy Steps

Math Skills: Learn how to find the perimeter of a rectangle, square, triangle, parallelogram, and circle.


Free Step-by-Step Guide: How to Find the Perimeter of a Shape.


Are you ready to learn how to find perimeter of various shapes and figures?

This free guide will teach you all about perimeter and how to find the perimeter of several common shapes. You can use the quick links below to jump to any section of this guide:

In math, every student must learn how to find the perimeter of a two-dimensional shape. As long as you understand what perimeter means, you can easily find the perimeter of a shape by following a few easy steps.

For each example of how to find perimeter in this guide, we will use a simple 3-step method for finding perimeter that you can use to find the perimeter of any shape and to solve any math problem involving perimeter. As long as you can follow the three simple steps shared in this guide, you will always be able to find perimeter.

Let’s get started with a quick review of perimeter including some key vocabulary terms as well as an explanation of how to find perimeter before we move onto several specific examples.

How to Find Perimeter: Quick Review

Before you can learn how to find perimeter, you should be familiar with some important math concepts and vocabulary terms, which we will quick review here in this first section.

What is Perimeter?

Definition: In math, the perimeter of a shape is the total distance around the outer boundary of the shape.

Another way to describe the perimeter of a figure is the total measured length of the outline of the shape. Note that perimeter applies to two-dimensional shapes including triangles, rectangles, squares, etc.

For example, consider an equilateral triangle where each side has a length of 5 centimeters. To find the perimeter of the triangle, you would simply have to add up the lengths of all three sides as follows:

  • 5 + 5 + 5 = 15 cm

Therefore, we could say that the triangle has a perimeter of 15 cm.

We can also think of perimeter as taking all of the side lengths of a shape and laying them out as one long straight line. The total length of this line would be the perimeter of the figure. This idea is illustrated in Figure 01 below.


Figure 01: How to Find Perimeter Explained.


On a larger scale, we can imagine a rectangular shaped park with a paved sidewalk surrounding it. The perimeter of the park would be the total distance that you would have to walk to travel the complete outer distance of the park (i.e. how far you would have to walk along the sidewalk to go around the park and end up back where you started.)

We can say that perimeter is the total distance around the outer boundary of a two-dimensional shape or figure.

Also, note that, unlike area, perimeter is only concerned with the outer boundary of a figure (not the inside of a figure).

Figure 02 below further illustrates the idea that the perimeter of a figure is the length of its outer boundary.


Figure 02: Perimeter is the total distance around the outer boundary of a two-dimensional shape or figure.


Now that you understand the concept of perimeter, you are ready to learn how to find a perimeter of several common two-dimensional shapes including squares, rectangles, triangles, parallelograms, and circles.


How to Find the Perimeter of a Square

Example #1: Find the Perimeter of a Square

For our first example, we have to find the perimeter of a square with a side length of 8m, as shown in Figure 03 below.


Figure 03: How to Find the Perimeter of a Square


We can solve this first example of how to find the perimeter of a square (and all of the examples in this guide) by following the following three steps:

  • Step #1: Identify the Shape

  • Step #2: Identify all of the side lengths and add them together

  • Step #3: Determine the perimeter and use appropriate units of measurement

Let’s go ahead and apply these three steps to this first example of how to find perimeter of a square.

Step #1: Identify the Shape

Our first step is super easy. We know that the figure in question is a square with four sides that all have the same length (8m in this case).

Step #2: Identify all of the side lengths and add them together

We know that each side of the square has a length of 8m, so we can add them together as follows:

  • 8 + 8 + 8 + 8 = 32

Step #3: Determine the perimeter and use appropriate units of measurement

Finally, we can say that the length of the outer boundary of the figure is 32m and we can conclude that:

Final Answer: P=32m

Our procedure for solving this first example is illustrated in Figure 04 below.


Figure 04: How to find the perimeter of a square with a side length of 8m.


That’s all that there is to finding perimeter! In this example, we learned how to find a perimeter of a square, but the steps that we used can be used to find the perimeter of any two-dimensional shape, as you will see in the following examples.


How to Find the Perimeter of a Rectangle

Example #2: Find the Perimeter of a Rectangle


Figure 05: How to find the perimeter of a rectangle


In this next example, we will learn how to find the perimeter of a rectangle with a length of 12 ft and a width of 7 ft.

Just like the previous example, we can find the perimeter of this rectangle by using our three step strategy as follows:

Step #1: Identify the Shape

We already know that the shape in question is a rectangle that has four sides (two lengths and two widths). We also know that the opposite sides have equal measure, meaning that the two lengths equal 12 feet each and the two widths equal 7 feet each.

In many cases, all four sides of the figure will not be labeled, but you may find it helpful to go ahead and label them as shown in Figure 06 below:


Figure 06: How to Find Perimeter of a Rectangle: It can be helpful to label all four side lengths (opposite sides of a rectangle have congruent lengths).


Step #2: Identify all of the side lengths and add them together

Now that we have labeled all four side lengths, we can add them together as follows:

  • 12 + 12 + 7 + 7 = 38

Step #3: Determine the perimeter and use appropriate units of measurement

And now, for the final step, we can say that the perimeter of the rectangle is 38 feet, and we can conclude that:

Final Answer: P=38 ft

The diagram in Figure 07 below summarizes how we found the perimeter of the rectangle in this example.


Figure 07: The rectangle has a perimeter of 38 feet.


Now, let’s work through one more example of how to find perimeter of a rectangle.


Example #3: Find the Perimeter of a Rectangle


Figure 08: How to Find the Perimeter of a Rectangle


Notice that the rectangle whose perimeter we have to find in Figure 08 above has decimal side lengths.

This, however, will not change how we solve this problem and we can again use our three step strategy as follows:

Step #1: Identify the Shape

Since the shape in this example is a rectangle, we know that it has four sides, two of which have a length of 4.7 mm and two of which have a length of 8.1 mm.

Step #2: Identify all of the side lengths and add them together

Next, we can go ahead and find the sum of all four side lengths as follows:

  • 4.7 + 4.7 + 8.1 + 8.1 = 25.6

Step #3: Determine the perimeter and use appropriate units of measurement

Now we can conclude that the rectangle has a perimeter of 25.6 mm.

Final Answer: P=25.6 mm

The diagram in Figure 09 below illustrates how we found the perimeter of a rectangle with a length of 4.7 and a width of 8.1.


Figure 09: How to Find the Perimeter of a Rectangle in 3 Easy Steps


How to Find the Perimeter of a Triangle

In this next section, we will focus on two examples of how to find the perimeter of a triangle. Unlike the last two sections where we focus on squares and rectangles, triangles only have three sides and they do not necessarily have right angles. However, these differences will not prevent us from finding the perimeter of a triangle using our three step strategy, as you will see in the examples below.

Example #4: Find the Perimeter of a Triangle


Figure 10: How to Find the Perimeter of a Triangle Example


For this next example of how to find the perimeter of a triangle, we can again use our three step strategy to find the solution.

Step #1: Identify the Shape

In this example, we want to find the perimeter of a triangle (a three-sided shape). In this example, our triangle has side lengths of 30, 64, and 68.
Note that the triangle in this example, as shown in Figure 10 above, already has all three side lengths labeled for us.
Step #2: Identify all of the side lengths and add them together

For the second step, we have to add all three side lengths together as follows:

  • 30 + 64 + 68 = 162

Step #3: Determine the perimeter and use appropriate units of measurement

Finally, we can say that the perimeter of the triangle is 162 units and we can conclude that:

Final Answer: P=162

The entire process for how to find the perimeter of a triangle is shown in Figure 11 below.


Figure 11: How to Find the Perimeter of a Triangle Explained


Example #5: Find the Perimeter of a Triangle


Figure 12: How to Find Perimeter of a Triangle


Here is another example of finding the perimeter of a triangle (in this case, a right triangle). Let’s go ahead and use our three step strategy to find the solution.

Step #1: Identify the Shape

Even though this example features a right triangle, we still know the side lengths to be 3.6, 4.8, and 6, so we have enough information to move onto the next step.

Step #2: Identify all of the side lengths and add them together

Now, we can find the sum of all three sides of the triangle as follows:

  • 6 + 3.6 + 4.8 = 14.4

Step #3: Determine the perimeter and use appropriate units of measurement

From here, we know that the perimeter of the triangle is 14.4 units.

Final Answer: P=14.4

The steps for solving this problem on finding the perimeter of a triangle are in the diagram in Figure 13 below.


Figure 13: How to Find the Perimeter of a Triangle Explained


How to Find the Perimeter of a Parallelogram

Next, let’s take a look at an example of how to find the perimeter of a parallelogram.

Note that, in math, a parallelogram is a four-sided figure with two pairs of parallel sides where opposite sides are congruent in length. So, if you can find the perimeter of a rectangle or a square, then you can easily learn how to find the perimeter of a parallelogram.

Example #6: Find the Perimeter of a Parallelogram


Figure 14: How to Find the Perimeter of Parallelogram


Step #1: Identify the Shape

Notice that this example specifically asks us to find the perimeter of a parallelogram, so knowing the properties of parallelograms will be incredibly useful here (namely that the opposite sides of a parallelogram have congruent, or equal, lengths).

So, even though the parallelogram in the diagram shown in Figure 14 above only has two sides labeled, we actually have enough information to find the perimeter of the parallelogram.

Before we move onto the next step, let’s go ahead and label all four sides of the figure as shown in Figure 15 below.


Figure 15: Finding the Perimeter of a Parallelogram: Label all four side lengths.


Step #2: Identify all of the side lengths and add them together.

From here, we have a parallelogram with four side lengths: 40, 40, 54, and 54. For this second step to finding the perimeter of a parallelogram, we can find the sum of these four side lengths as follows:

  • 40 + 40 + 54 + 54 = 188

Step #3: Determine the perimeter and use appropriate units of measurement

Now that we have found the sum of the four side lengths of the parallelogram, we can say that the perimeter equals 188 units.

Final Answer: P=188

The complete three step process of how to find the area of a parallelogram is illustrated in Figure 16 below.


Figure 16: How to find the perimeter of a parallelogram explained.


Now that we have learned how to find the perimeter of a parallelogram, let’s move onto the final section of this guide on how to find the perimeter of shapes by looking at circles.


How to Find the Perimeter of a Circle

For this last section, we will focus on how to find a perimeter of a circle.

All of the shapes that we have previously covered in this guide (squares, rectangles, triangles, and parallelograms) had straight side lengths. However, circles do not have any sides at all, so how can we possibly find the perimeter of a circle?


Figure 17: How to Find Perimeter of a Circle Using the Circumference Formula


Remember that the concept of perimeter refers to the length of the outer boundary of a figure. And, when it comes to circles, the term that refers to its outer boundary is called its circumference.

So, anytime you are wondering how to find the perimeter of a circle, you should really be wondering how to find the circumference of that circle!

And, to find the circumference of a circle, we will have to use the circumference of a circle formula:

  • C=πd

In other words, the perimeter of a circle (i.e. the circumference of a circle) is equal to the product of π and its diameter.

With this in mind, let’s work through two examples of how to find the perimeter of a circle using the circumference formula.

*Note that in the examples below, we will use a calculator to make calculations using the exact value for π. However, you can approximate by as 3.14 to find estimated answers if you do not have access to a calculator will a π button.

Example #7: Find the Perimeter of a Circle


Figure 18: How to Find the Perimeter of the Circle Example


In the case of finding the perimeter of a circle, our three step strategy will not work.

In fact, you will rarely see questions that ask you to find the perimeter of a circle. Rather, they will more often require you to find the circumference of the circle, which is exactly what we will do to solve this problem.

Again, we will be using the formula C=πd where d is the length of the circle’s diameter, which, in this example, is 116 inches.

So, we can use the formula as follows:

  • C = π x d

  • C = π x 116

  • C = 364.424747…

  • C ≈ 364.4

For this example, we will round our answer to the nearest tenth and we can conclude that the perimeter of the circle is 364.4 inches.

Final Answer: P = 364.4 inches


Figure 19: How to Find Perimeter of a Circle Explained


Now, let’s move onto our very last perimeter example where you will gain more practice with how to find a perimeter of a circle.

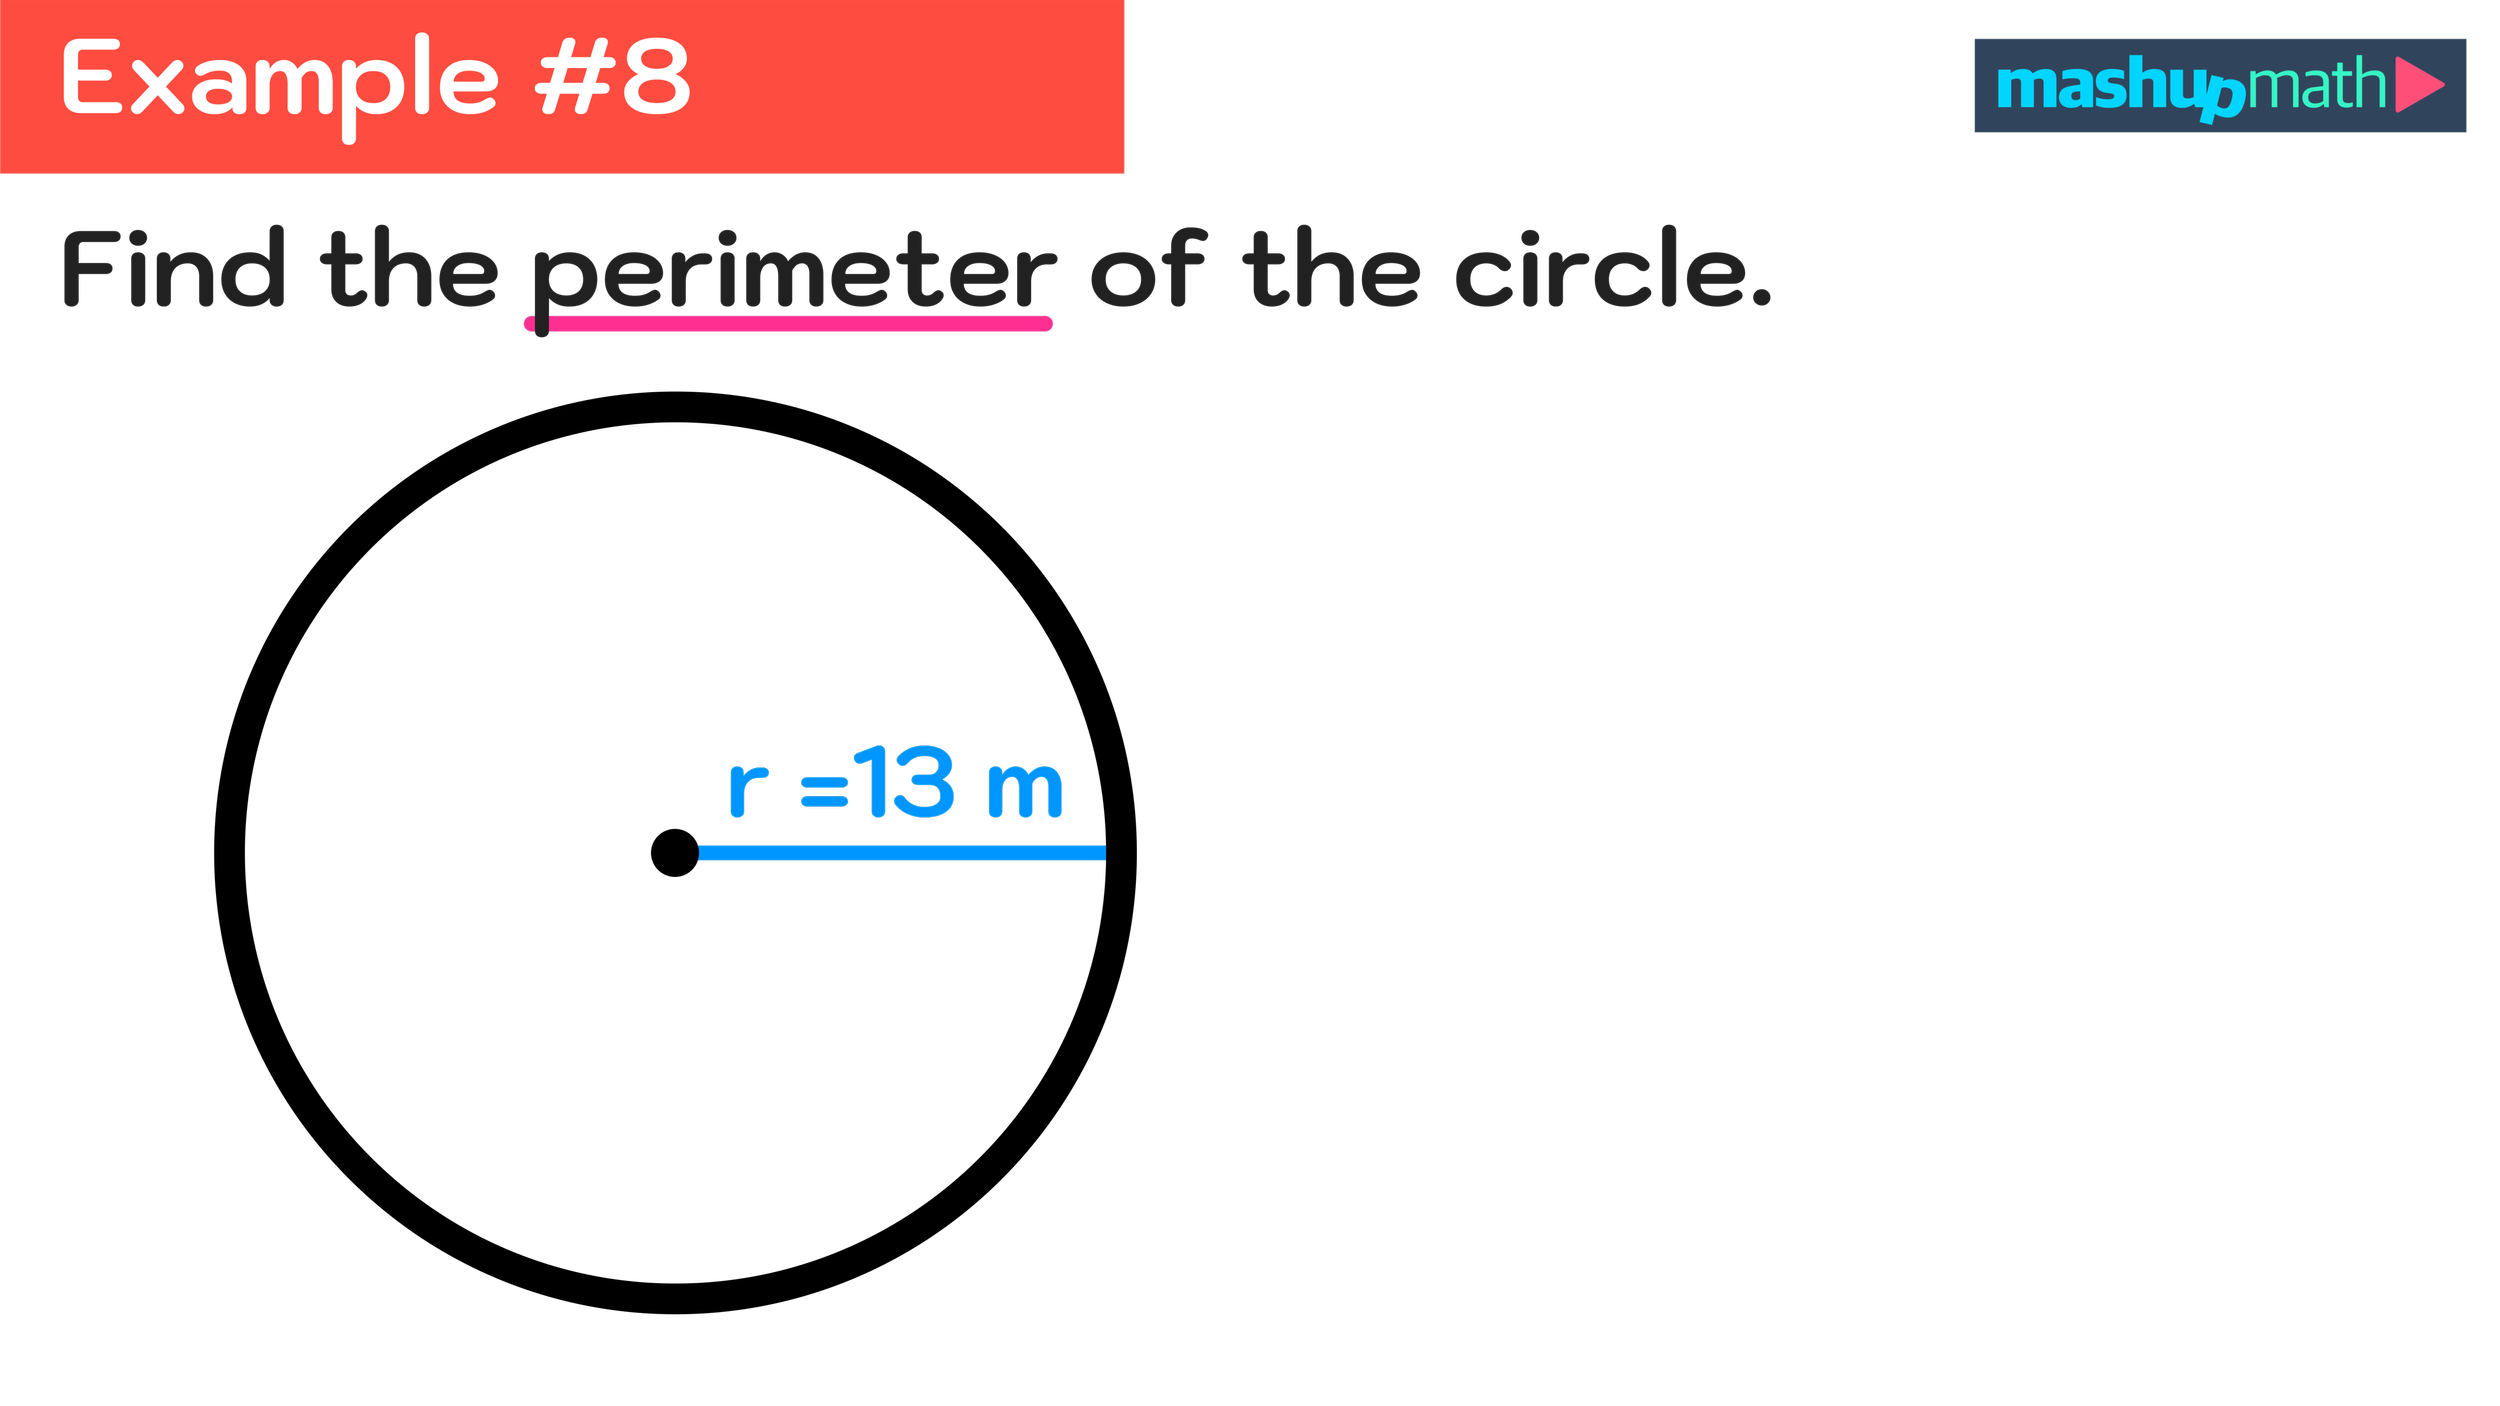
Example #8: Find the Perimeter of a Circle


Figure 20: How to find the perimeter of a circle with a radius of 13.


We can solve this example of finding the perimeter of a circle the same way that we did the previously one.

However, notice that this example only gives us the length of the circle’s radius and not its diameter.

To find the length of the radius, we simply have to double the length of the given radius (13 m) as follows:

  • d = r x 2

  • d = 13 x 2

  • d = 26

Now that we know that the circle has a radius of 26m, we can use the circumference of a circle formula to find its perimeter as follows:

  • C = π x d

  • C = π x 26

  • C = 81.6814089…

  • C ≈ 81.7

Rounding our answer to the nearest tenth, we can conclude that the circle has a perimeter of approximately 81.7.

Final Answer: P = 81.7 m.


Figure 21: How to Find the Perimeter of a Circle Using the Circumference Formula.


Conclusion: How to Find Perimeter

In math, the perimeter of a shape is the total distance around the outer boundary of the shape. You can also think of perimeter as the measured distance along the outline of the shape.

In this guide on how to find perimeter, we worked through several examples of how to find the perimeter of a rectangle, a square, a triangle, and a parallelogram using the following three step strategy:

  • Step #1: Identify the Shape

  • Step #2: Identify all of the side lengths and add them together

  • Step #3: Determine the perimeter and use appropriate units of measurement

We also looked at the special case of how to find the perimeter of a circle, where we used the circumference formula, C = π x d, the find the length of the outer boundary of any circle.

Finding the perimeter of a shape is a relatively easy math skill that you can learn through practice and understanding the meaning of perimeter and the procedure for finding it will help you to solve problems inside and outside of the math classroom.

Keep Learning

How to Find the Area of a Parallelogram in 3 Easy Steps

Learn how to find the area of any parallelogram in this free step-by-step guide.


Search Tags: how to subtract fractions, subtracting fractions, how to subtract fractions with different denominators, fraction subtraction, subtracting fractions with unlike denominators, how do you subtract fractions?

Comment

How to Address an Envelope—Explained with Examples

How to Address an Envelope—Explained with Examples

How to Address and Envelope Step-by-Step

Your Quick Guide on How to Write the Address on an Envelope


Learn how to write an address on an envelope in 3 easy steps.


Knowing how to address an envelope is a valuable life skill that every person should learn how to do at some point.

Sending and receiving letters containing important information, financial documents, and notifications is a part of adult life and you will need to know how to write an address on an envelope correctly. Luckily, addressing an envelope is relatively easy to do and you can learn how very quickly.

This free Life Skills Guide on How to Write an Address on an Envelope will cover the following topics and examples:

Note that you do not have to follow this guide in order, and you can use the text links above to skip to any particular section that interests you.

Now, let’s start with a quick explanation of why letters and useful and why being able to properly address an envelope is an important life skill like knowing how to write a check.


How to Address an Envelope: Many couples still send physical thank you cards through the mail to individuals who attended their wedding. (Image: Mashup Math MJ)


What are Letters and Why are They Useful?

Communicating via letters sent in envelops has been done for hundreds of years and, even in today’s digital world, remains a useful and popular way of sending and exchanging information.

Today, letters have many uses such as sending someone a physical card to commemorate an event or to share condolences, important notifications and information, and legal and financial documents.

For example, the Internal Revenue Service (IRS), relies primarily on sending letters through the mail to communicate with and notify individuals. In fact, the IRS’ first point of contact with a customer will always be through the mail, since sending letters is a secure and traceable form of communication.

Since sending and receiving letters continues to be prevalent, learning how to address an envelope is an important life skill because you will certainly want to know that anything that you send—whether it be a birthday card with a check enclosed or your tax return documents—will reach its intended recipient.

How to Address and Envelope: Step-by-Step


How to Address and Envelope in 3 Easy Steps


Now you are ready to learn how to write an address on an envelope.

Note that there are three key steps to correctly addressing an envelope:

  • Return Address (Top-Left Corner)

  • Recipient’s Address (Center)

  • Stamp (Top-Right Corner)

Next, we will walk through each step of how to put the address on an envelope so it reaches its intended destination.

While it is not a requirement, we highly recommend that you use black or blue ink whenever you are addressing an envelope and always write clearly and legibly so that postal workers are not confused or unable to deliver your envelope.

Start with a Blank Envelope

Before you do anything, make sure that you are starting with a blank envelope that is appropriately sized to fit your letter or card.

Note that the standard white envelope for letters is 4.125 x 9.5 inches, but envelopes come in many shapes, sizes, and colors. Greeting cards typically come with an envelope to hold the card as well. No matter what type of envelope you are using, the process below will apply.

However, make sure that you are writing the address on the front side of the letter. The front side is totally blank and empty, while the back side has a flap/opening (see Figure 01 below for a visual reference).

Figure 01: How to Address an Envelope: Start with a blank envelope that is large enough to hold your letter, card, or documents.


Step One: Write the Return Address in the Top-Left Corner

The first step is to write the return address in the top-left corner of the envelope.

The return address is your address (i.e. you, the sender). Putting a return address on a letter serves two purposes:

  1. It lets the recipient know who the letter is from before they open it

  2. If the letter can’t be delivered for any reason, it will be returned to this address

For example, let’s say that our sample letter is being sent by Alexander Johnson who lives at the following address:

  • 135 Pine Street, Denver, CO 80203

In the top left-hand corner of our blank envelope, we will write the following as our return address:

  • Alexander Johnson

  • 135 Pine Street

  • Denver, CO 80203

Individuals who send letters often will sometimes have custom envelopes with the return address already printed on them while others will purchase stickers/labels with their return address printed on them. Either of these are exceptional alternatives to handwriting the return address.

Figure 02 below shows what our envelope will look like after writing the return address in the top left-hand corner.

Figure 02: How to Write the Address on an Envelope: Start by writing the return address at the top left-hand corner.


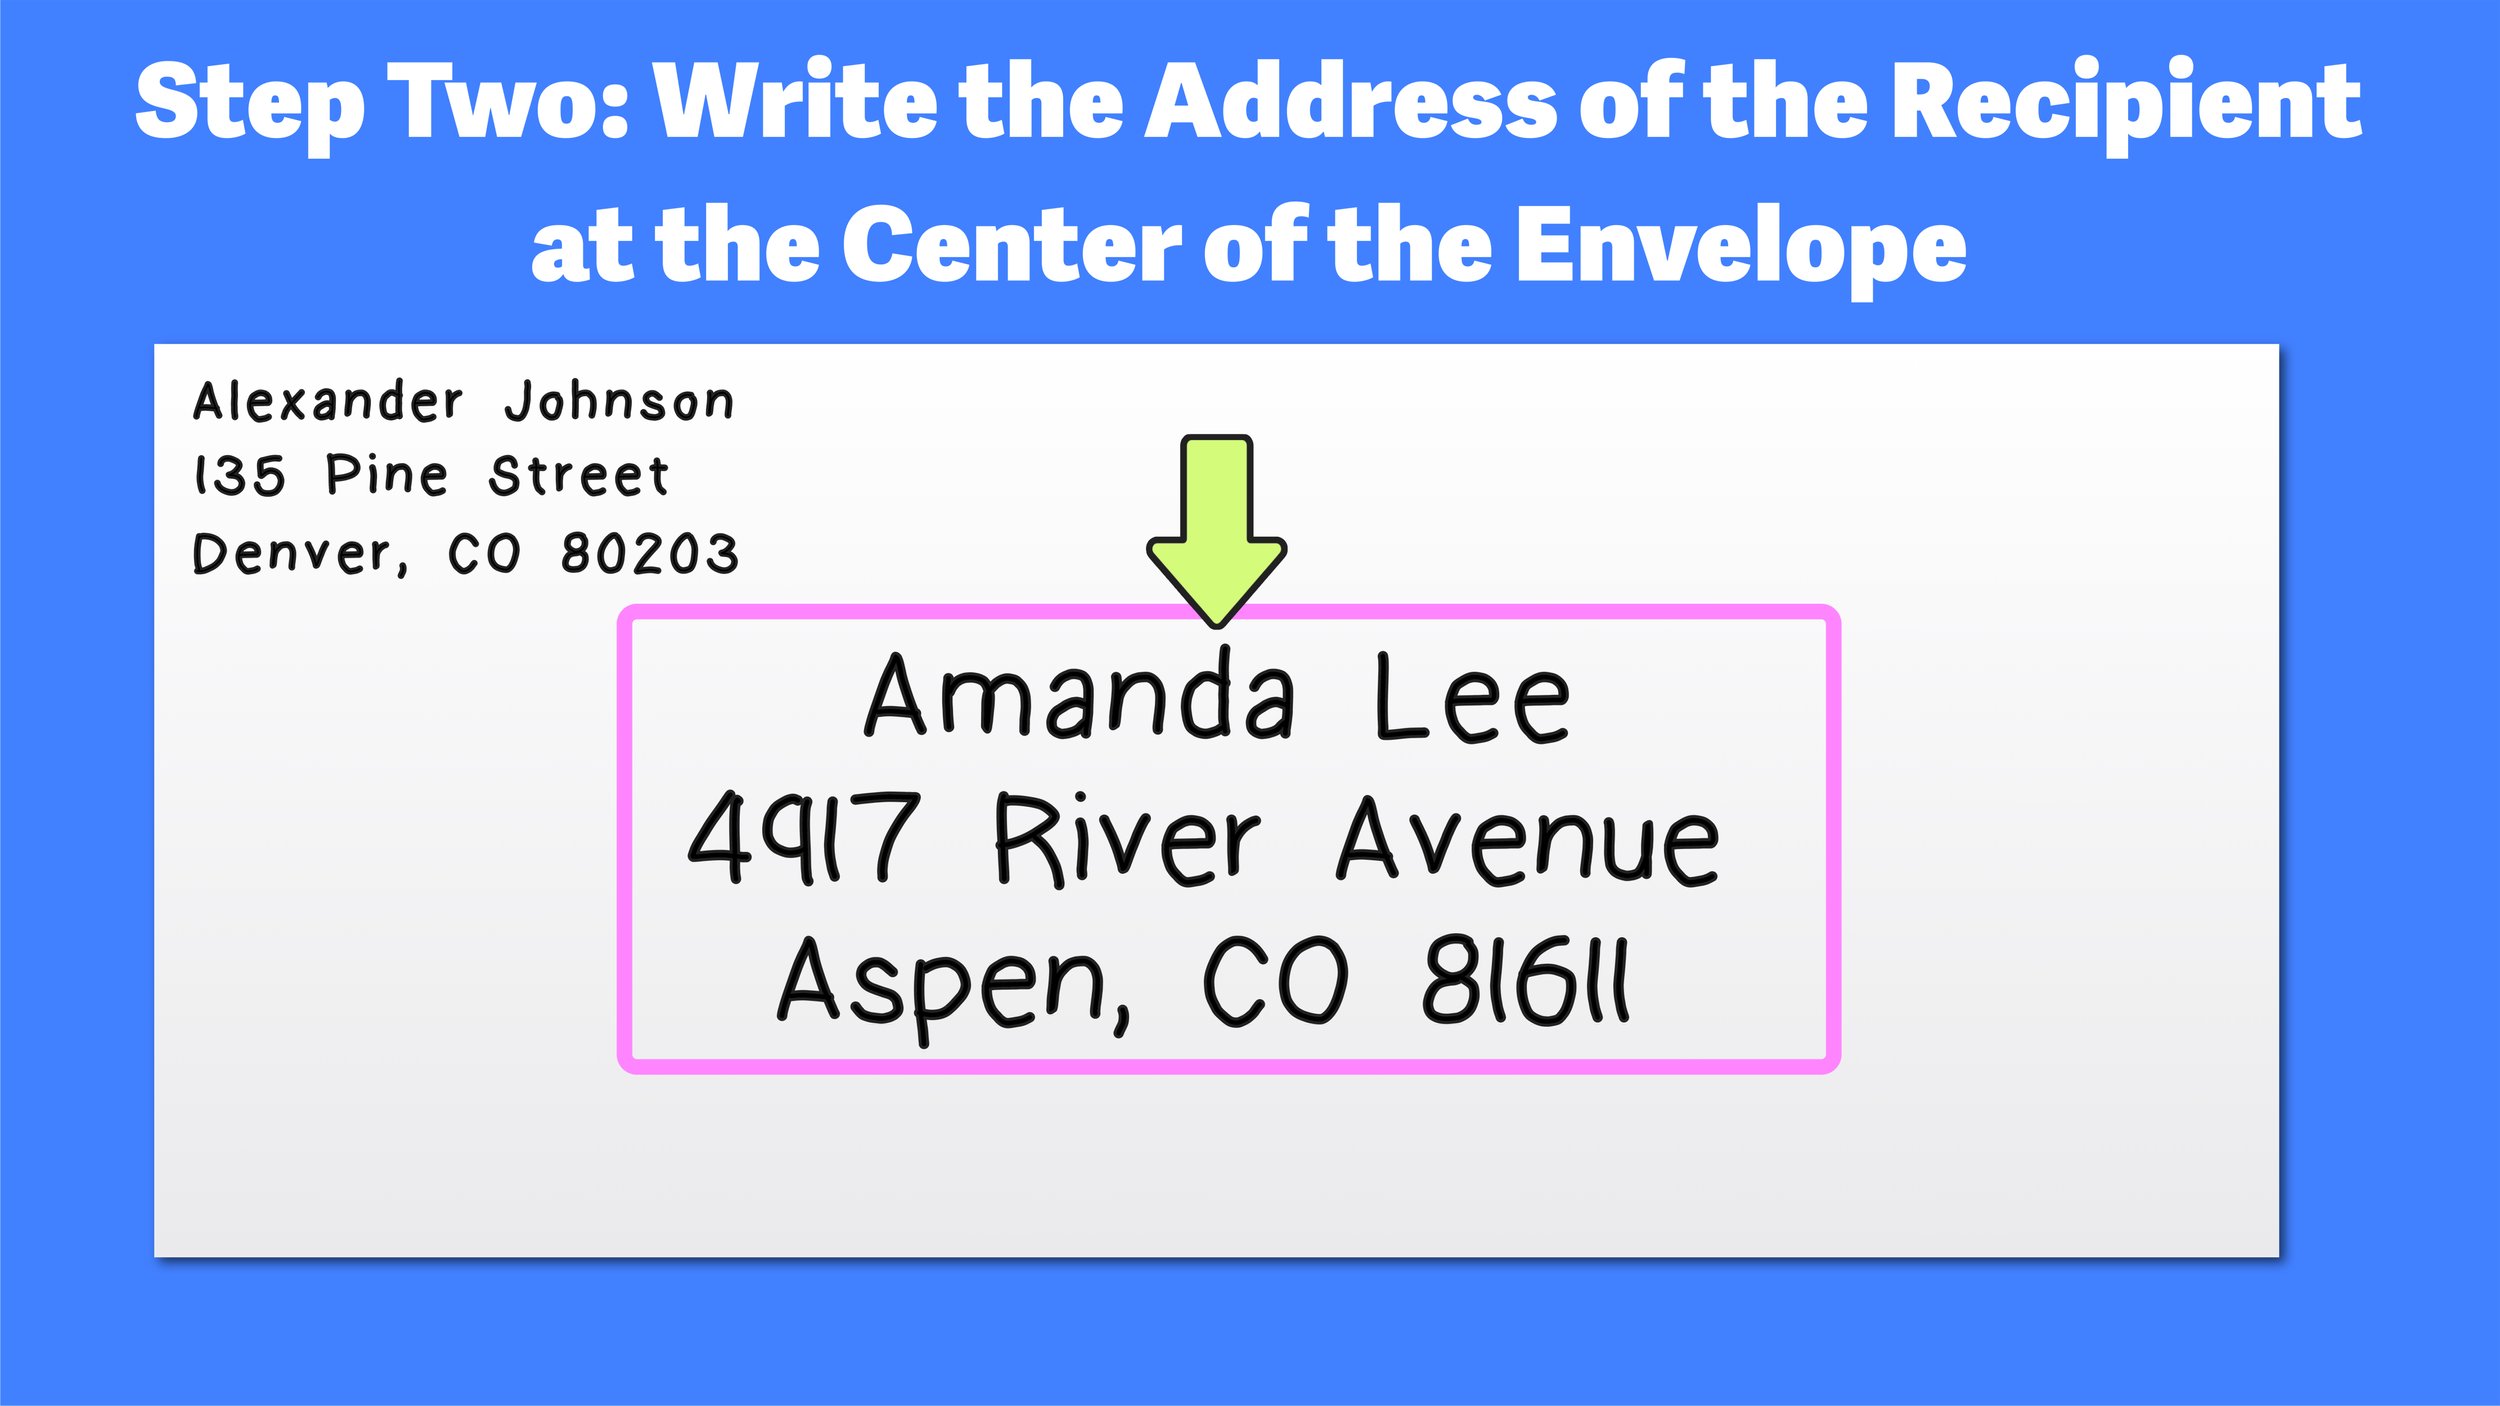
Step Two: Write the Address of the Recipient in the Center

The next step is to write the name and address of the recipient in the center of the envelope.

The recipient is the person or organization you are sending the envelope to.

Make sure that you write the name and address clearly and correctly and make sure that any numbers are legible and obvious to understand. If you make a mistake or if your handwriting is not readable, the letter will not make it to its intended destination.

In this example, we will be sending our letter to our friend Amanda Lee who lives at the following address:

  • 4917 River Avenue, Aspen, CO 81611

In the center of our envelope, in large font, we will write our recipient’s address as follows:

  • Amanda Lee

  • 4917 River Avenue

  • Aspen, CO 81611

Our letter after completing this second step is illustrated in Figure 03 below.

Figure 03: How to Address an Envelope: Clearly and legibly write the address of the recipient in the center of the envelope.


Step Three: Stamp and Seal Your Envelope

Now, all that you have to do is place a valid stamp in the top right-hand corner of the envelope and seal the flap on the backside.

Once you have completed this third and final step, your envelope is ready to be mailed.

There are several ways to mail a letter inside of a stamped envelope including:

  • Dropping the letter off at the post office

  • Placing the letter in an official USPS postal box

  • Leaving the letter in your mailbox for your mail carrier to receive

Figure 04 below shows what our envelope will look like after the final step has been completed.

Figure 04: How to Properly Address an Envelope


That’s all there is to it! You have just learned how to write the address in an envelope in a way that ensures that your letter or card will be delivered to the intended recipient. And, because you included a return address, your letter will be sent back to you in the event that it can not be delivered for any reason.

Figure 05 below shows what our completed envelope should look like. Once you have completed all three steps (return address, recipient’s address, and stamp), you are ready to send!

Figure 05: How to Address an Envelope: When your envelope looks like this, it is ready to send!


Example: How to Address an Envelope to a Family

Now that you know how to address an envelope to an individual, let’s take a look at a case where you want to address an envelope to an entire family.

For example, let’s say that Alexander Johnson who lives at 135 Pine Street, Denver, CO 80203 is sending invitations to a New Year’s Eve Party at his house and he wants to invite all six members of the Miller family.

Rather than sending each member their own invitation, he can send one invitation that is addressed to the entire family.

To address an envelope to a family, you will follow the same steps for addressing an envelope that we covered in the previous section, except that the name of the recipient will not be an individual or organization, but the name of the family (i.e. The Miller Family).

Let’s start by writing our return address in the top left-hand corner so that the family knows who the letter is from before opening it, as shown in Figure 06 below.

Figure 06: How to address a letter to a family: always include a return address.


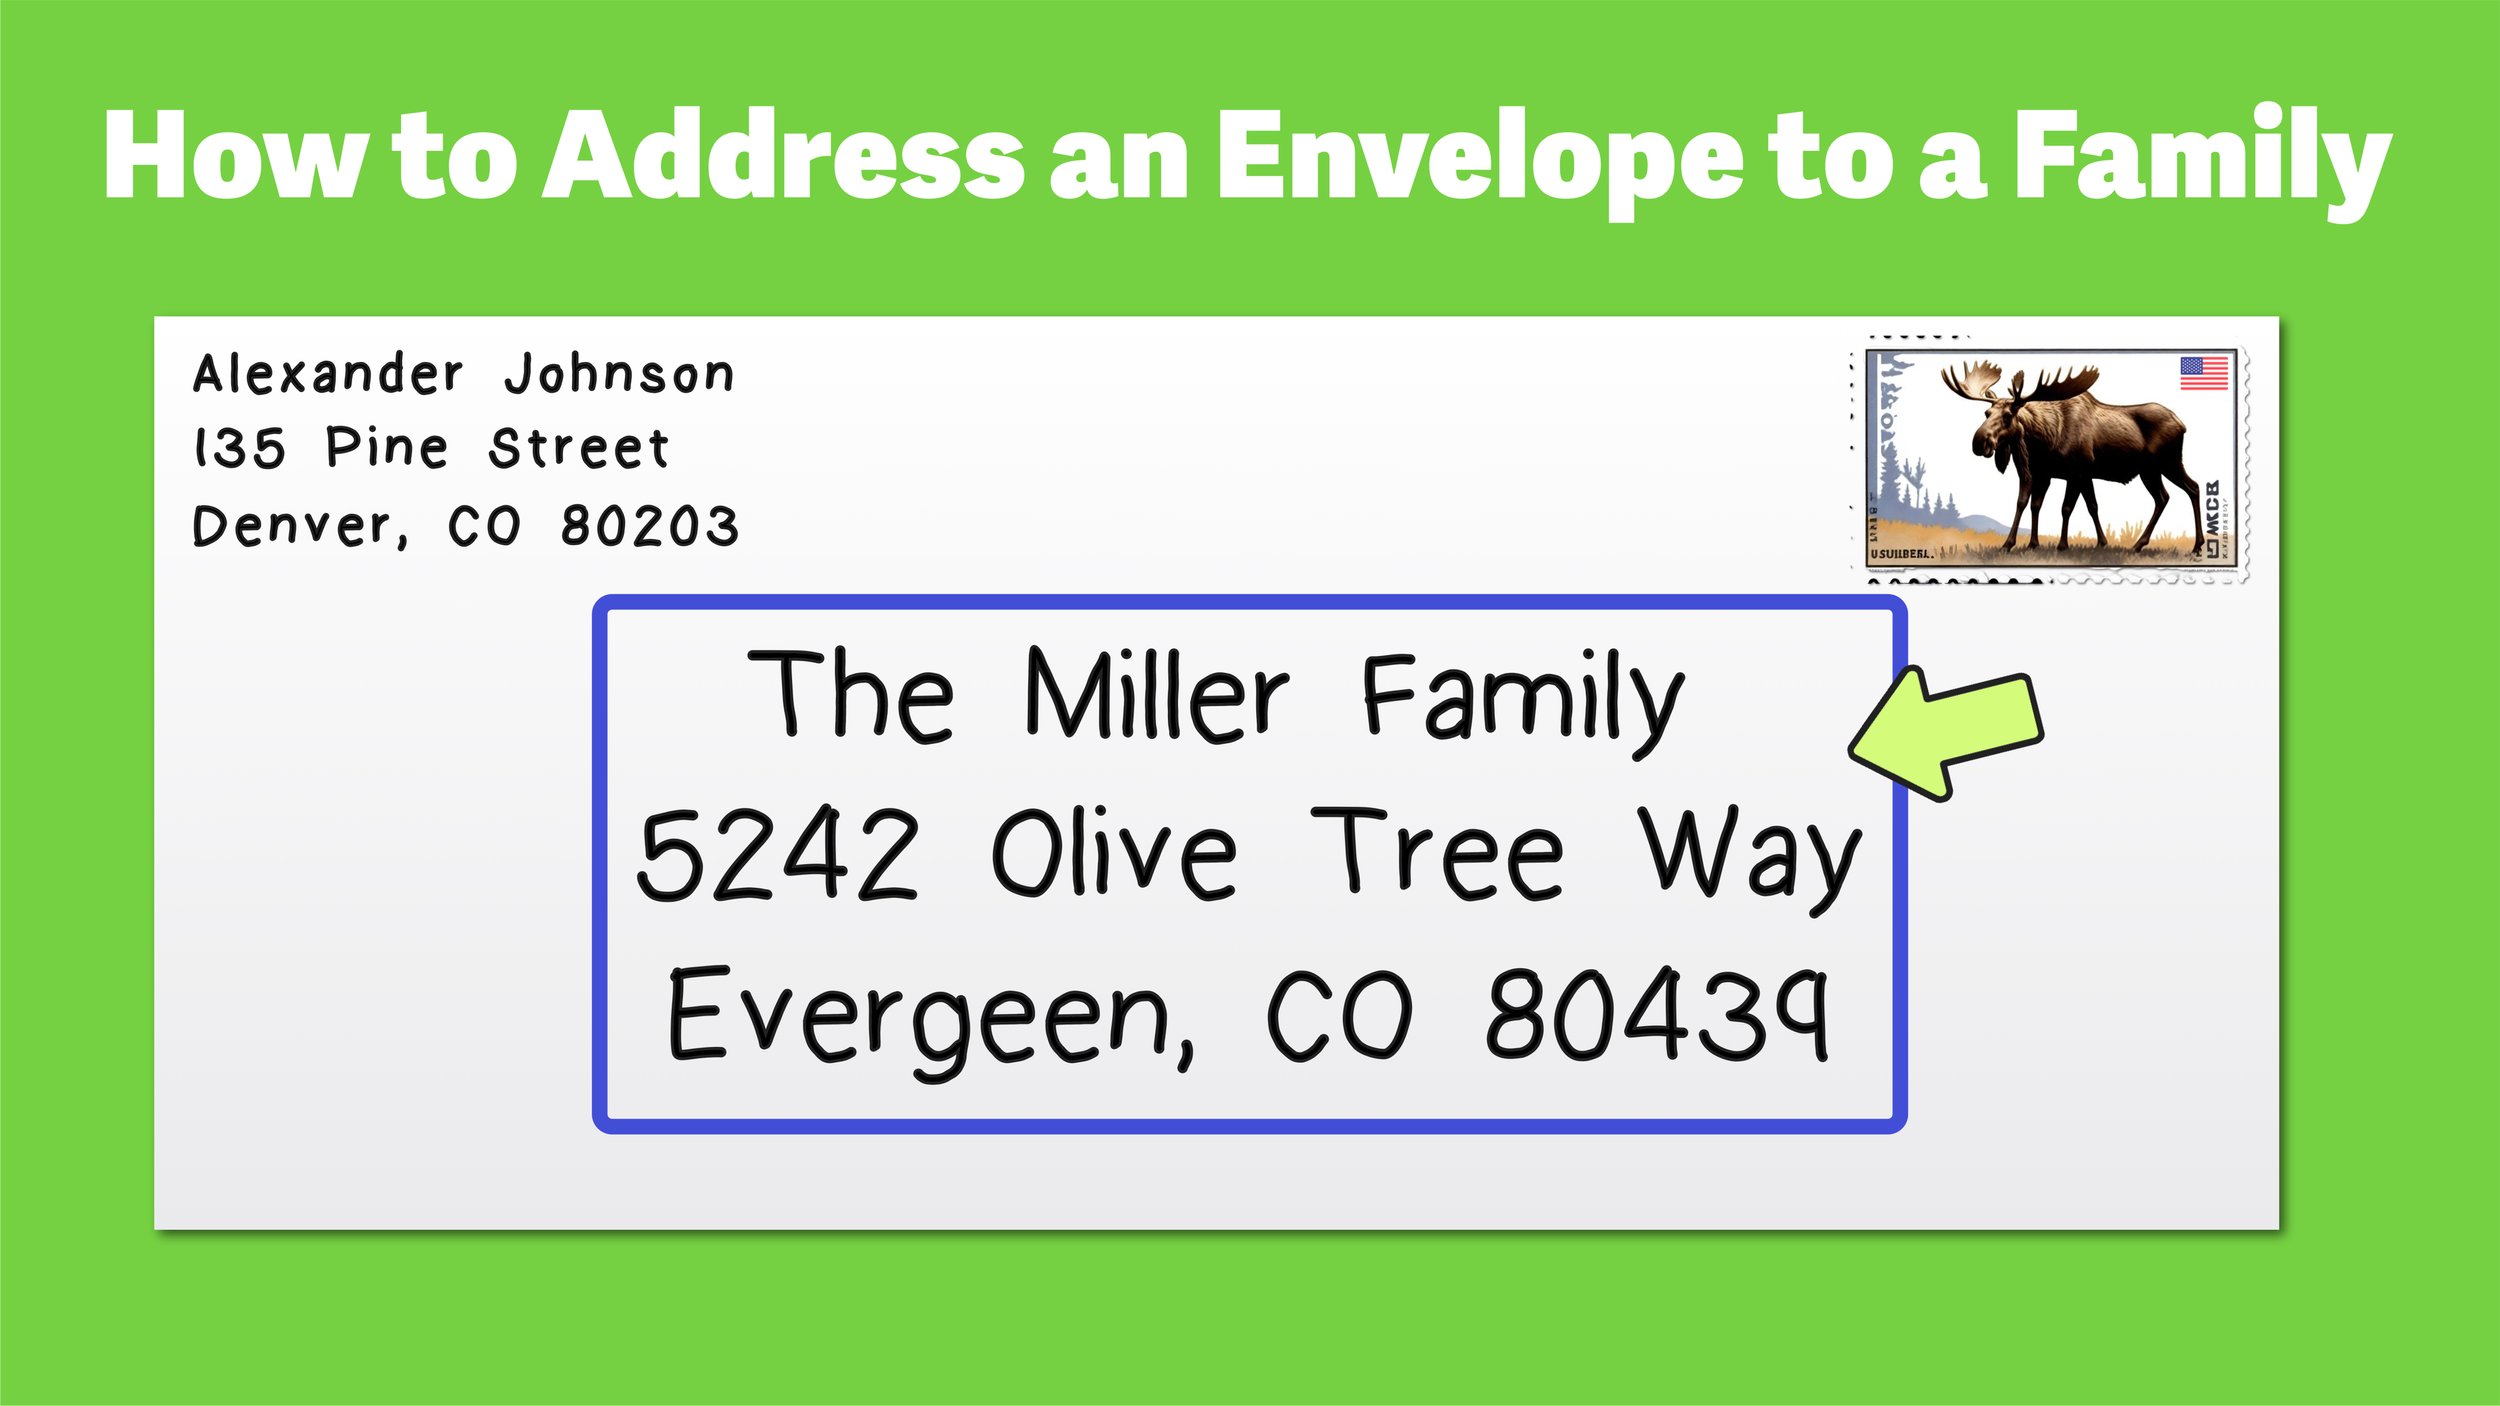
Now, we are ready to write the address of the recipients, The Miller Family, at the center of the envelope.

Let’s say that the Miller family lives at 5242 Olive Tree Way, Evergreen, CO 80439. We would write the recipient’s address as:

  • The Miller Family

  • 5242 Olive Tree Way

  • Evergreen, CO 80439

By addressing the envelope this way, it implies that the card/invite inside of the envelope is meant for the entire family and that the message inside can be shared by all family members.

Finally, we just have to stamp our letter and we are all finished.

Figure 07 below shows how to address an envelope to a family as a completed letter ready to be sent!

Figure 07: How to Address an Envelope to a Family


That’s all there is to it. Once your envelope has been stamped and sealed, it is ready to send.


Example: How to Address an Envelope to a PO Box

This next example will teach you how to address an envelope to a PO Box.

A PO Box (or a Post Office Box) is a secure mailbox located at a post office or postal facility that can only be accessed by authorized individuals with a key. PO boxes are often used by individuals or businesses who want a private and secure location to receive mail.

The process for addressing an envelope to a PO Box is exactly the same as step-by-step process for addressing an envelope described in the first section of this guide, except that the address of the recipient will be a P.O. Box address instead of a street address.

For this example, let’s say that Alexander Johnson who lives at 135 Pine Street, Denver, CO 80203 is sending a letter with important financial documents to Gary Smith who works at Green Stripe Bank Headquarters.

Rather than having a traditional address, Green Stripe Bank has a PO Box Address.

To properly address an envelope to a PO Box, we first have to write our return address in the top left-hand corner as shown in Figure 08 below.

Figure 11: How to Address an Envelope to a PO Box: Start by writing the return address in the top left-hand corner.


Next, we are ready to write the PO Box address of the recipient, Gary Smith at Green Stripe Bank, at the center of the envelope.

Let’s say that the PO Box address of Green Stripe Bank is PO Box 247, Dallas, TX 75201:

  • Gary Smith

  • Green Stripe Bank

  • PO Box 247

  • Dallas, TX 75201

Notice that the address in this example has four lines, including the name of an individual (Gary Smith) and the business he is associated with (Green Stripe Bank). Note that some PO Box address will only include the name of the individual, while others will only include the name of the organization.

All that we have to do now is write this address on the center of our envelope and stamp our letter, as shown in Figure 09 below.

Figure 09: How to Address an Envelope to a PO Box Example.


Now we have successfully addressed an envelope to a PO box and we are ready to send.


How to Address an Envelope (Image: Mashup Math FP)


Conclusion: How to Put the Address on an Envelope

There are many reasons why you may have to send a letter, documents, or a card inside of an envelope through the mail and knowing how to address an envelope is an important life skill that you can easily learn.

This free guide taught you how to address an envelope in three easy steps:

  • Step One: Write the return address in the top left-hand corner

  • Step Two: Write the address of the recipient in the center of the envelope

  • Step Three: Place a valid stamp in the top right-hand corner

In addition to our broad explanation of how to write the address on an envelope, we also walked through two specific examples—how to address an envelope to a family and how to address an envelope to a PO box. Both of these examples have useful and practical applications, which is why we gave them a special focus.

In conclusion, by learning how to properly address and envelope, you are able to communicate through the mail in any way that you need to, and you can ensure that whatever you are sending—whether it be cards, letters, or important documents—reaches its intended destination as planned.


Keep Learning:

How to Write a Check in 6 Easy Steps

Knowing how to write a check is an important life skill that every person should know how to do. This free step-by-step guide will teach you everything you need to know about writing checks.